
Change Log
View Change Log
May 8, 2026
- Changes the VLAN trunking from classic networking to SDN
- Previously, VLAN tags must be defined on each PVE node
- With SDN, you do everything at the Datacenter level, which is propagated across one or many PVE nodes, standalone or in a cluster
- This change has been reflected accordingly in the following modules:
Feb 9, 2026
- Refactored the FLOATING rule when configuring pfSense
- Adheres to best practcve with an implicit deny, whereby approved networks and/or IPs must be explicitly whitelisted to access firewall management ports
Nov 28, 2025
- Restructured the lab steps
- Moved the SIEM step closer to the end of the series
- Brings this lab closer in alignment with the VMware Workstation and VirtualBox labs
Jan 21, 2026
- Restructured a few of the sections on the project landing page (this page)
- Moved a few things around to make the flow a bit more logical and reflect this flow in the Table of Contents
- Tightened up and added some clarity in a few sections
Nov 28, 2025
- Restructured the lab steps
- Moved the SIEM step closer to the end of the series
- Brings this lab closer in alignment with the VMware Workstation and VirtualBox labs
Oct. 7, 2025
- Updated the Proxmox Wazuh SIEM / NIDS step to totally decouple OwlH from the environment.
- Referenced the Wazuh official documentation on integrating Zeek and made some tweaks to it to make it a bit more flexible
- All aspects of getting the NIDS up and running -- Suricata, Zeek, and Wazuh Agent -- are now concisely documented in this step
Sep. 16, 2025
- Update the Hack Your Proxmox AD Lab Step step with corrected Remote Desktop GPO configuration
- Thanks, Eggzy (@hcb420) in the HackTheBox Discord server for all the effort in tracking down the lapse in documentation
Aug. 4, 2025
- Updated the pfSense Installation step to bring it to parity with its VMware counterpart.
- Primarily due to the fact that the file server previously used in "the Google Way" step doesn't appear to be serving the latest version of pfSense CE any longer.
- It's also a better idea to update the guide to use the installation media officially supported by Netgate anyhow.
Feb. 19, 2025
- Updated the OWASP Juice Shop step with the documentation to place Juice Shop behind a reverse proxy for better resiliency to high-volume attacks
- Also added documentation for starting the Docker container with the environment variable to enable dangerous challenges
Feb. 5, 2025
- Updated the Wazuh SIEM + NIDS step to include more detailed documentation on installing the Wazuh agent on your endpoints
Jan. 7, 2025
- Based on feedback I've received, I updated the Kali VM creation step to make it more user-friendly by doing things via the GUI as much as possible
Jan. 6, 2025
- Updated the pfSense installation step in order to document two distinct ways of installing pfSense to the VM -- the online or offline installer. Also, updated the offline installer download link.
- Some cosmetic and editorial changes (screenshots, formatting, chronological ordering of steps)
Dec. 2, 2024
- Changed the title of the project to more accurately reflect the nature of the project being cybersecurity focused, while retaining its original intent of installing Proxmox VE on a laptop
- Created a permanent redirect -- HTTP 301 -- to the new URL
Aug. 25, 2024
- Added and updated network diagrams on a few pages
- Updated the verbiage and examples on adding static routes into the security lab
Aug. 9, 2024
- Added a new step to the lab demonstrating how to import HackMyVM boxes to your Proxmox cyber ranges
- This was added largely due to the fact that Vulnhub hasn't added a new challenge in over two years
June 25, 2024
- Updated the Create a pfSense Firewall step with updates to the pfSense CE ISO download procedure to include more privacy-friendly ways to obtain the ISO file
- Also added steps on extracting the ISO from the archive file
May 29, 2024
- Added some long overdue instructions on remote desktop options upon installing the Kali VM in the lab, as well as some additional optional tweaks.
- Added a cron job on the OwlH Node in the SIEM step that will trim stale logs older than 30 days in order to avoid disk space running out.
May 20, 2024
- Added some firewall rule changes as a floating rule. This enhances the security of the lab by ensuring that subnets that need to access the gateway can do so whilst also being denied access to firewall login ports.
Mar. 27, 2024
- Added a diagram to the project landing page for those that may not be familiar with -- or a struggling to visualize -- the process of clustering and what might be required to create a cluster.
Mar. 19, 2024
- Corrected the interface configuration on Metasploitable 2
- Prefer default route out AD lab interface for Internet access
- Added a route to Kali's subnet through the correct interface
Mar. 14, 2024
- Added a completely new module
- External Pentest Practice in Your Proxmox AD Lab
Mar. 13, 2024
- Update several screenshots in the AD lab section to bring it up-to-date with the latest user experience
- Update the AD lab firewall rules to correct a logic flaw
- The original ruleset will block traffic to the default gateway of the lab
- Update adds a rule to the top of the ruleset that allows traffic to the default gateway, which will also correct issues with the DNS resolver
Mar. 6, 2024
- Updated Setup Remote Access to Our Proxmox Home Lab step
- Since WireGuard kernel modules are now shipped in Linux kernels 6.x and up, it is no longer required to install the backported wireguard-dkms package
- The preparatory steps run in the PVE shell have now been updated to reflect this
Jan. 25, 2024
- Updated the Create a pfSense Firewall for Our Proxmox Lab step with new firewall rule creation screenshots
- Should remove any confusion where rules used to reference
INTERFACE netand now referenceINTERFACE subnets
Dec. 30, 2023
- Massive upgrade to the Active Directory Lab Step!
- Added a completely new step to help you set up a vulnerable AD lab using this project on GitHub, and also demonstrate some example attacks that are possible
- Added instructions on creating the Active Directory VLAN and firewall rules
- Added additional steps to help you understand how to roll back your AD lab to clean slate
- Redid some configurations to make it easier to get hosts up and running without driver injection, even if that does deviate from the known best practices
Oct. 16, 2023
- Update the Wazuh SIEM and NIDS step with new cron jobs
- Removed redundant
@rebootjobs and reduced two cron jobs with conditionals that will attempt to start the NIDS container if not running and create the mirror port.
Sept. 17, 2023
- Complete rewrite of the Create an OWASP Juice Shop Container in Proxmox step
- Now shows the reader how to set up and manage a Dockerized install of OWASP Juice Shop on LXC, greatly simplifying the installation and upkeep of the server
Sept. 13, 2023
- Updated the Create a pfSense Firewall for Our Proxmox Lab step with prompts added by Netgate when configuring the interface IPs, as there were some minor discrepancies that might be confusing to some.
Aug. 29, 2023
- Proxmox VE 8 runs on top of Debian 12 —
bookworm— whereas Proxmox VE 7 ran on top of Debian 11 —bullseye. - Changed references of
bullseyetobookwormin specific areas of the project to reflect the change to Proxmox VE 8. - Updated the title from
Proxmox VE 7...toProxmox VE 8...
Foreword
You could follow this guide successfully to get up and running with an old desktop computer or a dedicated server. A few things might change on your end like disk partitioning or format types (eg. ZFS or ext4). Should mostly stay the same otherwise.
A Note on Virtualization
Type 1 Hypervisors
- These are called “bare metal” hypervisors, because there is nothing between the hypervisor and the computer’s hardware.
- Installed directly on the disk
- When you turn on the computer, the hypervisor is loaded
- There is no other operating system
- Have 100% of the access to the computer’s hardware resources
- Common type 1 hypervisors:
- VMware ESXi
- Proxmox
- XCP-NG
Type 2 Hypervisors
- Installed on top of an operating system like Windows, Linux, or Mac OS
- Do not have direct access to the computer’s hardware
- Cannot utilize 100% of the computer’s hardware resources, as they must be shared with the primary operating system
- When you turn on the computer, the primary operating system is loaded, then you run the hypervisor
- Common type 2 hypervisors:
- VirtualBox
- VMware Player
- VMware Fusion
What We'll Build
Click here to view this diagram in a new tab
Reviewing the Network Diagram
Working downward from the top:
- Internet
- Modem (cable) / ONT (fiber)
- This is the line between you and your ISP (the demarcation point)
- Router
- WAN Port
- This is the IP address provided by your ISP
- The Wide Area Network
- LAN Port
- This is your private network
- The Local Area Network
- It is not accessible directly from the Internet except by port forwarding
- Uses Port Address Translation via the WAN interface to reach the Internet
- This is your private network
- WAN Port
- Laptop
- Connected to your router preferably by Ethernet cable
- This provides the hardware on which Proxmox runs
- This is how WAN-routed traffic gets to the Internet and how traffic gets to other hosts on the LAN from Proxmox guests
- Logical Interface
- Proxmox maps the physical network devices on your laptop to logical ones
- VMBR0 will be bridged to the physical interface to allow guests access to the LAN and WAN
- VMBR0 (Open vSwitch Virtual Switch)
- Bridged to the logical interface
- Any VMs attached to this virtual switch will be on your home router’s LAN
- We create a SPAN port to forward a copy of every frame on every interface to the sniff port used by the NIDS
- Virtual pfSense
- WAN Port (vtnet0 interface)
- This is not a public IP, rather a private IP on your home router’s LAN
- Attached to VMBR0
- Allows traffic to get out to the LAN and to the Internet via your home router’s WAN port
- LAN Port (vtnet1 interface)
- Provides another virtual LAN for VMBR1
- Firewall rules will dictate how traffic is routed between subnets
- VLANs are defined as sub-interfaces on vtnet1
- vtnet1 (native): 10.0.0.0/24
- Any machine that is not tagged with a VLAN
- vtnet1.80 - 10.80.80.0/24
- Active Directory Lab
- vtnet1.666 - 10.6.6.0/24
- Any untrusted machine that needs internet access
- vtnet1.999 - 10.9.9.0/24
- Any untrusted machine that should be isolated and only accessible to Kali Linux
- vtnet1 (native): 10.0.0.0/24
- WAN Port (vtnet0 interface)
- VMBR1 (Open vSwitch Virtual Switch)
- Connected to pfSense LAN port (not bridged to a physical interface)
- Provides connectivity to pfSense for internal VMs
- Any time a machine is plugged in, we can define a VLAN tag
- The VLAN tag will be stamped on the frame headers and flow up the wire to pfSense, where pfSense will determine how to route the packets between any networks
- We create a SPAN port to forward a copy of every frame on every interface to the sniff port used by the NIDS
Prerequisites
Host
- A dedicated host to run Proxmox VE
- Laptop
- Tower
- Rackmount Server
- Recommended Hardware
- RAM: 32 GB or more — runs out more quickly than you'd think
- Storage: Multiple SSD Storage
- Disk 1: 128 GB+ SSD
- Proxmox VE installed here (smallest disk)
- Additional Disk(s): 1 TB+ SSD
- If more than one disk, can be configured into a striped
zpoolor configured with ZFS software RAID - If only one disk, no problem, as we'll walkthrough how to partition it for maximum potential during installation
- If more than one disk, can be configured into a striped
- Disk 1: 128 GB+ SSD
- CPU: 4+ cores (more is better for heavy compute workloads)
Network
- Recommended Hardware
- Business-Grade Network Equipment
- A business-grade router
- A managed switch
- Will allow you to create more sophisticated setups with 802.1q VLANs
- Or, at the very least, an off-the-shelf router with more sophisticated configuration options
- Business-Grade Network Equipment
- This guide will walk through setting up remote access via VPN
- At the moment, there are no instructions for working around CG-NAT
How can I check if I am behind CG-NAT?
- Login to your home router and find its public IP address
- Google search:
what’s my IP - Compare the two
- If they’re the same, good. If they’re different, you are behind CG-NAT
My Setup
Production Home Server
- Single Intel Xeon D-1541
- 128 GB RAM
- 256 GB SSD OS Disk
- 4 TB, 4 disk SATA array, ZFS Raid-Z2
- 4 port network interface card
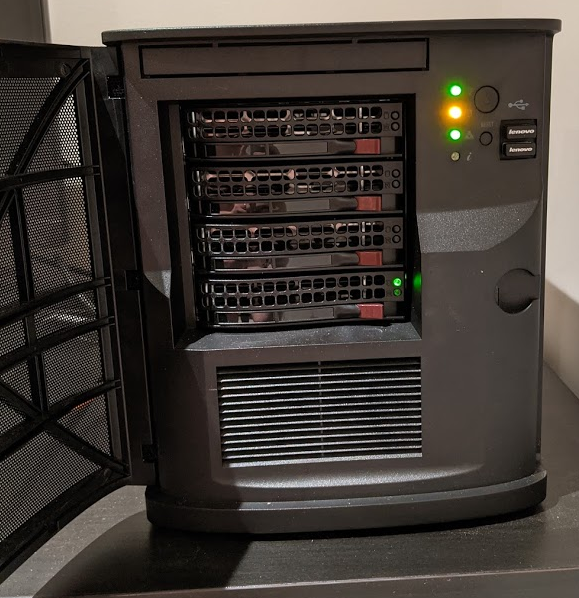
The New Laptop Server
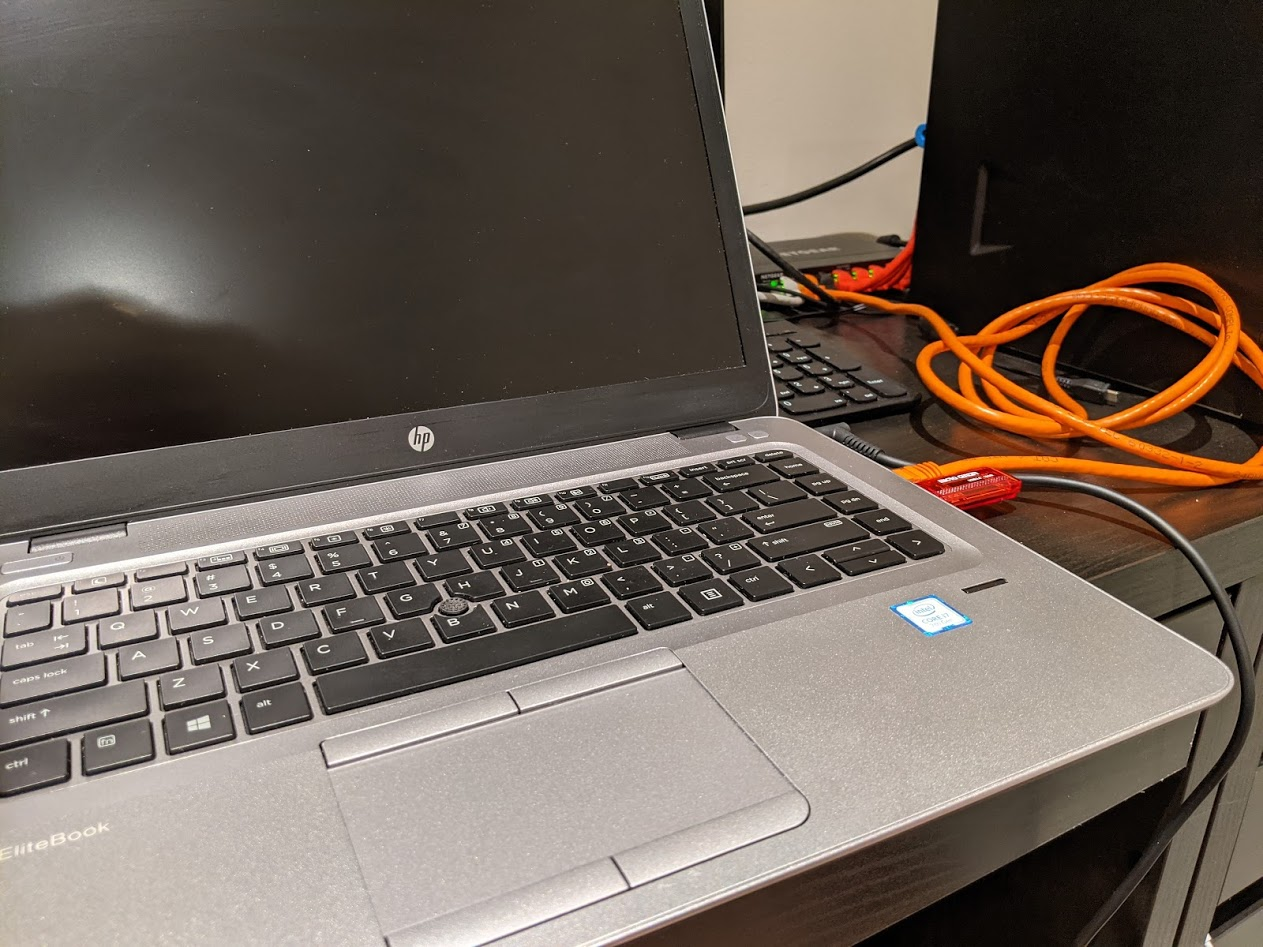
An HP EliteBook 840 G4
- Intel i7-7600U dual core, hyperthreaded = 4 vCPU
- 32 GB RAM (formerly 16 GB, was able to upgrade)
- 1 Intel gigabit Ethernet NIC
- 1 SSD, 500 GB
I want to demonstrate that we can GET STARTED TODAY with a simple home lab using something that you may have lying around the house; or something that is not going to cost a fortune to acquire.
As you follow along with this project, the benefits of running a bare-metal hypervisor will become quickly apparent, as you'll see just how much more you are capable of creating.
Installing Proxmox VE
Staging the Environment
Setting the Local Domain
I will be using my home router as an example. This procedure may vary from router to router. Most routers ship with a default private IP address range of 192.168.1.0/24. This can be changed at any time. I changed mine to be 172.16.1.0/24.
In my browser, I go to https://172.16.1.1 and login.

Then, I go to the Advanced > System Settings. I set my local domain to home.lab and save the changes.

Now, I can ping any device on my network using a local fully qualified domain name (FQDN)
# Pinging using the FQDN
ping lapprox.home.lab

Pinging lapprox.home.lab [172.16.1.16] with 32 bytes of data:
Reply from 172.16.1.16: bytes=32 time=2ms TTL=64
Reply from 172.16.1.16: bytes=32 time=1ms TTL=64
Reply from 172.16.1.16: bytes=32 time=1ms TTL=64
Reply from 172.16.1.16: bytes=32 time=2ms TTL=64


# We're on the same local network so using only the hostname works, too
ping lapprox

Pinging lapprox.home.lab [172.16.1.16] with 32 bytes of data:
Reply from 172.16.1.16: bytes=32 time=2ms TTL=64
Reply from 172.16.1.16: bytes=32 time=1ms TTL=64
Reply from 172.16.1.16: bytes=32 time=1ms TTL=64
Reply from 172.16.1.16: bytes=32 time=2ms TTL=64
Optional: Changing the Private IP Address Range
You can skip this step if you don't wish to change your private IP address range.
While still logged into the router, if you wish to change your private IP address range from the default to something else – like 172.16.1.0/24 – now is the time to do that.
Using my home router as an example (your procedure may vary).
Go to My Network > Network Connections > Network (Home/Office)
Go Settings and change the following values:
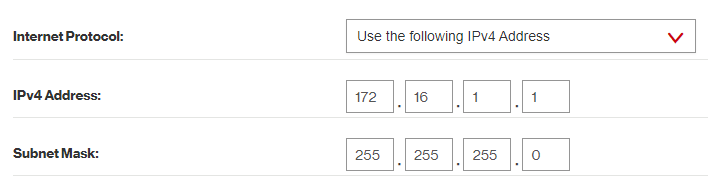
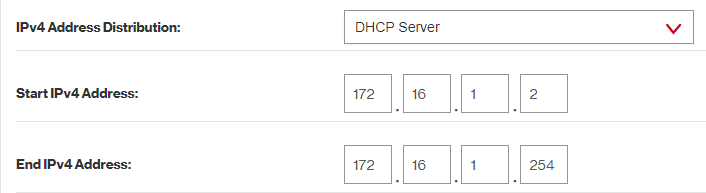
Don't forget to save the changes. The router may reboot after making these changes. If you were previously logged in at https://192.168.1.1, you will now be logged in at https://172.16.1.1.
You should do either of the following to facilitate that change:
A) Restart the client devices so they get a new IP address
B) Wait for the client DHCP lease to expire and they request a new address
Preparing the Laptop
Please remember that the steps I am taking here will probably be different from the steps you take to prepare your computer. This is just serving as a guide to get you in the right direction.
Creating a Bootable USB Drive
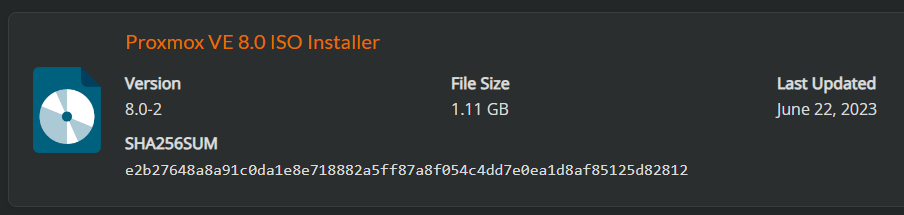
First, Download the Proxmox VE ISO.
Then, use a USB drive to make a bootable image using the .ISO file.

Enabling Virtualization in the BIOS
Turn on the laptop.
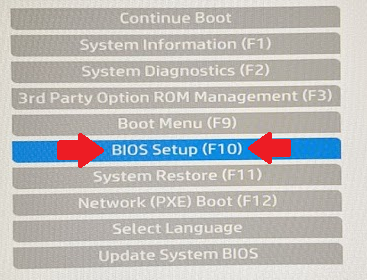
Press the ESC key multiple times until you get to the system setup menu.
Warning: you might need to press a different key on your system to get to the BIOS. For my HP laptop, ESC was the key to get to the BIOS.
Choose BIOS Setup
Go to Advanced > System Options
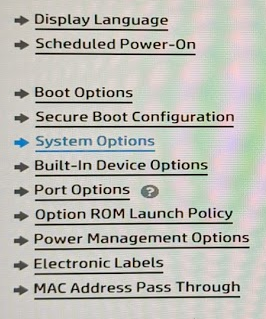
Enable VTx and VTd

Save changes and exit the BIOS setup
Boot from the USB Drive
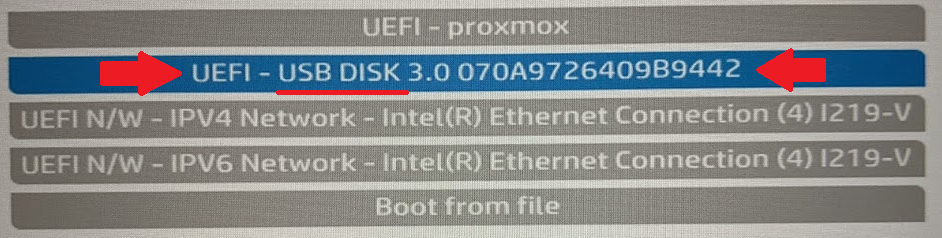
Power off the laptop and insert the USB drive. Power on the laptop and press the ESC key until you reach the setup menu.

Choose the Boot Menu. Then, choose USB Disk.
Proxmox Installation Steps
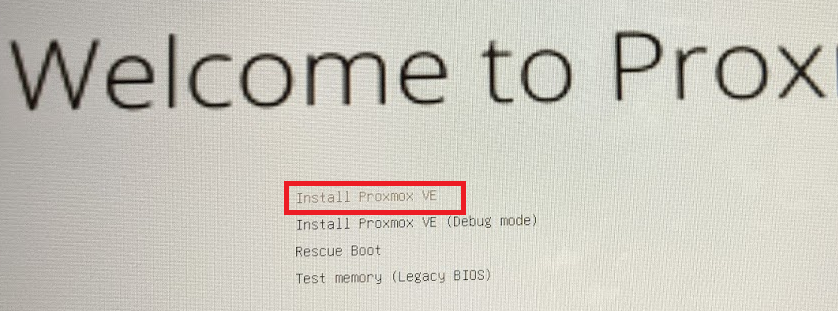
Choose Install Proxmox VE (sorry, the font was very small). Down in the bottom-right, click I agree.
Disk Partitioning for Single Disk Installations
Select the install disk and click Options

I referenced the official documentation here: https://pve.proxmox.com/wiki/Installation regarding the partition sizes.
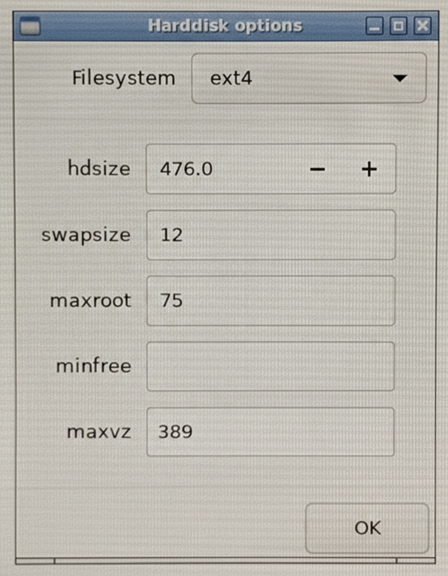
hdsize: Defines the total hard disk size to be used.- In my case, I want to use the entire disk, so I specify
476.0
- In my case, I want to use the entire disk, so I specify
swapsize: Defaults to the amount of RAM installed in the host12 GBis a reasonable choice, but the minimum is4 GB
maxroot: Defines the maximum size of the root volume, which stores the Proxmox VE operating system (Debian core files, logs, etc)- The maximum value is
hdsize/4— or in my case476/4 - However, I want to dedicate most of my space to
maxvz, so I'll choose75 GB
- The maximum value is
minfree: Defines the amount of free space left in the LVM volume group pve- We can leave this empty in order to preserve space for
maxvz - But, you could set it to something small like
16
- We can leave this empty in order to preserve space for
maxvz:- Make this value as large as you can!
- This is where your VM and container storage will be placed
- You calculate
maxvzas suchhdsize - maxroot - swapsize - minfree, so in my case476 - 75 - 12 - 0=389
I will partition my 500 GB disk as such:
Click OK
Wrapping Up
Choose your country, time zone, and keyboard layout. Set a password for the root user. Set your email address – where you will receive alerts. Then, configure your network settings.
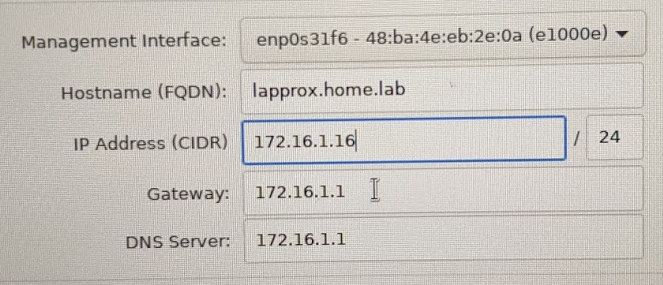
- Hostname:
lapprox.home.lab(laptop Proxmox. Get it? Funny, right?) - IP Address: I logged into my router and gave lapprox a static IP reservation of
172.16.1.16/24and filled it out here. - Gateway: Your home router's IP address
- DNS Server: Probably your home router, unless you want to specify otherwise
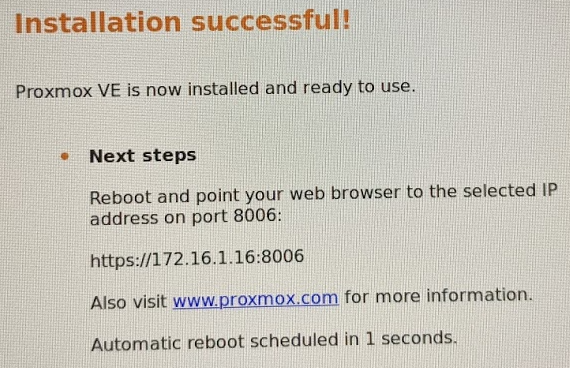
Confirm everything looks good and install. That's all there is to it.
Before We Begin
The Local Console
Proxmox VE is now installed on your laptop, desktop, server, mini PC, or whatever host you decided to use.
proxmox login: _ prompt. The username is root and the password whatever you set it to when installing.
The Web Console
As seen above in the Local Console section, the message tells you to log into https://x.x.x.x:8006/ in your web browser.
In my case, I will be going to https://172.16.1.16:8006 on my personal computer You should see a login screen.
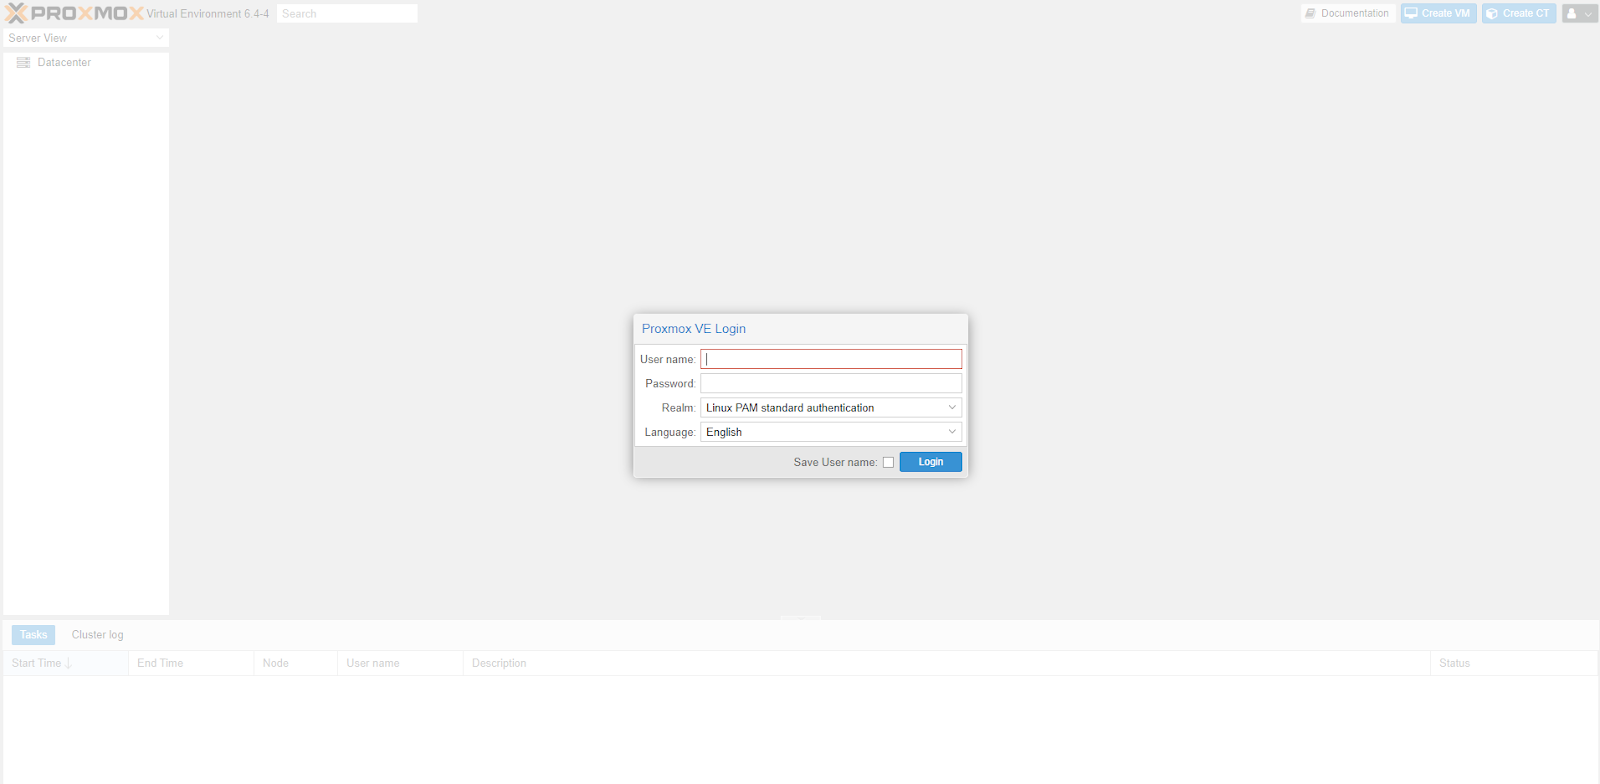
root and the password whatever you set it to when installing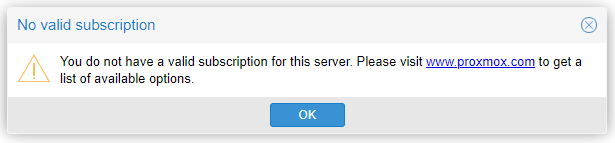
Some Required Changes
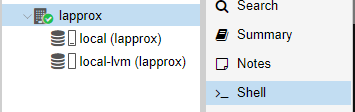
Open the shell from the web console. This is the same shell as if you are sitting in front of the server.
Update the APT Repositories
# Comment out the enterprise repositories
sed '/^[^#]/ s/^/# /' -i /etc/apt/sources.list.d/pve-enterprise.list
sed '/^[^#]/ s/^/# /' -i /etc/apt/sources.list.d/ceph.list
sed '/^[^#]/ s/^/# /' -i /etc/apt/sources.list.d/pve-enterprise.list.dpkg-dist
sed '/^[^#]/ s/^/# /' -i /etc/apt/sources.list.d/pve-enterprise.sources

# Add the community repositories
echo -e '\n# Proxmox community package repository' >> /etc/apt/sources.list
echo "deb http://download.proxmox.com/debian/pve $(grep CODENAME /etc/os-release | cut -d '=' -f 2) pve-no-subscription" >> /etc/apt/sources.list
Install Some Dependencies
apt clean && apt update
apt install ifupdown2 openvswitch-switch -y
If You're Using a Laptop
If you are following this guide, using an old laptop, you will want to disable power off when the lid is closed.
nano /etc/systemd/logind.confWe're going to edit this file in the terminal
Change these lines from this:
#HandleLidSwitch=suspend
#HandleLidSwitchExternalPower=suspend
#HandleLidSwitchDocked=ignore
Before
to this:
HandleLidSwitch=ignore
HandleLidSwitchExternalPower=ignore
HandleLidSwitchDocked=ignore
After
- Press
CTRL + Xto exit - Press
Yto save the changes - Press
Enterto save with same file name
systemctl restart systemd-logind.serviceRestart the service to enable the changes we just made
Install Any Pending Upgrades
pveupgradepveupgrade may install a new kernel or other updates that require a reboot. Read the output carefully once the upgrade is finished and reboot the server if required.Changing the Software Networking
Converting to Open vSwitch
By default, Proxmox uses Linux Bridges. There is nothing wrong with Linux Bridges. They just do not allow us to accomplish some of the things we could do with our home lab.
Make a Backup of the Current Network Configuration
cp /etc/network/interfaces /etc/network/interfaces.bakRun this command in the shell to backup the current network configuration file
Remove the Linux Bridge
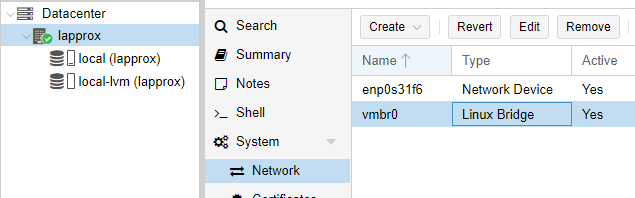
vmbr0 > choose Remove.Create the Open vSwitches
Create the Production Switch

Note: that my physical interface on my laptop has the name
enp0s31f6. Fill in this field with your physical interface name.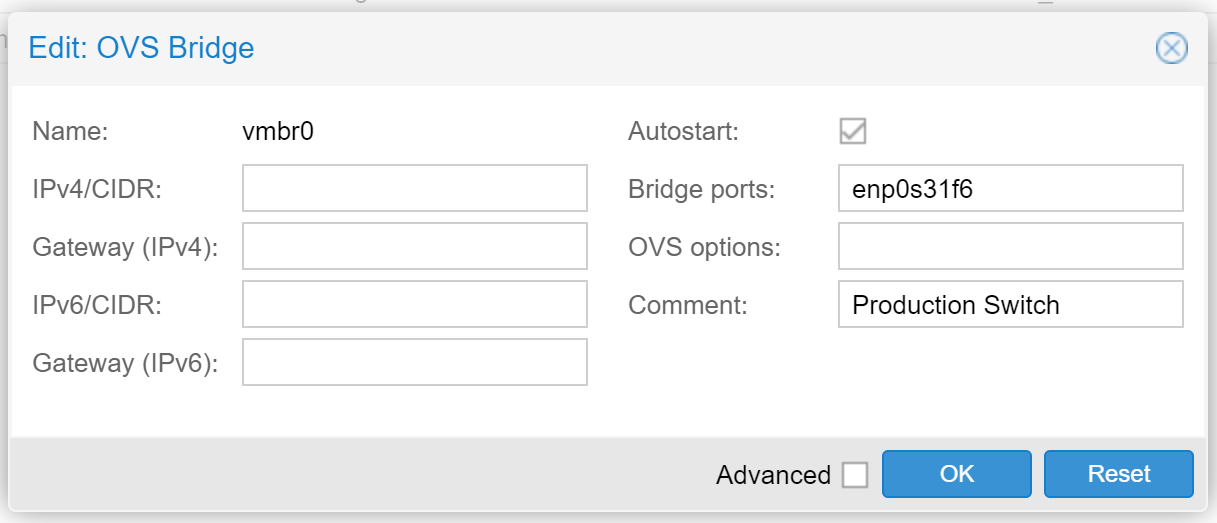
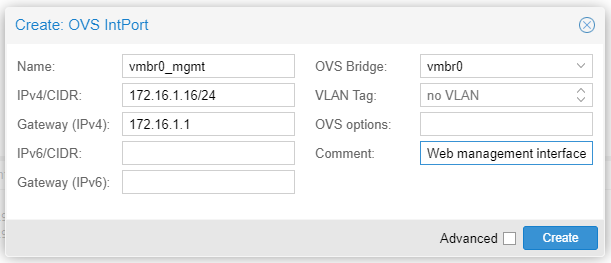
Create the Management Interface
vmbr0 switch, so that we can reach the Proxmox GUI.
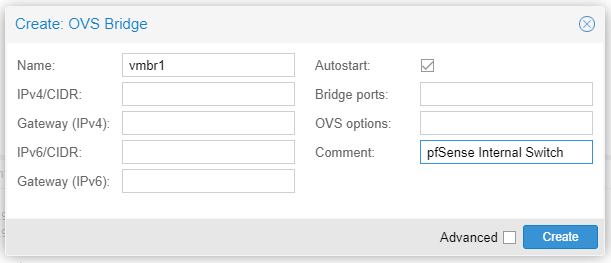
Create the pfSense Internal Switch

You may lose connectivity to the Proxmox web console if an error was made during the configuration steps

If for some reason you made a typo or some other error in your configuration and you’re having trouble connecting via the web browser:
- Go to your Proxmox server and logon locally
- Run these commands
cp /etc/network/interfaces.bak /etc/network/interfaces
ifreload -a
- Try following these steps again
Trunk VLANs up VMBR1
Create the VLAN Zone
- Click Datacenter
- Click SDN
- Click Zones

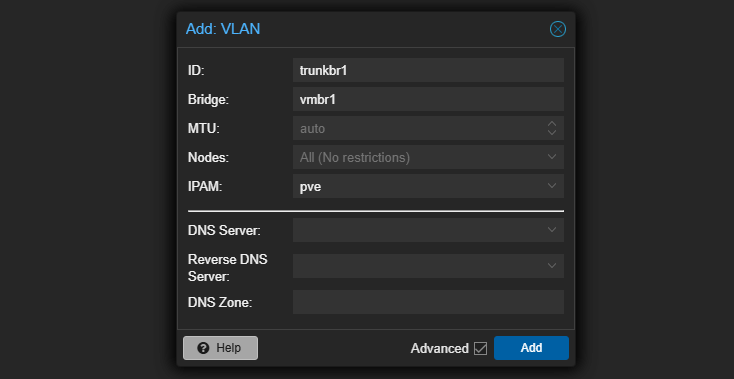
Create the VLAN Tags

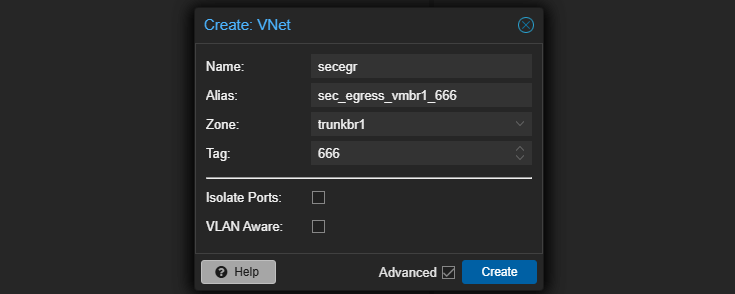
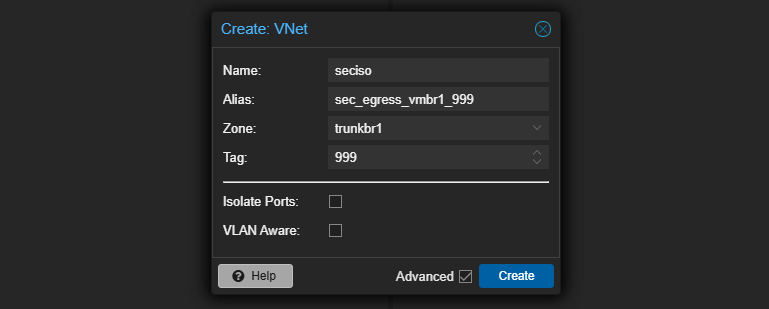
Apply the SDN Settings

Tell Proxmox to Load the SDN Configurations
# Adds the line "source /etc/network/interfaces.d/*" to /etc/network/interfaces
# If grep does not find the line already exists
grep 'source /etc/network/interfaces.d/sdn' /etc/network/interfaces > /dev/null ||
grep 'source /etc/network/interfaces.d/\*' /etc/network/interfaces > /dev/null ||
echo -e '\nsource /etc/network/interfaces.d/*' >> /etc/network/interfaces
Effectively, sources in "/etc/network/interfaces.d/sdn"
ifreload -aReload the configurations
Next Steps in the Series
Getting to Know Proxmox
 0xBEN
0xBENCreate a pfSense Firewall for Security Infrastructure
0xBENCreate a Kali Linux VM
0xBEN
Create an OWASP Juice Shop Container
0xBENAdding Vulnhub VMs to the Cyber Range
0xBENAdding HackMyVM Boxes to the Cyber Range
0xBENSetup Remote Access to Our Home Lab
0xBENProxmox Troubleshooting
0xBENRunning Windows Guests on Proxmox
0xBENActive Directory Lab: Getting Started
0xBENHack Your Active Directory Lab
0xBENSet up a Pivoting Lab
0xBEN
Adding a Comprehensive Wazuh SIEM and Network Intrusion Detection System (NIDS) to the Lab
0xBENCreating a Windows 7 Buffer Overflow VM
0xBEN
Keeping Tabs on Our Lab
Always-Running Resources
At any time, we are always going to want these resources running, so that our lab will function as intended. You should have these resources set to start at boot, just in case your computer loses power and comes back on.
| Name | Type | CPU | RAM | Disk |
|---|---|---|---|---|
| Kali | VM | 2 cores | 4 GiB | 75 GB |
| OpenVPN | CT | 1 core | 512 MiB | 10 GB |
| pfSense | VM | 2 cores | 2 GiB | 50 GB |
| Wazuh Indexer | CT | 2 cores | 4 GiB | 25 GB |
| Wazuh Dashboards | CT | 2 cores | 512 MiB | 10 GB |
| Wazuh Manager | CT | 2 cores | 1 GiB | 10 GB |
| NIDS Node | CT | 4 cores | 4 GiB | 50 GB |
| Wireguard | CT | 1 core | 512 MiB | 10 GB |
| Totals | 17 GB | 240 GB | ||
On-Demand Resources
| Name | Type | CPU | RAM | Disk |
|---|---|---|---|---|
| Juice Shop | CT | 1 core | 512 MB | 10 GB |
| Windows Server 2019 | VM | 2 core | 2 GB | 40 GB |
| Windows 10 Enterprise | VM | 2 core | 2 GB | 30 GB |
| Windows 10 Enterprise | VM | 2 core | 2 GB | 30 GB |
| Totals | 6.5 GB | 110 GB | ||
If we are running on a laptop with 32 GB RAM and 512 GB SSD storage, you can see that we have nearly maxed out the resources. It’s up to you how to proceed. Your options in this scenario would be:
- Increase the RAM on the server (if possible) and add another disk.
- Or, you could add another Proxmox node to your network and cluster them and then move the Active Directory lab to the other node.
We can keep tabs on our node’s resource consumption by glancing at the Summary panel, as well as the storage panels -- local and local-lvm.

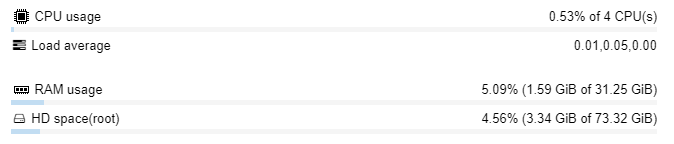
local partition.If it looks smaller than the actual disk size, that's because in default Proxomx installation using LVM, the
local-lvm partition is using the rest. local-lvm is where your VM and Linux Container guest data is stored.To see how much space has been used in your local-lvm partition, you can scroll down to local-lvm (nodename) and then click Summary.

What Next?
Work within your constraints and look at ways you can improve what you already have.
Upgrade in Place
If you have a laptop with 16 GB of RAM and 1 TB disk space, I would consider the following:
- What is the maximum amount of RAM compatible with your system?
- 32 GB or 64 GB?
- Can you find a good deal on the memory?
- Upgrade
- If not, consider looking at another node.
- Can you find a good deal on the memory?
- 32 GB or 64 GB?
Add Another Proxmox Node
That’s the nice thing about clustering multiple nodes together. If you have a couple of under-resourced nodes working together, you can accomplish more of your goals. You just have to budget out what works best for you.
Additional Lab Ideas
Other Proxmox Write-Ups
0xBENMalware Analysis
You could set up a malware analysis environment using some unpatched Windows VMs and the Remnux Linux distro.
Networking Labs
Set up some additional Linux routers and use IPTABLES or set up some additional pfSense firewalls and practice routing between them. You could set up some pivoting networks and practice SSH tunneling and data exfiltration.
Mail Server
Try hosting your own email system.
Web Server
Build a public or internal web server and try deploying a website to said server.
Clustering Proxmox Nodes
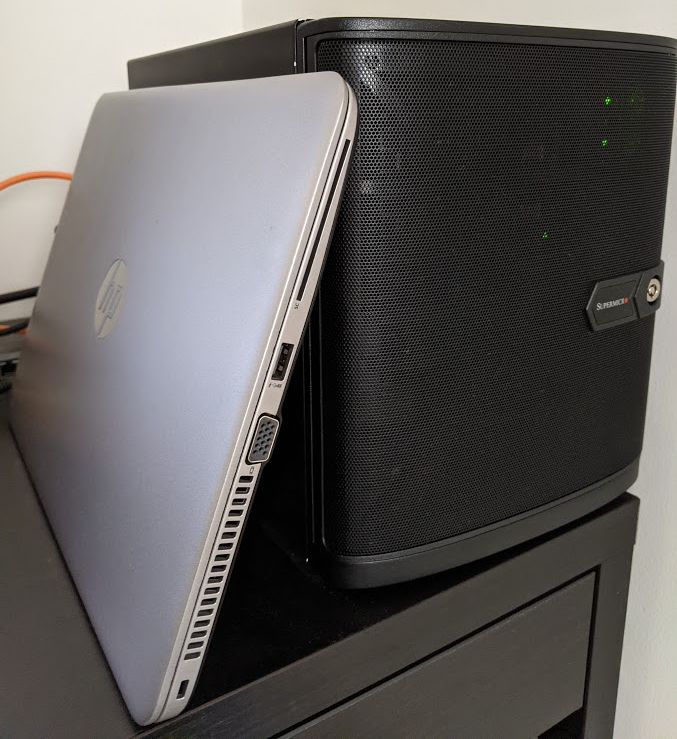
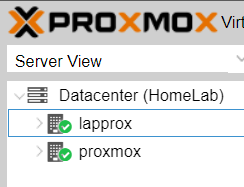
On the left, there is lapprox -- the laptop used in the making of this guide. On the right, there is my production Proxmox node. Lapprox is at 172.16.0.16 and my production server is at 172.16.0.6. I have joined them together to form a cluster. I can manage both servers from a single IP address. If I log into lapprox, I can manage both servers. If I log into production, I can manage both servers.
Visualizing the Cluster
Adding another PVE node and creating a cluster is a great way to add more CPU, RAM, and disk when low. You can then migrate existing VMs and LXCs to — and create new ones on — your new PVE node.
If you're still somewhat new to Proxmox, new to home labbing, or the concept of clustering servers is eluding you, I hope this diagram will help.
Click here to view this diagram in a new tab
Preparing to Cluster
Home Firewall Before
- You probably had a consumer-grade firewall with an integrated Wi-Fi radio, likely issued by your Internet Service Provider
- A pfSense VM was sandwiched between
vmbr0andvmbr1 - The
vtnet1interace on the pfSense VM was the parent interface for 802.1q VLANs in the lab — such asvtnet1.80 - Any Proxmox VM or Linux Container (CT) plugged into
vmbr0received a DHCP IP configuration from the home router - Any Proxmox VM or Linux Container (CT) plugged into
vmbr1received a DHCP IP configuration from the pfSense VM, depending on its assigned VLAN
Home Firewall After
- You've invested in a business-grade hardware firewall that supports 802.1q, perhaps pfSense
- The firewall doesn't have an integrated Wi-Fi radio, so you've also purchased a business-grade wireless access point that supports 802.1q-segmented SSIDs, perhaps Unifi
- The pfSense VM no longer exists
- The 802.1q VLANs have all been migrated to the hardware firewall, where a different interface is the parent as shown in the diagram — such as
igb1.80 - All VMs and CTs are attached to
vmbr0and receive DHCP IP configurations from your new firewall depending on their assigned 802.1q VLAN ID
Home Switch Before
- You had a dumb switch, or plugged your PVE node into one of the integrated Ethernet ports on the consumer-grade firewall
- Any VM or CT attached to
vmbr0in Proxmox was effectively on your home network - To segment certain VMs or CTs, you had to attach them to
vmbr1under the pfSense VM, and assign them specific VLAN IDs for the pfSense VM to manage - Traffic from
vmbr1flowed up to pfSense, tovmbr0if firewall rules allowed it, and to your dumb switch or router
Managed Switch After
- You've invested in a managed switch with 802.1q support
- Since the switch is managed, ports on the switch can be configured with 8021.q IDs, or left unconfigured as access ports for your Proxmox VMs and CTs
- All of your Proxmox nodes are plugged into this switch, and receive IP addresses from the DHCP server running on your new hardware firewall
- There is no more
vmbr1, every VM and CT is attached tovmbr0and receives access via your new managed switch - All VLAN segmented traffic from the VMs and CTs flows up the trunk from
vmbr0to your new managed switch and then, to pfSense where firewall rules dictate the flow of traffic - All VLAN segmented traffic from the wireless access point flows up the trunk to the managed switch and then, to pfSense where firewall rules dictate the flow of traffic
The Clustering Process
I would highly advise reading this page before proceeding: https://pve.proxmox.com/wiki/Cluster_Manager#pvecm_join_node_to_cluster
/etc/pve is overwritten when joining a cluster, since guest IDs could be conflicting. When forming a cluster, empty nodes should always join existing nodes.- Go to your existing node (eg.
https://existing-node-ip:8006)
This is your Proxmox node that already has guests and configurations.- Click on Datacenter > Cluster
- Click on Create Cluster
- Click on Join Information
- Click Copy Information
- Go to your brand new node (eg.
https://172.16.0.16:8006)
This is your brand-new Proxmox node. It is empty, no guests, no configurations.- Go to Datacenter > Cluster
- Click Join Cluster
- Paste the Join Information you copied above
- And, join the cluster
Other Projects
0xBEN 0xBEN
0xBENHonorable Mentions
- @Tank1334 for QA testing and feedback
- @dfir-jesseee from the Black Hills Information Security Discord server for QA testing and feedback
- @Jj19101 for QA testing and feedback
- @Blund from the TCM Security Discord Server for QA testing and feedback
- @Admiral Awesome from the InfoSec Prep Discord Server for QA testing and feedback
- @ip3c4c for QA testing, feedback, and his own additions to this lab guide documented at his blog
- @Khiz3r for QA testing and feedback
