
Previous Step
 0xBEN
0xBENOverview of the Setup
Click here to view this diagram in a new tab
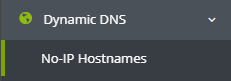
Register for a Free Dynamic DNS Hostname
This step is necessary if you do not have a static IP address provided by your Internet service provider (ISP). I imagine most residential customers do not have static WAN IPs, but check with your ISP if you want to be sure.
The dynamic DNS hostname will be used to track your WAN IP anytime it changes. This will work, because a client will reach out to the dynamic DNS provider (No-IP in this case) and periodically inform the provider of the current WAN IP. If the WAN IP has changed since the last check-in, the DNS record will be updated.
Go to https://noip.com. Create an account if you do not already have one. Go to Dynamic DNS > No-IP Hostnames.
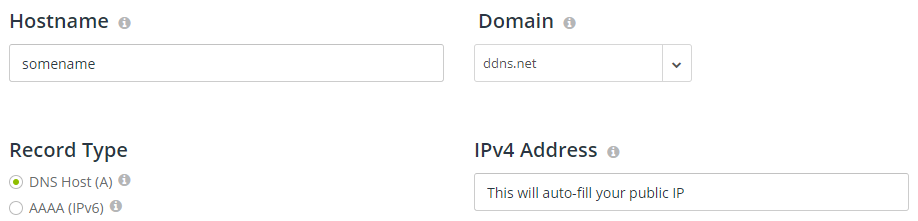
Click Create Hostname. Create the host using the following options. Change somename with a hostname that you would like to resolve back to your house's public IP address.
Setup the Dynamic DNS Client in pfSense
pfSense is going to act as an updater client for us. It will periodically login to the https://noip.com service for us and tell them what our home’s new public IP address is when it changes.
Log into your pfSense web portal: https://pfsense-ip-address. Go to Services > Dynamic DNS. Click Add.
- Service Type: No-IP (Free)
- Interface to monitor: WAN
- Hostname: Use the hostname from Step 5 above
- Username: https://noip.com username
- Password: https://noip.com password
- Description: Home public IP address
OpenVPN Container Alternative: pfSense Running OpenVPN
Using the Configuration Wizard
Log into pfSense and go to VPN > OpenVPN > Wizards. Then, choose Local User Access.
Create the CA

Create the Server Certificate
Now that the local Certificate Authority (CA) has been created, we can create a server certificate and sign it via the CA.

Configure the Server


10.102.102.0/24, but use whatever tunnel network you prefer. Be sure that there is no IP overlap with an existing subnet that would cause routing conflicts.


home.lab, so change yours accordingly. 10.102.102.1 would be the gateway of the VPN tunnel network in this case, and the IP have chosen to provide DNS resolution to VPN clients.
tun-mtu and mssfix options are the sizes that I chose to fix packet loss in accordance with my experience. You may need different options. Also, the push "route $NET $MASK"; options are those which I'm OK with universally setting on all VPN clients, since it's only me connecting to the VPN.If you'd prefer, you can do the
push options on a client-by-client basis.

Create a VPN User Profile
- Go to
System > User Manager- Add a user, do not provide any groups
- Set a strong password
- Create a certificate for the user (sign the certificate using the CA you created when initially setting up the server)
- Export the client connection package
- Go to
VPN > OpenVPN > Client Export- If you don't see this option, you may need to install the pfSense package under
System > Package Manager - Choose your Remote Access Server
- Ensure the hostname resolution uses the dynamic DNS record
- The Inline Configurations option for most clients / Android should work fine in most cases
- If you don't see this option, you may need to install the pfSense package under
- Go to
- Import the
.ovpnfile into your OpenVPN client on your device
Create an OpenVPN Debian 11 Container
- Create the unprivileged container
- Set it to start at boot. Set the startup order if desired.
- Note the MAC address and create a static DHCP reservation for the server
- Port forward the OpenVPN listen port to the internal IP
Resources
- RAM: 512 MiB
- Swap: 512 MiB
- Cores: 1
- Disk: 10 GB
Network

Recommended Options
- Start at boot: Yes
- Start/Shutdown order: User preference
- Unprivileged Container: Yes
Create the Container
Open a shell on the Proxmox node and run this command:
# Update container template repository
pveam update
Now, create an unprivileged Debian 11 container using the GUI. Once you've created the container, we'll need to make a few small changes. Open a shell on the Proxmox node and run this command:
# Get the container configuration information
pct config [container-id]

# Edit the configuration information
nano /etc/pve/lxc/[id-number].conf
Add these lines:
lxc.cgroup.devices.allow: c 10:200 rwm
lxc.mount.entry: /dev/net dev/net none bind,create=dir
Press CTRL + X to exit. Save your changes.
pct start [id-number]Open a Shell on Your OpenVPN Container
Run these commands
apt update
apt dist-upgrade
apt install openvpn git
git clone https://github.com/angristan/openvpn-install
cd openvpn-install
bash openvpn-install.sh
Answer the questions in the wizard. When the wizard asks you for IP address or hostname, provide the Dynamic DNS hostname you configured above.
This way it will always use your Dynamic DNS hostname to resolve your home’s public IP when connecting to the VPN server.
The client configuration will be in /root/client.ovpn. Just move client.ovpn to your phone or laptop. Install OpenVPN client app on your phone or laptop. Import the client.ovpn configuration and connect.
If you have additional subnets you would like to be able to route to from your VPN client, you can edit the /etc/openvpn/server.conf file and add multiple push "route" commands. This will tell the VPN server to inform the VPN client of any routes that should be sent through the VPN tunnel.
push "route 10.0.0.0 255.255.255.0"
push "route 10.10.10.0 255.255.255.0"
Example
If you do push additional routes to your VPN client(s), you'll need to make sure you update any firewall rules as necessary.
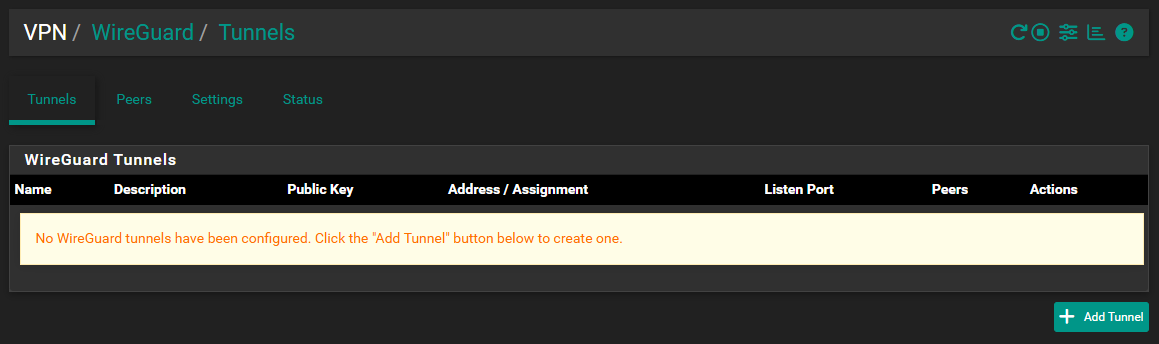
WireGuard Container Alternative: pfSense Running WireGuard
Install WireGuard Package

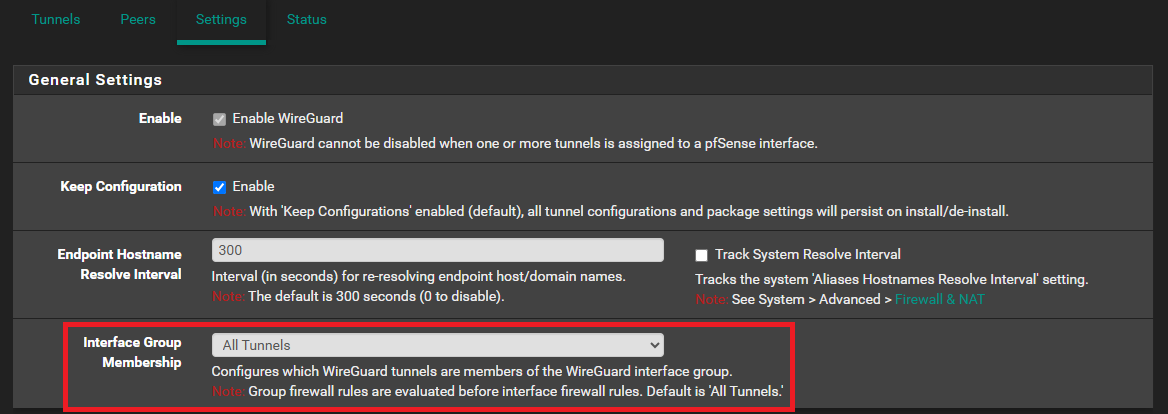
Configure WireGuard Tunnels and Peers
Add a Tunnel


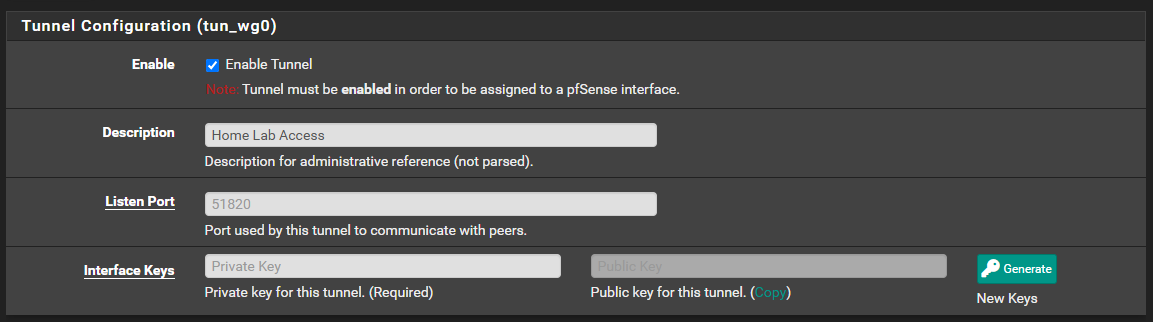
Optional: Tunnel with Custom MTU
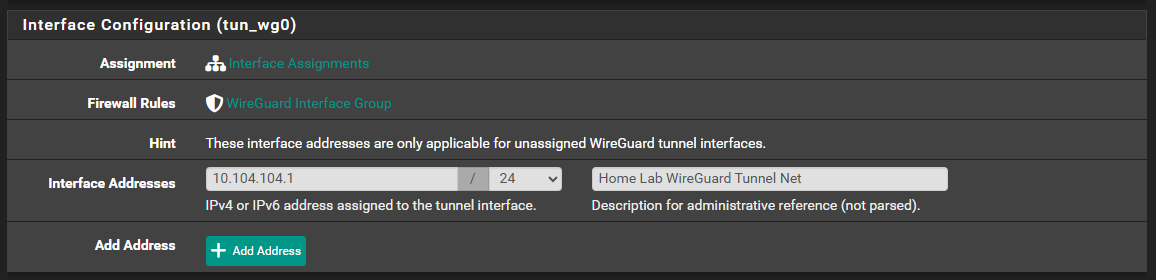
1024 on the client side. This is due to the WireGuard tunnel itself adding some overhead to the IP packet.As a workaround, I had to create a WireGuard interface in pfSense to be able to specify a custom MTU and MSS-clamping. Just adding this here in case others have issues with connectivity and want to test custom MTU options as a troubleshooting step.

tun_wg0 interface. Click "Add".
OPT18. Click it.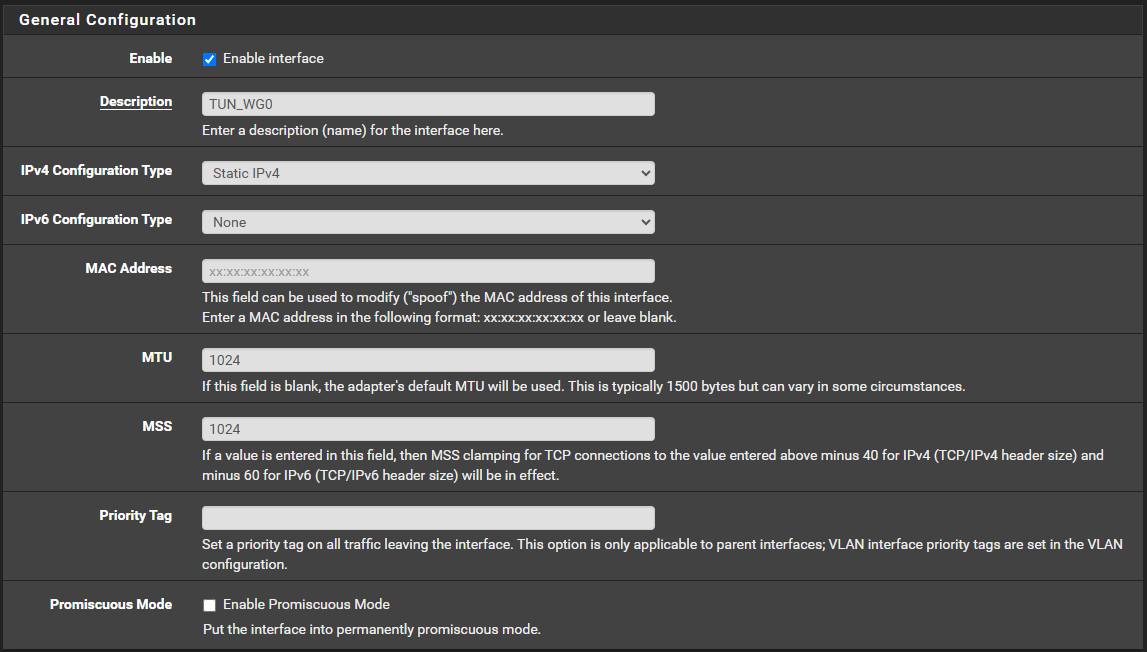
1024, which have worked well for me with OpenVPN and IPsec
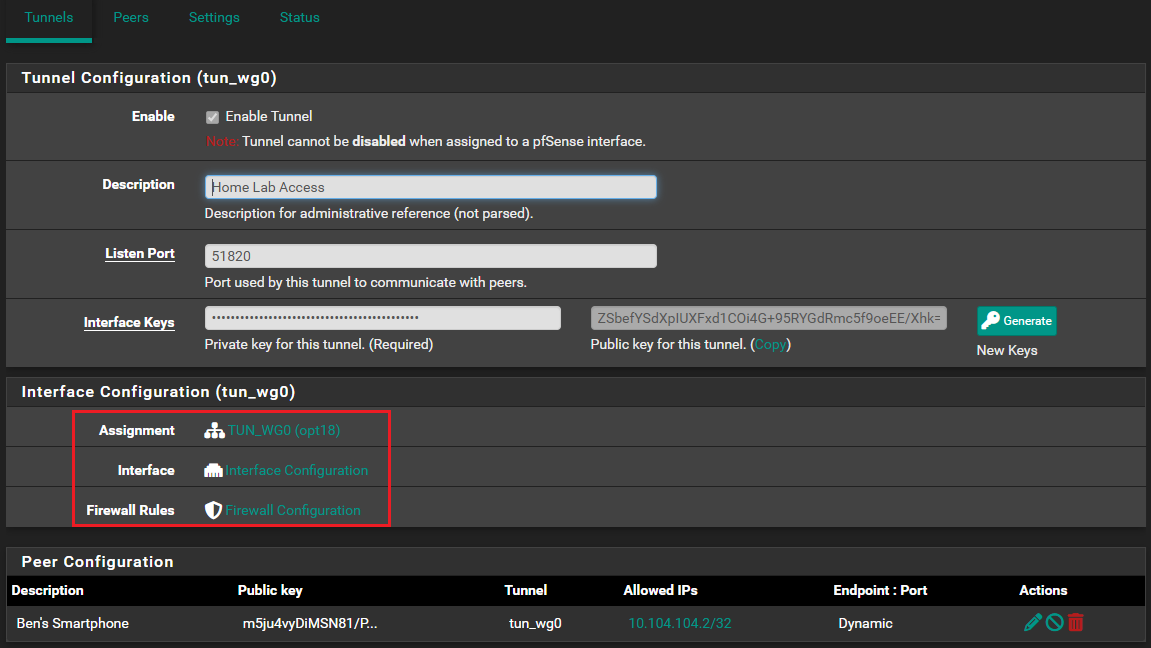
Add Peers
Generate Key Pair(s)
k=$(wg genkey); echo "Private Key: ${k}" ; export PRIV=$k ; echo "Public Key: $(echo $PRIV | wg pubkey)" ; unset PRIV

Add the Peers to the Tunnel


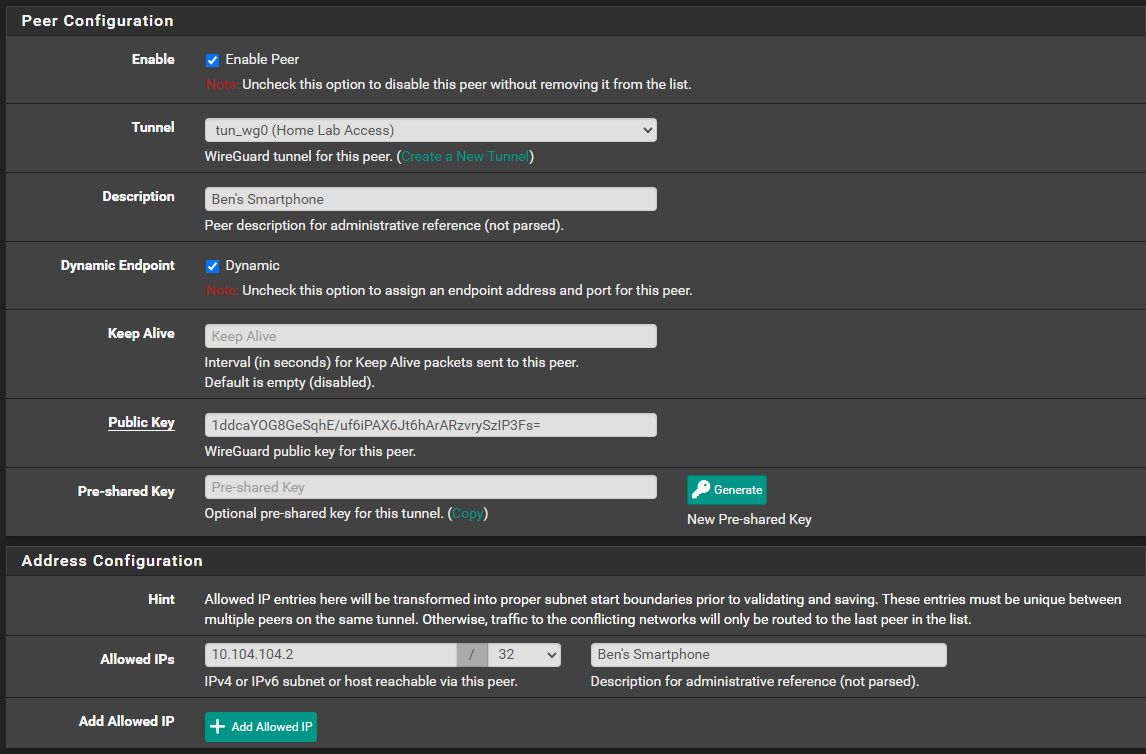
OPT18, the traffic will route through the correct interface.A quick review of the options:
- Tunnel: Automatically selected when editing tunnel
- Description: Make it clear who the peer is
- Dynamic: Default is checked, leave it so
- Keep Alive: Optional, depends on client network conditions
- Public Key: This is the public key from Diagnostics > Command Prompt
- Pre-shared Key: Optional password the client must provide
- Allowed IPs: The assigned IP of the device
- Tunnel is
10.104.104.1/24 - So, we assign peer at
10.104.104.x/32
- Tunnel is
Configure Firewall Rules

Just a reminder here of the following:
WireGuardis the default firewall rules canvas for any and all WireGuard tunnelsTUN_WG0exists, because I added the interface for a custom MTU and MSS
It's entirely up to you what kind of firewall rules you craft here, but you'll want to decide on a few things:
- What internal servers / services / endpoints should peers be able to reach?
- What external servers / services / endpoints?
- Should peers be able to log into the pfSense firewall?
- Should they be restricted to specific IPs, ports, and / or protocols?

10.104.104.0/24 to anywhereConfigure WireGuard Client
- Install WireGuard client software on the target device
- Add a configuration to the client
[Interface]
PrivateKey = {PEER_PRIVATE_KEY_HERE}
Address = 10.104.104.2/32
DNS = 10.104.104.1, 1.1.1.1

[Peer]
PublicKey = fCqY9BulgDUKgtHdWcr7nBNbdrNVnt6uNf9eJTIP6XA=
AllowedIPs = 0.0.0.0/0
Endpoint = {SERVER_PUBLIC_IP_OR_FQDN}:51820
PersistentKeepalive = 25
Example Client WireGuard Configuration File
A review of the configuration file from top to bottom:
- Interface
- PrivateKey: Private key generated in Diagnostics > Command Prompt
- Peer public key has already been added to pfSense above
- Address: The address we assigned to the client in pfSense
- DNS:
10.104.104.1is the gateway WireGuard tunnel gateway1.1.1.1is the failover DNS resolver
- PrivateKey: Private key generated in Diagnostics > Command Prompt
- Peer
- PublicKey: Public key of the WireGuard server generated when initially setting up the tunnel
- AllowedIPs:
0.0.0.0/0indicates to route all traffic through the tunnel - EndPoint: The public IP or FQDN of your WireGuard server
- PersistentKeepalive: default value
AllowedIPs specification...AllowedIPs = 10.0.0.0/24, 192.168.10.0/24, 0.0.0.0/5, 8.0.0.0/7, 10.128.0.0/20, 172.25.1.0/24, 11.0.0.0/8, 12.0.0.0/6, 16.0.0.0/4, 32.0.0.0/3, 64.0.0.0/3, 96.0.0.0/4, 112.0.0.0/5, 120.0.0.0/6, 124.0.0.0/7, 126.0.0.0/8, 128.0.0.0/3, 160.0.0.0/5, 168.0.0.0/8, 169.0.0.0/9, 169.128.0.0/10, 169.192.0.0/11, 169.224.0.0/12, 169.240.0.0/13, 169.248.0.0/14, 169.252.0.0/15, 169.255.0.0/16, 170.0.0.0/7, 172.0.0.0/12, 172.32.0.0/11, 172.64.0.0/10, 172.128.0.0/9, 173.0.0.0/8, 174.0.0.0/7, 176.0.0.0/4, 192.0.0.0/9, 192.128.0.0/11, 192.160.0.0/13, 192.169.0.0/16, 192.170.0.0/15, 192.172.0.0/14, 192.176.0.0/12, 192.192.0.0/10, 193.0.0.0/8, 194.0.0.0/7, 196.0.0.0/6, 200.0.0.0/5, 208.0.0.0/4, 224.0.0.0/3 This AllowedIPs specification would achieve the following:
- Route private IPs:
10.0.0.0/24and192.168.10.0/24through the tunnel - Route all public IPv4 blocks through the tunnel
Create a WireGuard Debian 11 Container
- Create the unprivileged container
- Set it to start at boot. Set the startup order if desired.
- Note the MAC address and create a static DHCP reservation for the server
- Port forward the WireGuard listen port to the internal IP
Resources
- RAM: 512 MiB
- Swap: 512 MiB
- Cores: 1
- Disk: 10 GB
Network

Recommended Options
- Start at boot: Yes
- Start/Shutdown order: User preference
- Unprivileged Container: Yes
Open the Proxmox Shell
6.x and there is no need to install the backported wireguard-dkms package at this timepveupgrade # Reboot if necessary
modprobe wireguard # Load the kernel module
# Add kernel modules to autoload at boot
echo "wireguard" >> /etc/modules-load.d/modules.conf wireguard kernel modules loaded on the PVE hostOpen the WireGuard Container Shell
apt clean && apt update
apt install -y --no-install-recommends wireguard-tools iptables
nano /etc/sysctl.confUncomment the IPv4 forwarding configuration
- Before:
#net.ipv4.ip_forward=1 - After:
net.ipv4.ip_forward=1
Uncomment IPv6 forwarding configuration
- Before:
#net.ipv6.conf.all.forwarding=1 - After:
net.ipv6.conf.all.forwarding=1
Press CTRL+X, then Y, and Enter to save your changes. Now, run these commands:
sysctl -p
cd /etc/wireguard
umask 077
WireGuard Server Setup
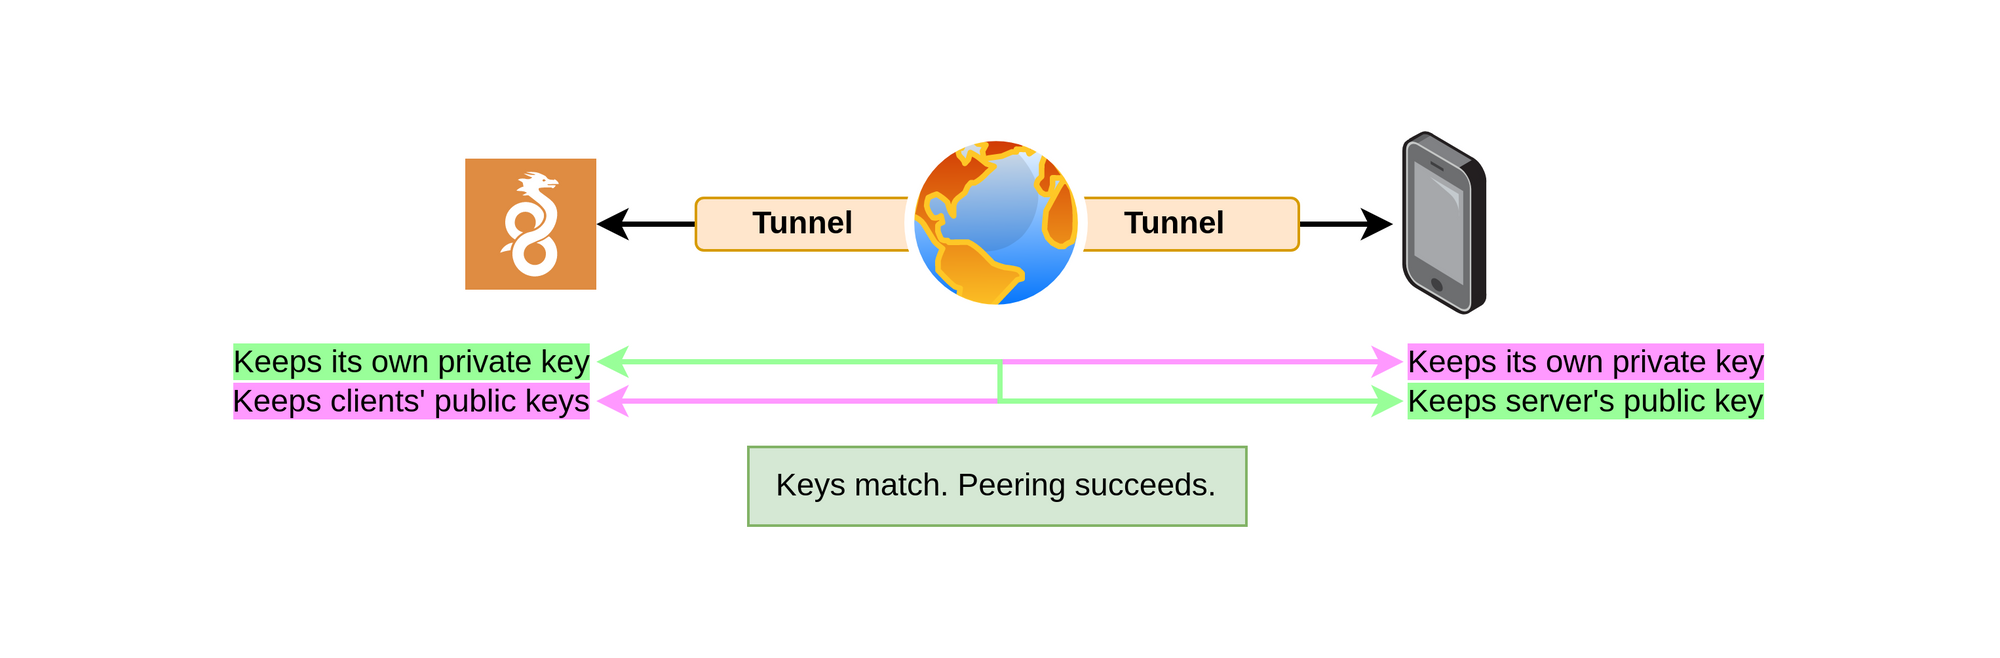
WireGuard uses public-key authentication to verify peers. WireGuard does not authenticate users, rather it authenticates devices to create a tunnel between the two.
Create a Server Public and Private Key Pair
wg genkey | tee server-private-key | wg pubkey > server-public-keyEdit the Server Interface Configuration File
nano /etc/wireguard/wg0.confThe configuration data in the wg0.conf file should look something like this.
Replace the <placeholder-values> with their respective information.
NOTE: in the interface PostUp command, I specified ip link set wg0 mtu 1500, because this is the default MTU on my network. When the WireGuard default MTU of 1420 was being used, it was fragmenting the packets and causing EXTREME latency on my Windows client (for some reason, Android didn’t seem to mind the default of 1420).
That said, your MTU settings may be different, so you can try adjusting this if you have connectivity issues or poor performance.
[Interface]
PrivateKey = <server-PRIVATE-KEY file contents>
Address = 10.0.10.1/24
ListenPort = <port forward created above>
PostUp = ip link set wg0 mtu 1500 ; iptables -A FORWARD -i %i -j ACCEPT; iptables -A FORWARD -o %i -j ACCEPT; iptables -t nat -A POSTROUTING -o eth0 -j MASQUERADE
PostDown = iptables -D FORWARD -i %i -j ACCEPT; iptables -D FORWARD -o %i -j ACCEPT; iptables -t nat -D POSTROUTING -o eth0 -j MASQUERADE

# Smartphone
[Peer]
PublicKey = <smartphone-PUBLIC-KEY file contents>
AllowedIPs = 10.0.10.2/32

# Laptop
[Peer]
PublicKey = <laptop-PUBLIC-KEY file contents>
AllowedIPs = 10.0.10.3/32 # Same as internal LAN
Press CTRL+X, then Y, and Enter to save your changes.
Edit the Client Interface Configuration File
This is just an example of client configuration. It’s the same for any device.
mkdir -p /etc/wireguard/clients/smartphone
cd /etc/wireguard/clients/smartphone
wg genkey | tee smartphone-private-key | wg pubkey > smartphone-public-key
nano smartphone.confThe configuration file should look something like this.
Replace the <placeholder-values> with their respective information.
[Interface]
PrivateKey = <smartphone-PRIVATE-KEY file contents>
Address = 10.0.10.2/32
DNS = # example: <home-router-ip>, 1.1.1.1, 1.0.0.1

[Peer]
PublicKey = <server-PUBLIC-KEY file contents>
Endpoint = dynamicdns.host.name:[port-forward]
AllowedIPs = 0.0.0.0/0, ::/0
PersistentKeepalive = 25
The AllowedIPs configuration specifies subnets available to the client. 0.0.0.0/0 means all traffic is sent through the tunnel.
For smartphones, you can import the config by scanning a QR code.
Install terminal QR code generator. This will be used to scan a QR code to generate a configuration file on the client.
You can enter the configuration details manually, this is just for convenience
apt install qrencode
qrencode -t ansiutf8 < smartphone.conf
Note: For laptops you’ll have to export the config file to the device and import it using the WireGuard client
Wrapping Up WireGuard Server Configurations
chown -R root:root /etc/wireguard
chmod -R og-rwx /etc/wireguard
systemctl enable wg-quick@wg0
systemctl start wg-quick@wg0
Setup Port Forwarding in Home Router
Default Service Ports
Unless you configured them otherwise, these services are running on these ports:
- OpenVPN:
UDP 1994 - WireGuard:
UDP 51820
Configuring Port Forward in Home Router
This will vary from router to router. I am just demonstrating using my own router.
If the Linux Container is running OpenVPN server, forward to the LXC internal IP address. If the pfSense VM is running OpenVPN server, forward to the pfSense WAN IP address.
- Login to home router. For me, this is
https://172.16.1.1 - Go to Firewall > Port Forwarding
- Specify a target IP address from the list
- This is the internal host that will receive the external traffic
- Specify a port (eg. UDP 1194)
- Click Add
- Specify a target IP address from the list
- Now, when an application goes to:
your-dynamic-dns-name:port,the application will be forewarded to the internal service
Example
- OpenVPN client tries to connect to
fakehost.ddns.net:UDP1194 - Your home router receives the connection
- It forwards the UDP traffic to the internal IP address of the OpenVPN container
Next Step
0xBEN