

Previous Step
How DDNS Works in the Lab
Click here to view this diagram in a new tab
Staging the Environment
Adding the VLAN for BIND
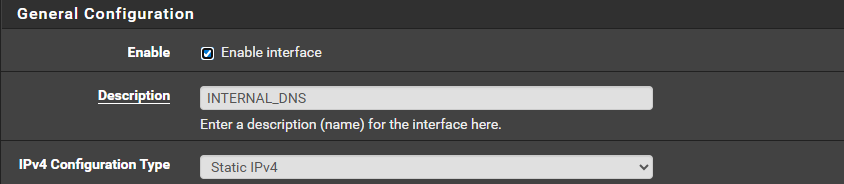
Add the VLAN to pfSense


Configure the Interface

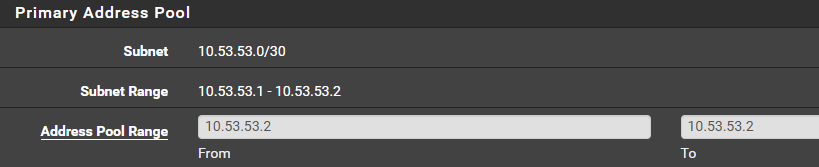
Configure DHCP
Configure Firewall Rules
Interface-Specific Rules
Select the interface name of the VLAN to configure interface-specific rules.

tcp/22 on your BIND server.Configure Managed Switch(es)
- Log into managed switch(es)
- Add VLAN 53 to 802.1q VLANs
- Tag each interface where VLAN 53 is expected to flow across the wire
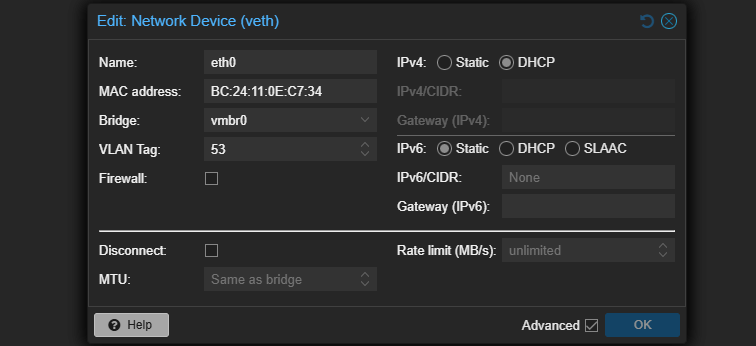
Configure Proxmox Networking
Classic Networking
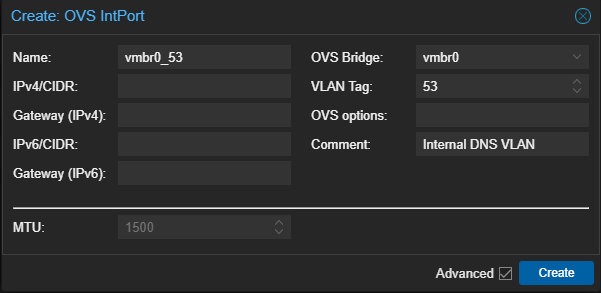
Assumes you're using OVS Bridge
If you do it this way, you must create this VLAN on each PVE node.
- Log into Proxmox VE
- Select a PVE node
- Click Network > Create > OVS IntPort
SDN
Add VLAN Zone
- Log into Proxmox VE
- Select Datacenter > SDN
- Select Zones


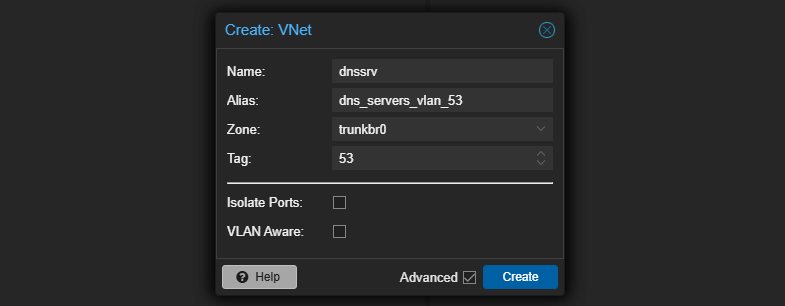
Add VLAN Tag
- Log into Proxmox VE
- Select Datacenter > SDN
- Select VNets


Add a DNS Record for BIND Server
Install and Configure BIND9
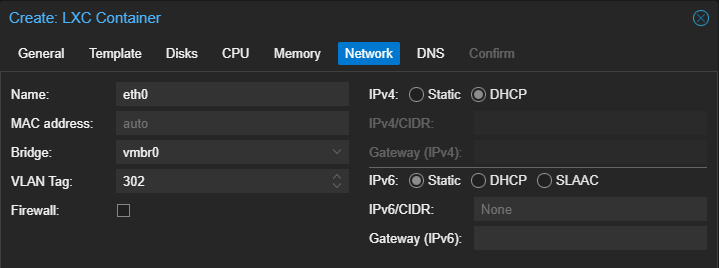
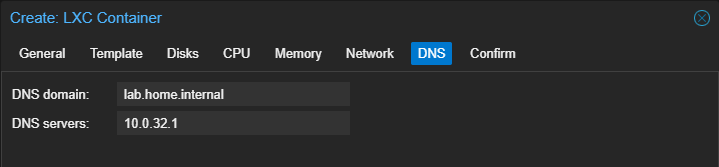
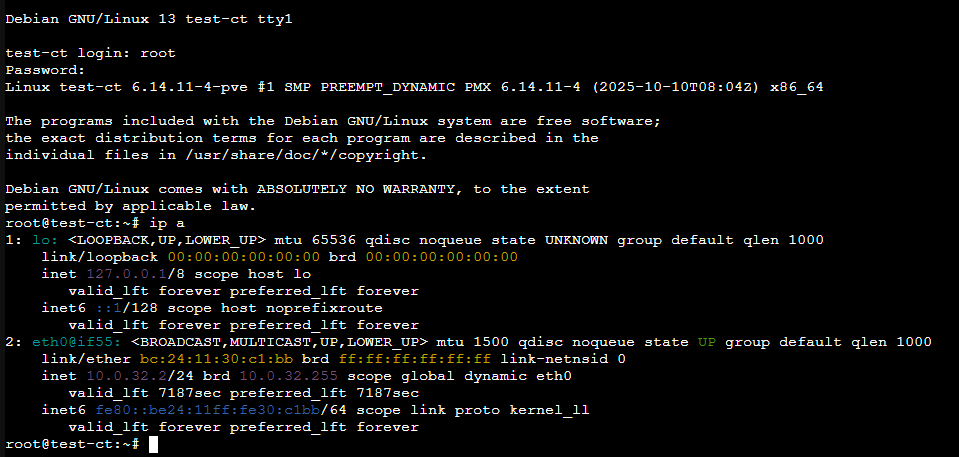
Create the Linux Container
- Log into Proxmox VE
- Clone the Debian 13 template Linux Container created previously
- Migrate the clone to your desired PVE node


Install BIND9
apt update && apt install -y bind9 bind9utils bind9-docsystemctl enable namedGenerate Dynamic DNS Key
This key will be used by the pfSense DHCP service to add / update / remove DNS records in specific home.internal subdomains as clients come online. For this to work, you'll need to note:
- Key name
- Secret
tsig-keygen -a HMAC-SHA256 pfsense-key > /etc/bind/pfsense.keyKey name: "pfsense-key", Secret is stored in "/etc/bind/pfsense.key"
chown root:bind /etc/bind/pfsense.keychmod 640 /etc/bind/pfsense.keyConfigure BIND
Options
nano /etc/bind/named.conf.optionsacl "trusted_net" {
127.0.0.0/8; # Allow to self
10.53.53.2/32; # Allow self
10.53.53.1/32; # Allow queries from pfSense for domain overrides
};
options {
directory "/var/cache/bind";
recursion yes;
allow-query { trusted_net; };
# Forward unknown to gateway
forwarders {
10.53.53.1;
};
dnssec-validation auto;
listen-on-v6 { none; };
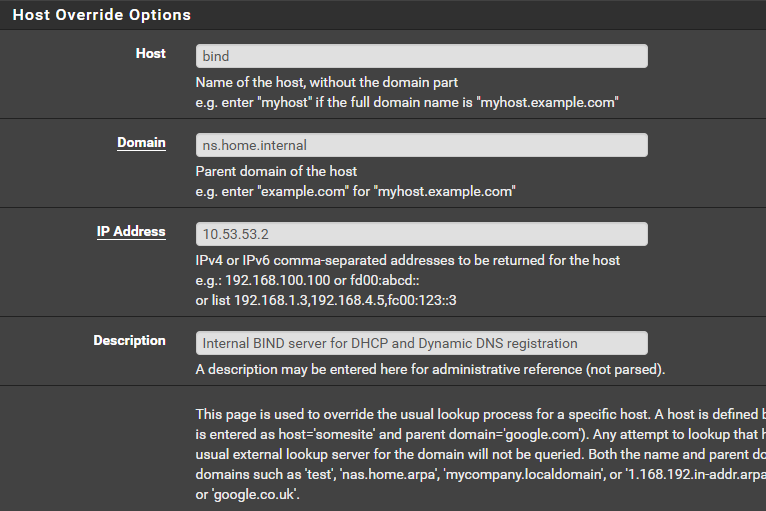
};Referencing the diagram:
- A host asks the default gateway (pfSense) for
test.lab.home.internal - pfSense observes domain override for
lab.home.internal - pfSense asks
10.53.53.2for the IP address oflab.home.internal - pfSense relays back to host
Therefore, adding 10.53.53.1 in the ACL is sufficient for this to work.
10.53.53.2is set as the lookup server forlab.home.internal- pfSense has
10.53.53.0/30in its routing table onigb1.53 - pfSense will always send packets destined for
10.53.53.2out that interface, which is configured with10.53.53.1
Zones and Zone Files
nano /root/generate-zones.shFor the sake of this tutorial, I'm focusing on the internal domain of lab.home.internal. If you'd like to add dynamic DDNS to other subnets in your home lab, feel free to add them to the ZONES list in the script.
60. This would create a lot of compute and network overhead. A TTL of
300 would still be considered very short, but more reasonable. But for the sake of our home lab, 60 is fine, as we likely won't have that many records and very few clients actually making DNS queries.#!/bin/bash
# Configuration
LOCAL_DOMAIN="home.internal"
BIND_DIR="/etc/bind"
ZONE_DIR="/var/lib/bind"
TSIG_KEY_FILE="$BIND_DIR/pfsense.key"
NS_IP="10.53.53.2"
ADMIN_EMAIL="administrator.${LOCAL_DOMAIN}."
SERIAL=$(date +%Y%m%d01)
TTL=60
NUM_MIN=$(($TTL/60))
if [ "$NUM_MIN" -gt 1 ] ; then
MIN_QUANTIFIER="minutes"
else
MIN_QUANTIFIER="minute"
fi
# Forward Zones
ZONES=(
"example1.${LOCAL_DOMAIN}"
"example2.${LOCAL_DOMAIN}"
)
# Zone Files
# First-time config, initialze file with include directive
if ! [ -f "$BIND_DIR/named.conf.local" ] ; then
echo "include \"$TSIG_KEY_FILE\";" > "$BIND_DIR/named.conf.local"
fi
# Append each zone to the local config
for ZONE in "${ZONES[@]}"; do
cat << EOF >> "$BIND_DIR/named.conf.local"
zone "$ZONE" {
type master;
file "$ZONE_DIR/db.$ZONE";
allow-update { key "pfsense-key"; };
allow-query { "trusted_net"; };
};
EOF
# Zone Databases
cat <<EOF > "$ZONE_DIR/db.$ZONE"
\$ORIGIN .
\$TTL $TTL ; $NUM_MIN $MIN_QUANTIFIER
$ZONE IN SOA ns1.$ZONE. $ADMIN_EMAIL (
$SERIAL ; serial
$TTL ; refresh
$TTL ; retry
$TTL ; expire
$TTL ; minimum
)
NS ns1.$ZONE.
\$ORIGIN $ZONE.
ns1 A $NS_IP
EOF
done
chown -R bind:bind "$ZONE_DIR"
chmod 750 "$ZONE_DIR"
chmod -R 640 "$ZONE_DIR/*.jnl" 2>/dev/nullbash /root/generate-zones.shcat /etc/bind/named.conf.local and ls -l /var/lib/bind/.Configure pfSense
DHCP
Internal Domains

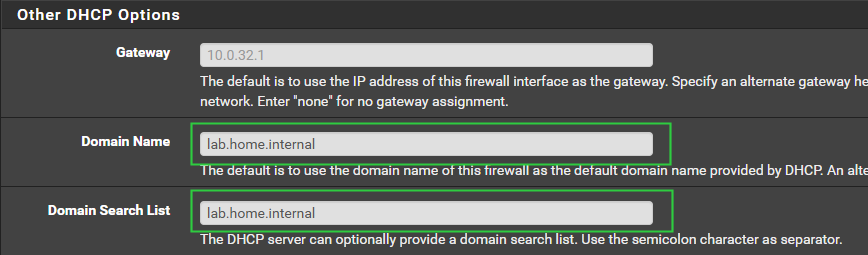
For example, you might have a
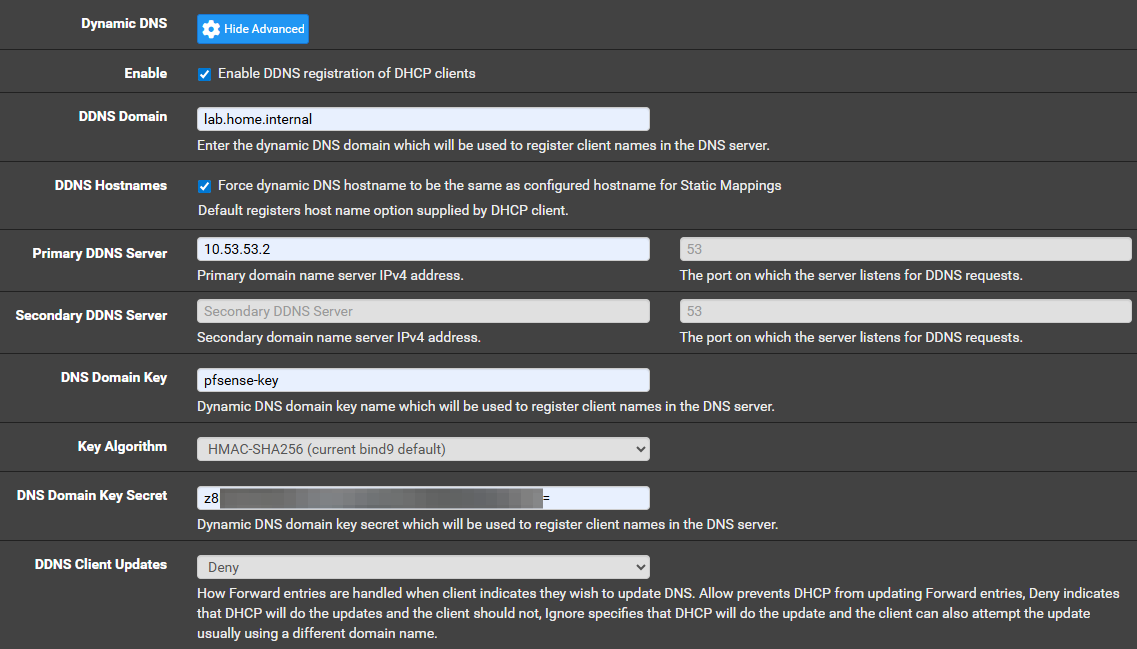
cameras VLAN where you want to add the cameras.home.internal domain. You'd have to add that zone to BIND and configure Dynamic DNS as shown just below.Dynamic DNS
- Log into pfSense
- Click Services > DHCP Server
lab.home.internal domain and add the configuration as shown below.
DNS Resolver
Add the Private Domain
- Log into pfSense
- Click Services > DNS Resolver

server:
    private-domain: home.internal
    local-zone: "lab.home.internal." transparent
domain-insecure: home.internalprivate-domain— indicates this domain returns private IP addresseslocal-zone— tells unbound not to attempt outside lookupdomain-insecure— tells unbound to ignore DNSSEC failures for local, private domain
Click Save and Apply Changes.
Add the Domain Override
- Log into pfSense
- Click Services > DNS Resolver
- Scroll down to the bottom to Domain Overrides


Testing Dynamic DNS


Adding Static IPs to Dynamic DNS
Problem
There are some instances where a host has been set with a static IP configuration. One such example is my Proxmox VE nodes. In my case, the following is true:
- Proxmox VE has been set with a static IP address on
vmbr0_mgmt, which is anOVS IntPort - I've logged into pfSense and added a DHCP reservation for those addresses that are statically configured, so that DHCP won't hand them out
- The Proxmox VE nodes are members of a VLAN configured with
lab.home.internaland this VLAN has been configured with DHCP Dynamic DNS
Solution
- SSH or
pct enterinto the BIND server - Use some configuration file and
crontrickery to add the records
nano /etc/bind/static-records.txtserver 127.0.0.1
debug yes
; Update Lab Zone
zone lab.home.internal.
update add proxmox.lab.home.internal. 60 A 172.16.100.6
update add proxmox-hx90.lab.home.internal. 60 A 172.16.100.12
update add proxmox-um690s.lab.home.internal. 60 A 172.16.100.15
update add proxmox-um690.lab.home.internal. 60 A 172.16.100.14
show
sendCreate a "nsupdate" file to add the static IPs
/usr/bin/nsupdate -k /etc/bind/pfsense.key -v /etc/bind/static-records.txtUse the DDNS key and the nsupdate file to add the records
crontab -e# Dynamic DNS update to add static IP configurations
# Run every twelve hours to keep in BIND cache
0 */12 * * * /usr/bin/nsupdate -k /etc/bind/pfsense.key -v /etc/bind/static-records.txtOverriding pfSense DDNS TTL
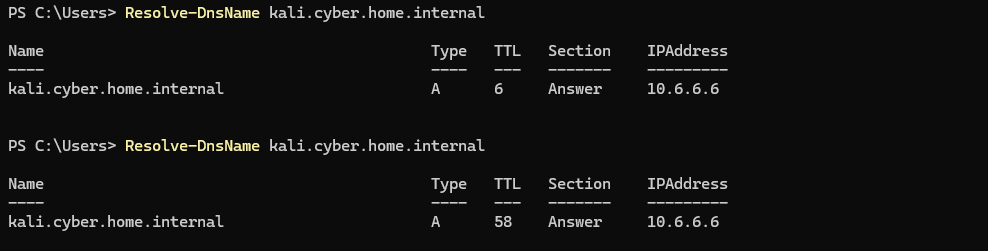
By default pfSense will push DHCP Dynamic DNS records with a TTL of 3600 — or 1 hour — and BIND will accept the TTL pushed by the DDNS client. In my testing, this had caused a problem with a stale record.
Synopsis of the problem
- You build a VM / LXC with a specific hostname and its DHCP address gets pushed by Dynamic DNS – say
test.lab.home.internal. - A host on the network queries
test.lab.home.internaland Unbound returns the record from BIND. It's now cached with a TTL of3600. - A few minutes later, you give the host a static IP configuration at a different IP address and refresh its DHCP lease, which is pushed to BIND.
- Unbound still has the old record cached, because the TTL has not yet lapsed, so the new IP address of this host is not returned.
ssh admin@pfsenseSSH into pfSense
nano /etc/inc/services.inc2924 if (isset($dhcpifconf['ddnsupdate'])) {
2925 $need_ddns_updates = true;
2926 $newzone = array();
2927 if ($dhcpifconf['ddnsdomain'] <> "") {
2928 $newzone['domain-name'] = $dhcpifconf['ddnsdomain'];
2929 $dnscfg .= " ddns-domainname \"{$dhcpifconf['ddnsdomain']}\";\n";
2930 } else {
2931 $newzone['domain-name'] = config_get_path('system/domain');
2932 }Before
2924                 if (isset($dhcpifconf['ddnsupdate'])) {
2925                         $need_ddns_updates = true;
2926                         $newzone = array();
2927                         if ($dhcpifconf['ddnsdomain'] <> "") {
2928                                 $newzone['domain-name'] = $dhcpifconf['ddnsdomain'];
2929                                 $dnscfg .= "    ddns-domainname \"{$dhcpifconf['ddnsdomain']}\";\n";
2930                                 $dnscfg .= "    ddns-ttl 60;\n";
2931                         } else {
2932                                 $newzone['domain-name'] = config_get_path('system/domain');
2933 }Note: that this change may be overwritten by system upgrades, at which point, you'll need to reconfigure the service with the changes above.
Next Step

