
Previous Step
 0xBEN
0xBENBest Practices
VirtIO Drivers Download
Add this .iso file to your ISO collection in Proxmox. Some drivers from this disk will be installed on your Windows guests to optimize their performance.
https://fedorapeople.org/groups/virt/virtio-win/direct-downloads/stable-virtio/virtio-win.iso
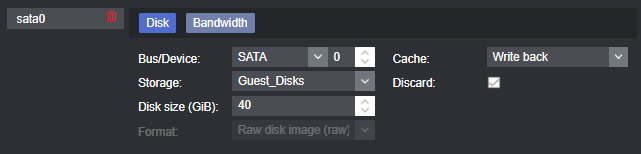
Disk
SATA is the best for compatibility across Windows hosts. When creating the disk, the following options should be set:
Network

VirtIO (paravirtualized) will get you the best network performance.
Intel E1000 is a good fallback.
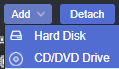
Disc Drives
When creating the VM, you will initially add the OS installation ISO:

Then, add another disc drive containing the VirtIO drivers ISO:
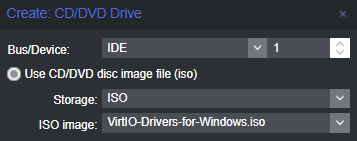
Your VM's disc drives should look something like this:

Windows ISO Files
We will be getting most ISO files from the Microsoft Evaluation Center. Most of the ISOs you encounter here will have a lifespan of 90 – 180 days of usage. Some say that you can extend beyond the lifespan and the VMs will still function just fine
Windows Server 2019
Fill out the form as indicated below:
- Please select your experience: ISO
- Fill out your information (uncheck the box for additional communications)
- Select your language and click Download
Windows 10 Enterprise
Fill out the form as indicated below:
- Please select your experience: ISO - Enterprise
- Fill out your information (uncheck the box for additional communications)
- Select 64bit and Select your language and click Download
Windows 7
When this page was initially written, these download links — on download.microsoft.com — for Windows 7 were functional. At last check — June 23, 2023 — these links are all dead.
I am leaving the links here in case anyone reading this would like to try and look for them on the Internet Archive.
https://web.archive.org/web/20220000000000*/{INSERT_URL_HERE} in order to search for occurrences of {INSERT_URL_HERE} in the year 2022, so they should just be cached copies of the .iso files.Still, use caution when loading images from unofficial sources.
Windows 7 Ultimate (x64) ISO(dead link)Windows 7 Ultimate (x32) ISO(dead link)Windows 7 Professional (x64) ISO(dead link)Windows 7 Professional (x32) ISO(dead link)
Installation
Injecting VirtIO Drivers
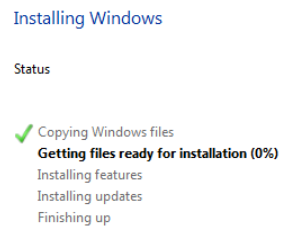
Start the VM and open the NoVNC console. When asked, choose custom installation (just install Windows).
You should see a button to load drivers. Browse the CD on IDE Drive 2.


- SCSI Driver:
virtioscsi\<operating-system-version>\amd64\vioscsi.inf(64-bit) - NIC Driver:
NetKVM\<operating-system-version>\amd64\netkvm.inf(64-bit) - Ballooning Memory Driver:
Balloon\<operating-system-version>\amd64\balloon.inf(64-bit)


Finish Installation
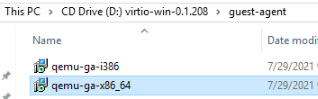
Finish installing the OS. Once on the Windows desktop, install the qemu-guest-agent. Open Windows Explorer, open the CD drive, and install: Guest-agent\qemu-ga-x86_64 (64-bit)
Open Windows Device Manager and check for any missing drivers. My experience has been that Windows generally does a great job of grabbing drivers.

If it is a fresh install, wait a bit to see if Windows Update will download the required drivers.
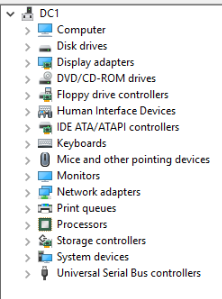
Looks good! There are no unknown device alert icons.
Next Step
0xBEN