
Previous Step
 0xBEN
0xBENSystem Setup
vmbr1. After pfSense boots, you can start your other VMs on that switch.Download pfSense CE ISO
I understand that this is a mitigation strategy to combat piracy of their pfSense Plus software by third-party firewall appliance vendors (among other reasons). That said, I will show you a way to download the file whilst protecting your privacy.
Whenever you are building a lab – whether in the cloud or on premise – you should always plan your network first. You should factor in future growth as well. It's much more difficult to change network design later than planning for it now.


AMD64 ISO and click ADD TO CART

Go here to get a temporary email for the email requirement
Go here to get a temporary number for the phone requirement


Extracting the ISO Image

Download an archive file handler such as 7-Zip or simialr


.iso file will be stored in this folderUpload the ISO and Create the VM
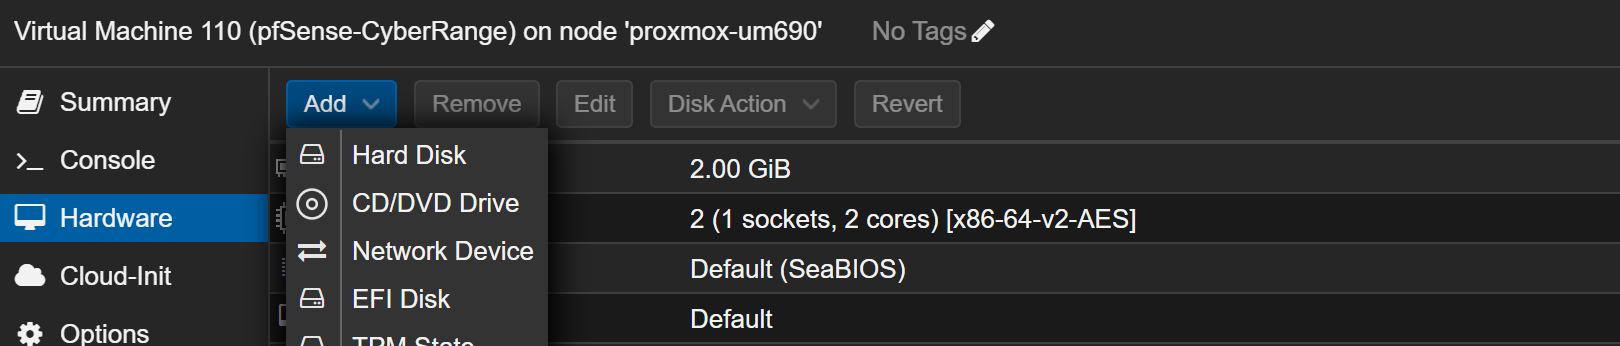
After uploading the .iso file to Proxmox, you're ready to create the VM. Refer here if you need a refresher on uploading ISOs to Proxmox.

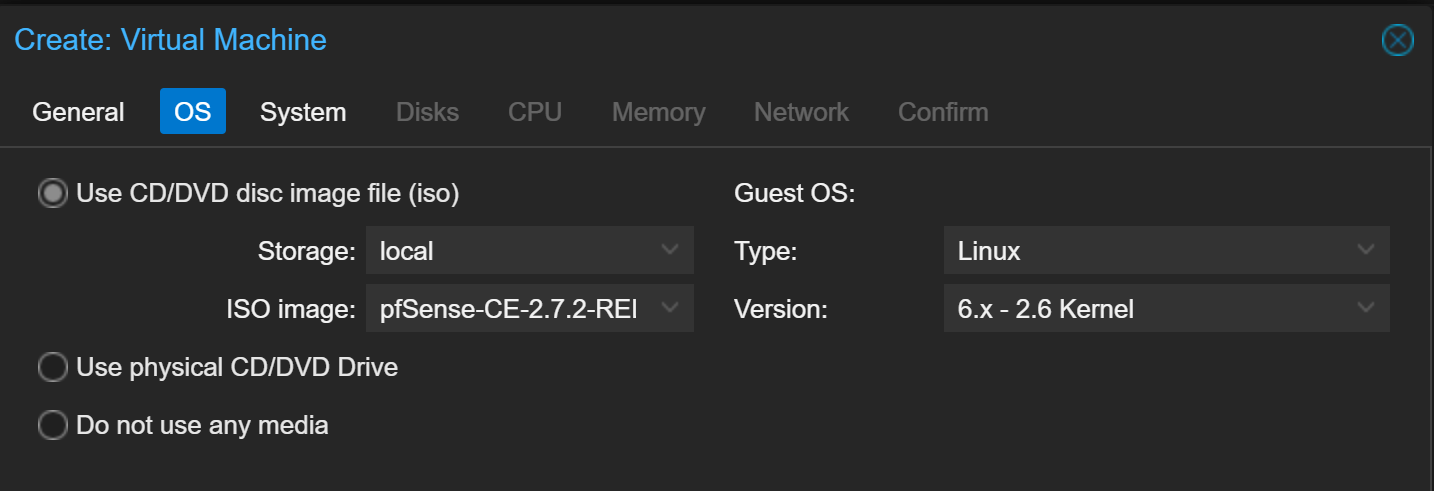
pfSense-CE or netgate-installer-amd64 ISO file

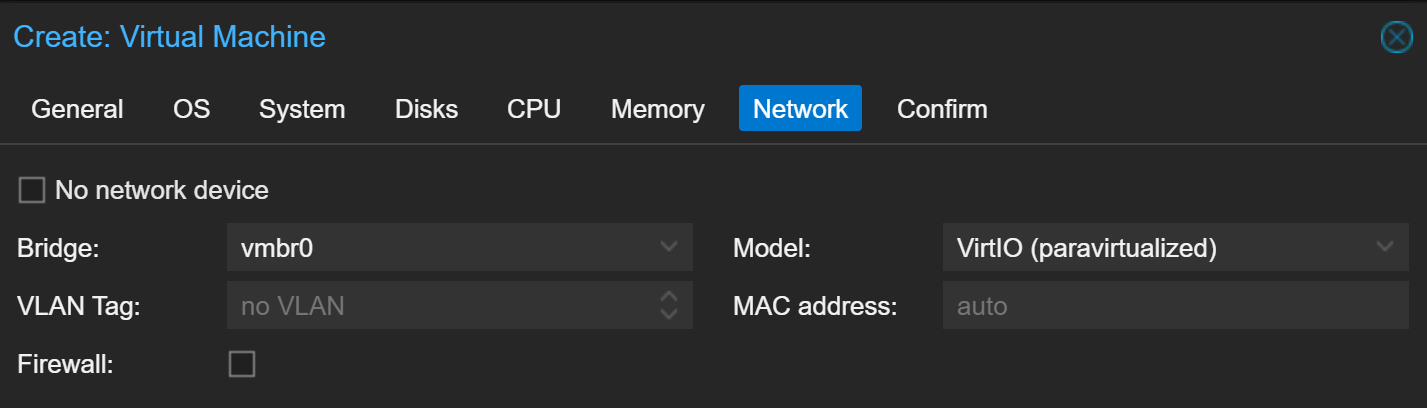
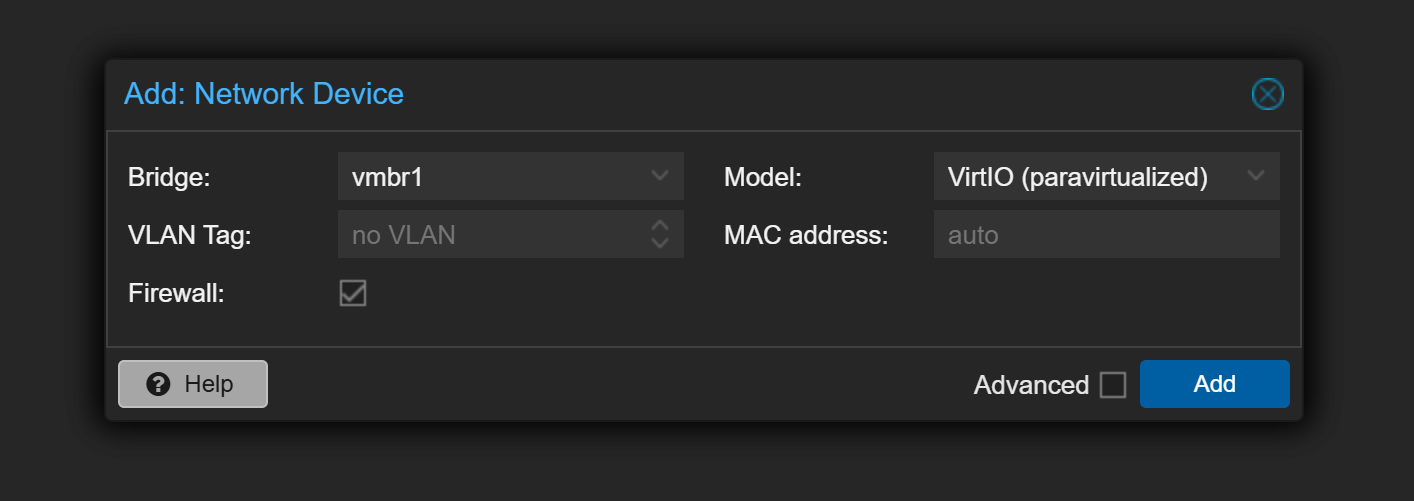
vmbr1
Give your pfSense VM a Static DHCP Reservation
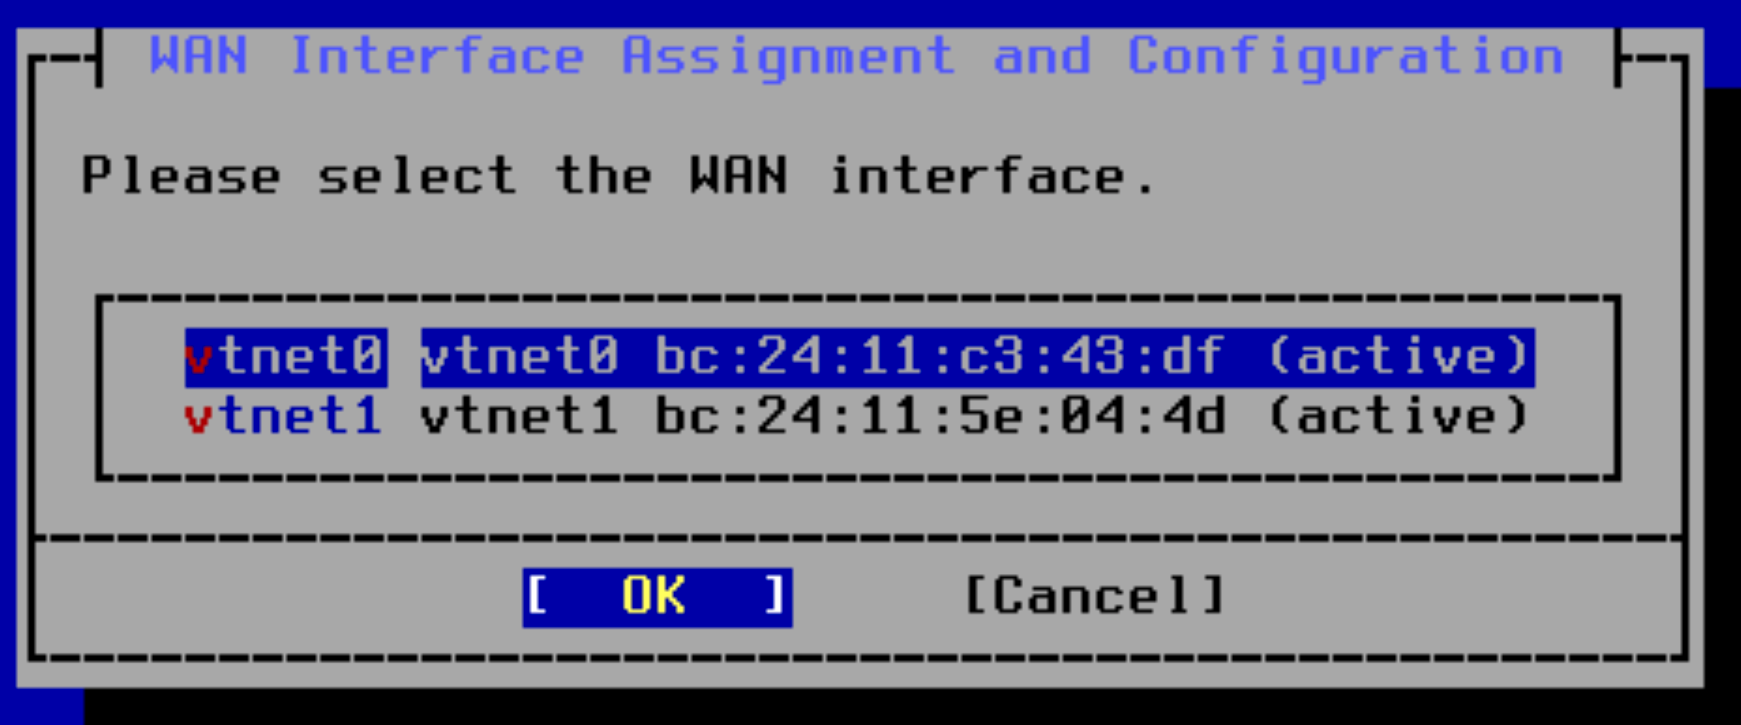
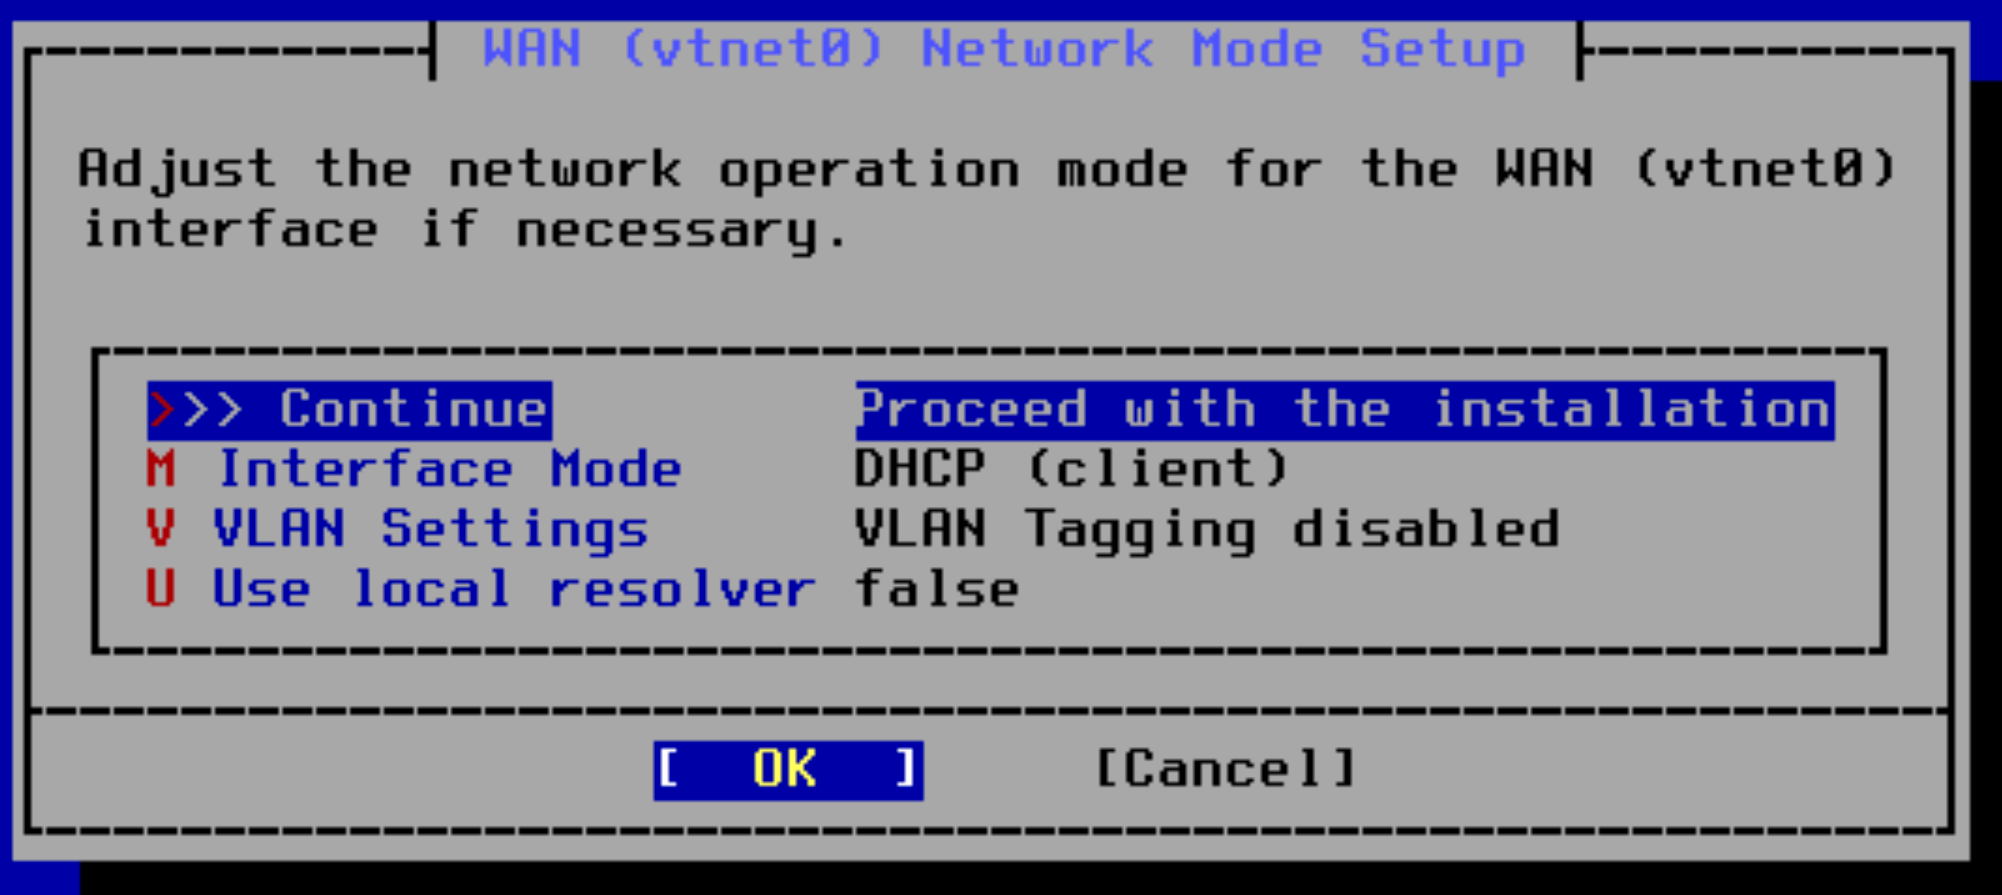
net0. This is the WAN interface on your pfSense VM. It is going to ask your home router for a DHCP address.We want the WAN IP address of the pfSense VM to stay the same every time it reboots.
- Log into your home router and give the pfSense WAN MAC Address a static IP address.
- If your home IP address space is
192.168.1.0/24, give pfSense an IP of192.168.1.2. If your address space is172.16.1.0/24, give pfSense and IP of172.16.1.2. Something llike this.
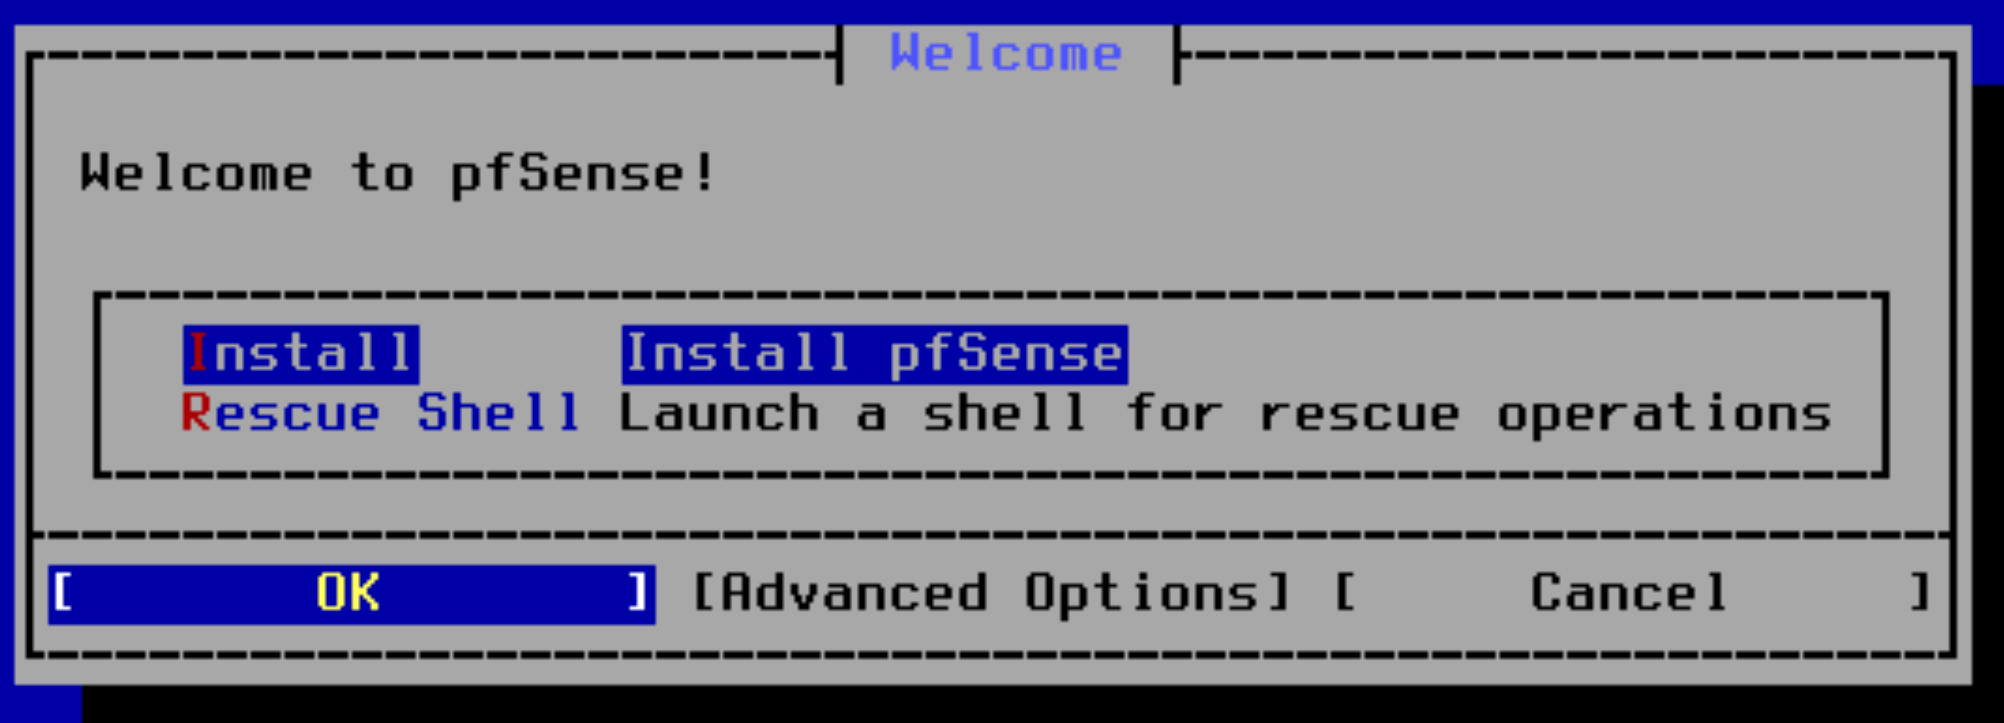
Install and pfSense Initial Setup


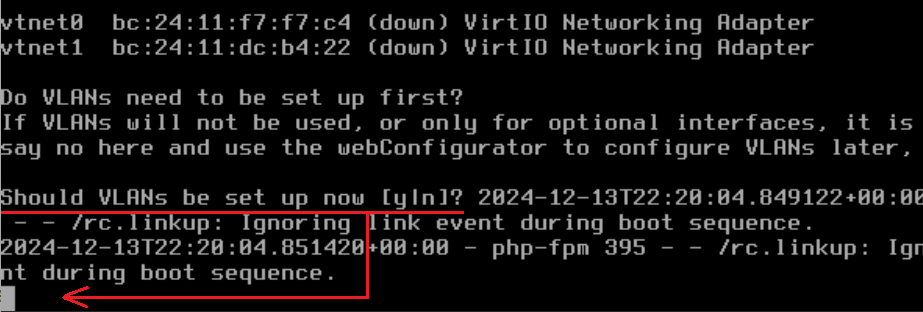
Configure VLANs
At the beginning of the guide, when we first installed Proxmox, we setup some Open vSwitch bridges and defined some VLANs on the vmbr1 bridge. In order for VLANs to function, both the switch and the router need to be aware of the VLANs.
You can read more about VLANs here if you'd like:
 0xBEN
0xBEN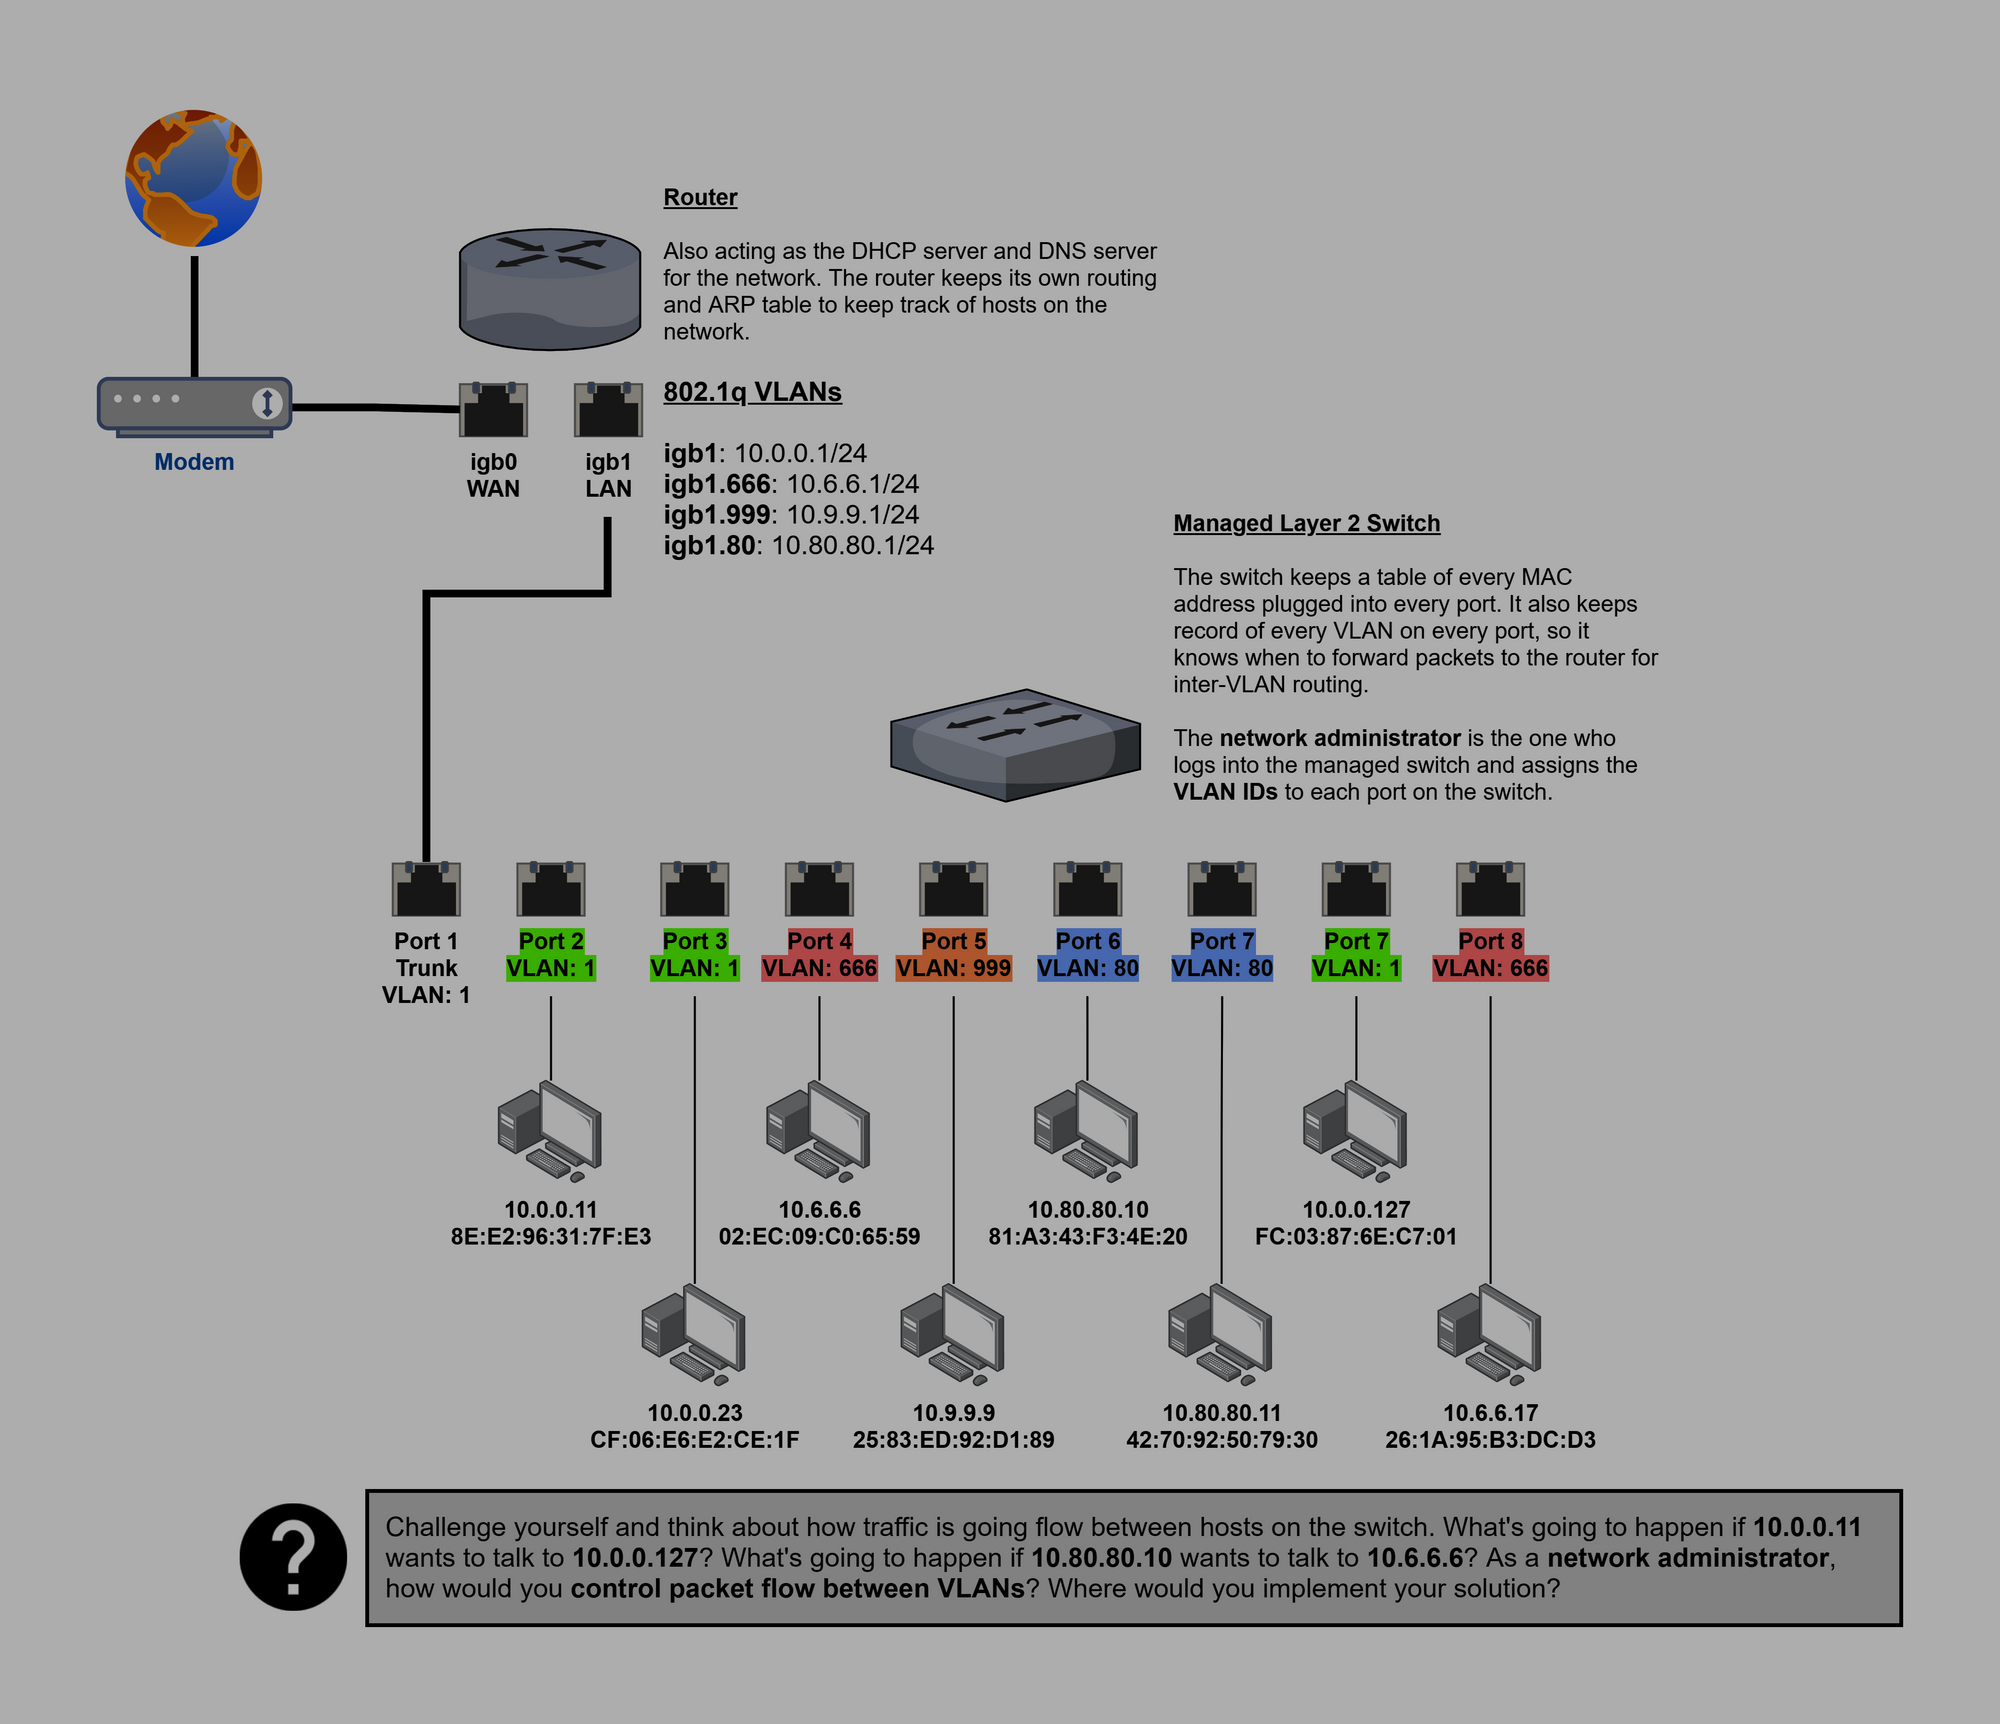
Y at the blinking cursor which is offset due to some output
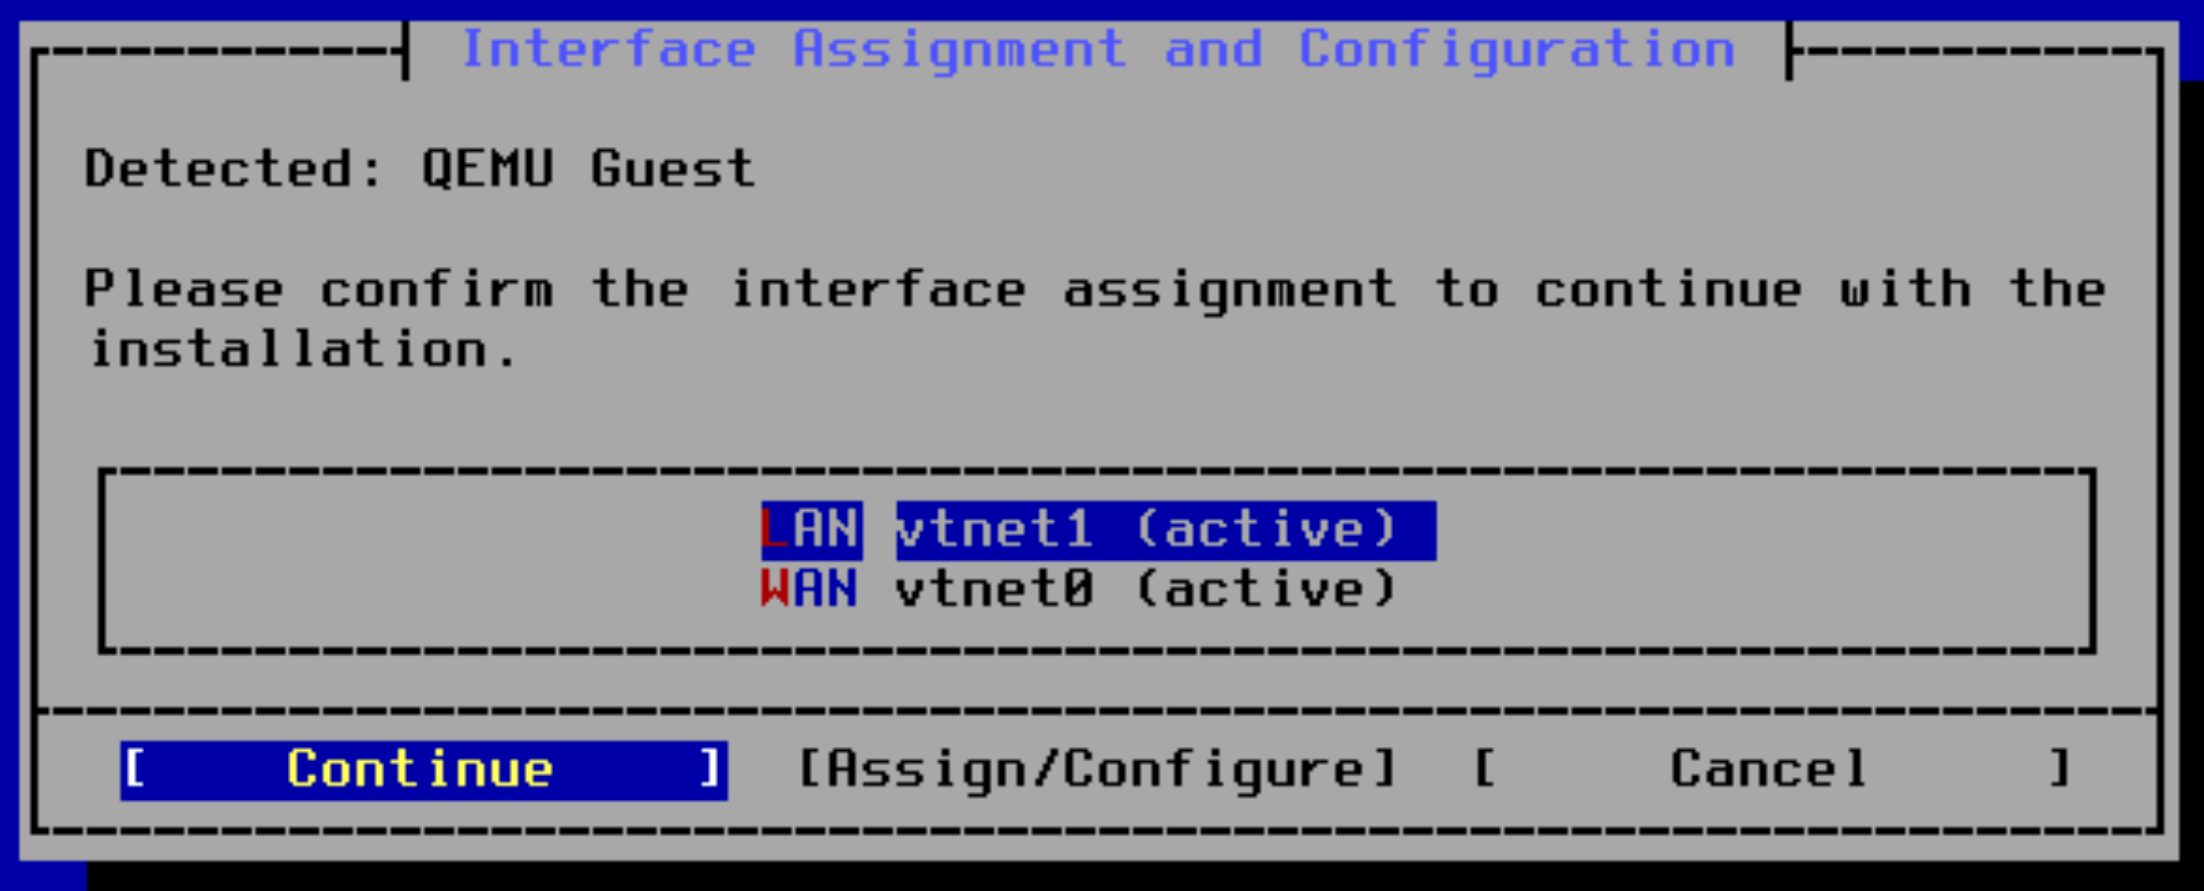
vtnet1 as the parent interface
666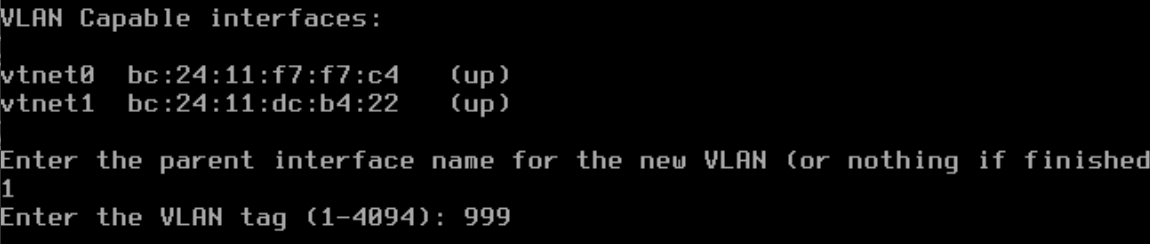
vtnet1 and then VLAN tag 999
Define the Interfaces

vtnet0 is the WAN
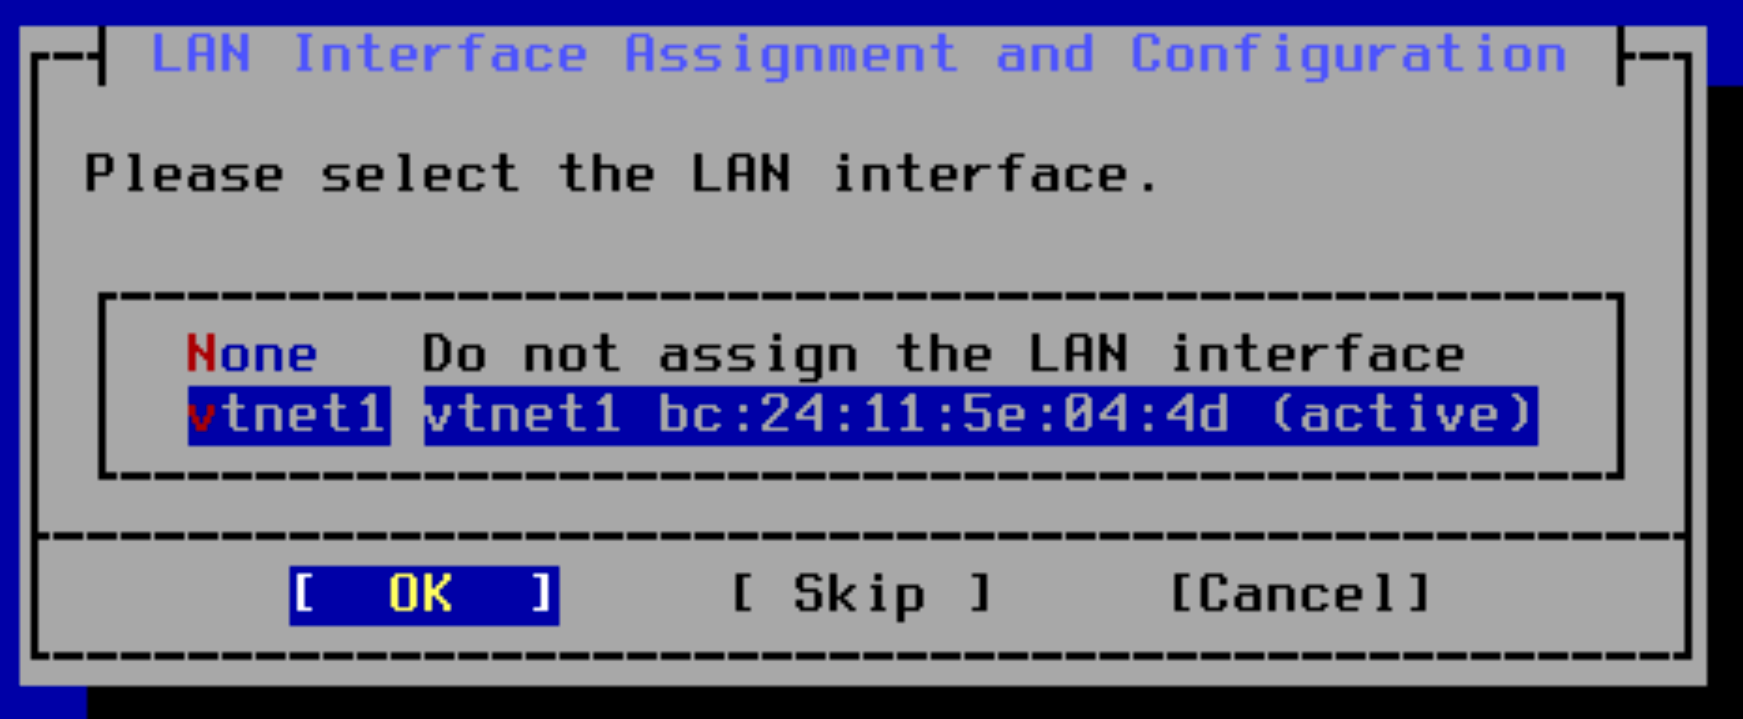
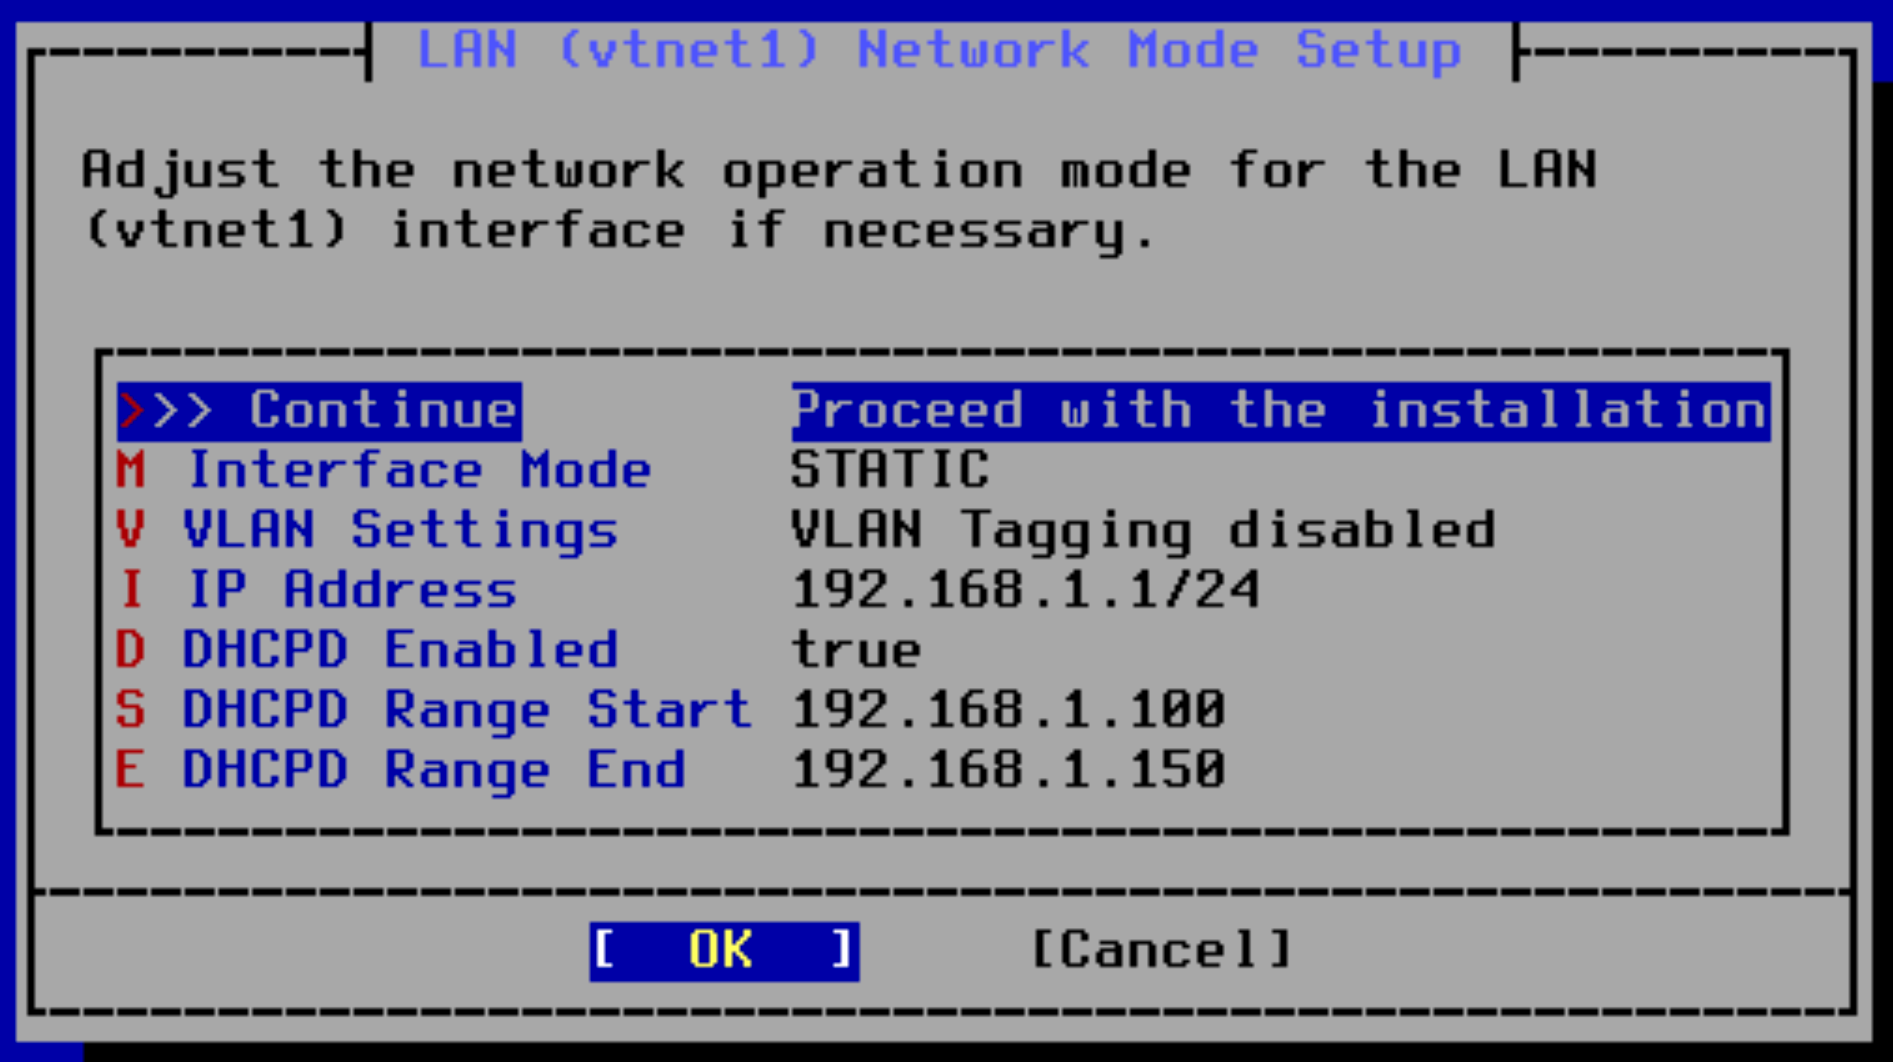
vtnet1 is the LAN
vtnet1.666 is the "Optional 1" interface
vtnet1.999 is the "Optional 2" interface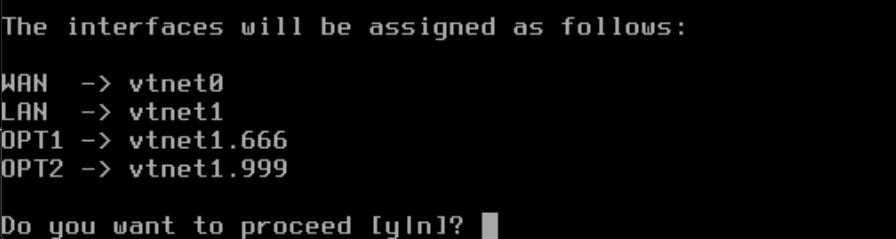
y to proceed with the configurationConfiguring Interface IP Address Ranges
Now, we are going to configure each interface and sub-interface with IP address spaces for clients on each Local Area Network (LAN).
Default LAN
Enter 2 to configure2 — LAN (vtnet1 — static)
Configure IPv4 address LAN interface via DHCP? (y/n)- Enter
N
- Enter
Enter the new LAN IPv4 address. Press <ENTER> for none- Enter
10.0.0.1 - Enter
24for the network mask
- Enter
For a WAN, enter the new LAN IPv4 upstream gateway address.
For a LAN, press <ENTER> for none:- Press Enter key
Configure IPv6 address LAN interface via DHCP6? (y/n)- Enter
N
- Enter
Enter the new LAN IPv6 address. Press <ENTER> for none:- Press Enter key
Do you want to enable the DHCP server on LAN? (y/n)- Enter
y - Start of Range:
10.0.0.11 - End of Range:
10.0.0.244
- Enter
Do you want to revert to HTTP as the webConfigurator protocol? (y/n)- Enter
N
- Enter
- Press Enter key to continue when prompted
Optional 1
Enter 3 to configure interface 3 — OPT1 (vtnet1.666)
Configure IPv4 address LAN interface via DHCP? (y/n)- Enter
N
- Enter
Enter the new LAN IPv4 address. Press <ENTER> for none- Enter
10.6.6.1 - Enter
24for the network mask
- Enter
For a WAN, enter the new LAN IPv4 upstream gateway address.
For a LAN, press <ENTER> for none:- Press Enter key
Configure IPv6 address LAN interface via DHCP6? (y/n)- Enter
N
- Enter
Enter the new LAN IPv6 address. Press <ENTER> for none:- Press Enter key
Do you want to enable the DHCP server on LAN? (y/n)- Enter
y - Start of Range:
10.6.6.11 - End of Range:
10.6.6.244
- Enter
Do you want to revert to HTTP as the webConfigurator protocol? (y/n)- Enter
N
- Enter
- Press Enter key to continue when prompted
Optional 2
Enter 4 to configure interface 4 — OPT2 (vtnet1.999)
Configure IPv4 address LAN interface via DHCP? (y/n)- Enter
N
- Enter
Enter the new LAN IPv4 address. Press <ENTER> for none- Enter
10.9.9.1 - Enter
24for the network mask
- Enter
For a WAN, enter the new LAN IPv4 upstream gateway address.
For a LAN, press <ENTER> for none:- Press Enter key
Configure IPv6 address LAN interface via DHCP6? (y/n)- Enter
N
- Enter
Enter the new LAN IPv6 address. Press <ENTER> for none:- Press Enter key
Do you want to enable the DHCP server on LAN? (y/n)- Enter
y - Start of Range:
10.9.9.11 - End of Range:
10.9.9.244
- Enter
Do you want to revert to HTTP as the webConfigurator protocol? (y/n)- Enter
N
- Enter
- Press Enter key to continue when prompted
Configuring the System Settings
We can now configure the rest of the setup through the GUI. However, if you go try to login to pfSense at the WAN IP address, it's going to fail.
This is because pfSense is blocking WAN access to the web console. This is a good thing if your pfSense router is sitting at the edge of your network. You wouldn't want anybody to be able to reach the login page of your home router from the internet.
In reality, the IP address on the WAN port is a private IP address – which is not accessible from the Internet without some workarounds. So, in this case, it's perfectly safe to open the WAN port inside our home network.
Allowing Access to the Web Console from the WAN
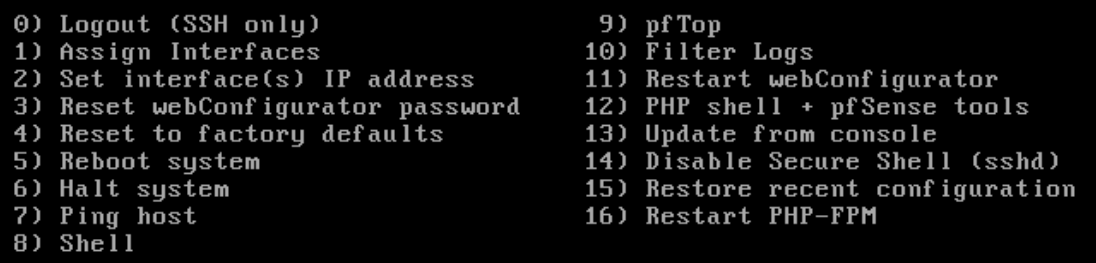
Enter option 8 to open a system shell on pfSense. Then, type this command to disable the firewall. We need to do this at first to allow access.
pfctl -dLogging in and Setting Up
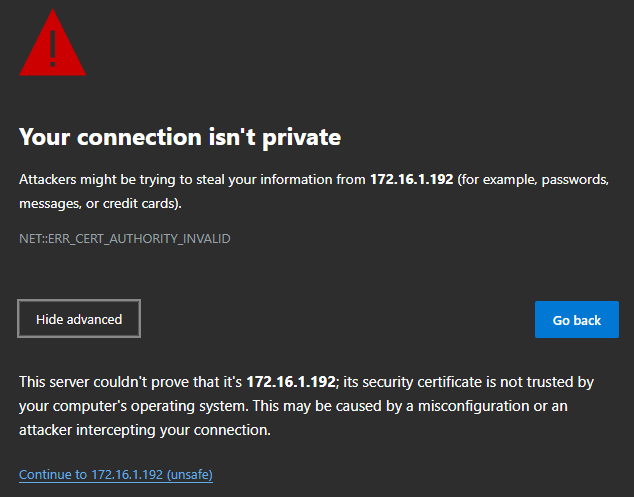
Open up your web browser and go to https://pfsense-ip-address. You may get a security warning about an untrusted certificate. Disregard and continue.
The default login for the web console is:
- Username:
admin - Password:
pfsense
Hostname and Domain
Click Next > Next. Set the hostname and domain.
- Hostname:
pfSense-sec - Domain:
cyber.range
DNS Settings
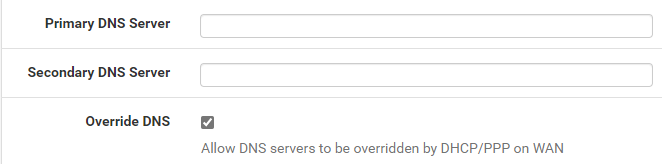
You can specify DNS servers here. The Override DNS box tells pfSense to use DNS settings from your home router. If you want to use the DNS settings from your home router, check this box and leave the DNS server boxes empty.
NTP Server
Click Next. Select an NTP server. Click Next.
Configure the WAN Interface
Select the type to DHCP
- DHCP Hostname:
pfSense-sec
Uncheck the box: Block RFC1918 Private Networks, as we want to allow private IP addresses through to the WAN interface.
Configure the LAN Interface
Skip this part
Wrapping Up
Change the admin password. Click Next > Reload > Finish.
Permanent Access via WAN IP
Disable the Firewall Again
After the initial setup, the firewall re-enables itself. We need to disable it one more time, so we can create some firewall rules in the GUI.
Go back to your pfSense system shell and run this command:
pfctl -dIf the web GUI is stalling, you probably have an asymmetric routes issue (we will cover that later). For now, go to the pfSense system shell and run these commands to restart the WAN network interface:
ifconfig vtnet0 down
ifconfig vtnet0 up
You should now be able to log into pfSense again.
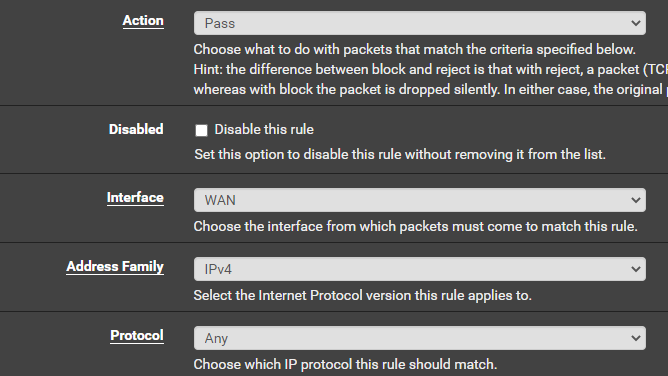
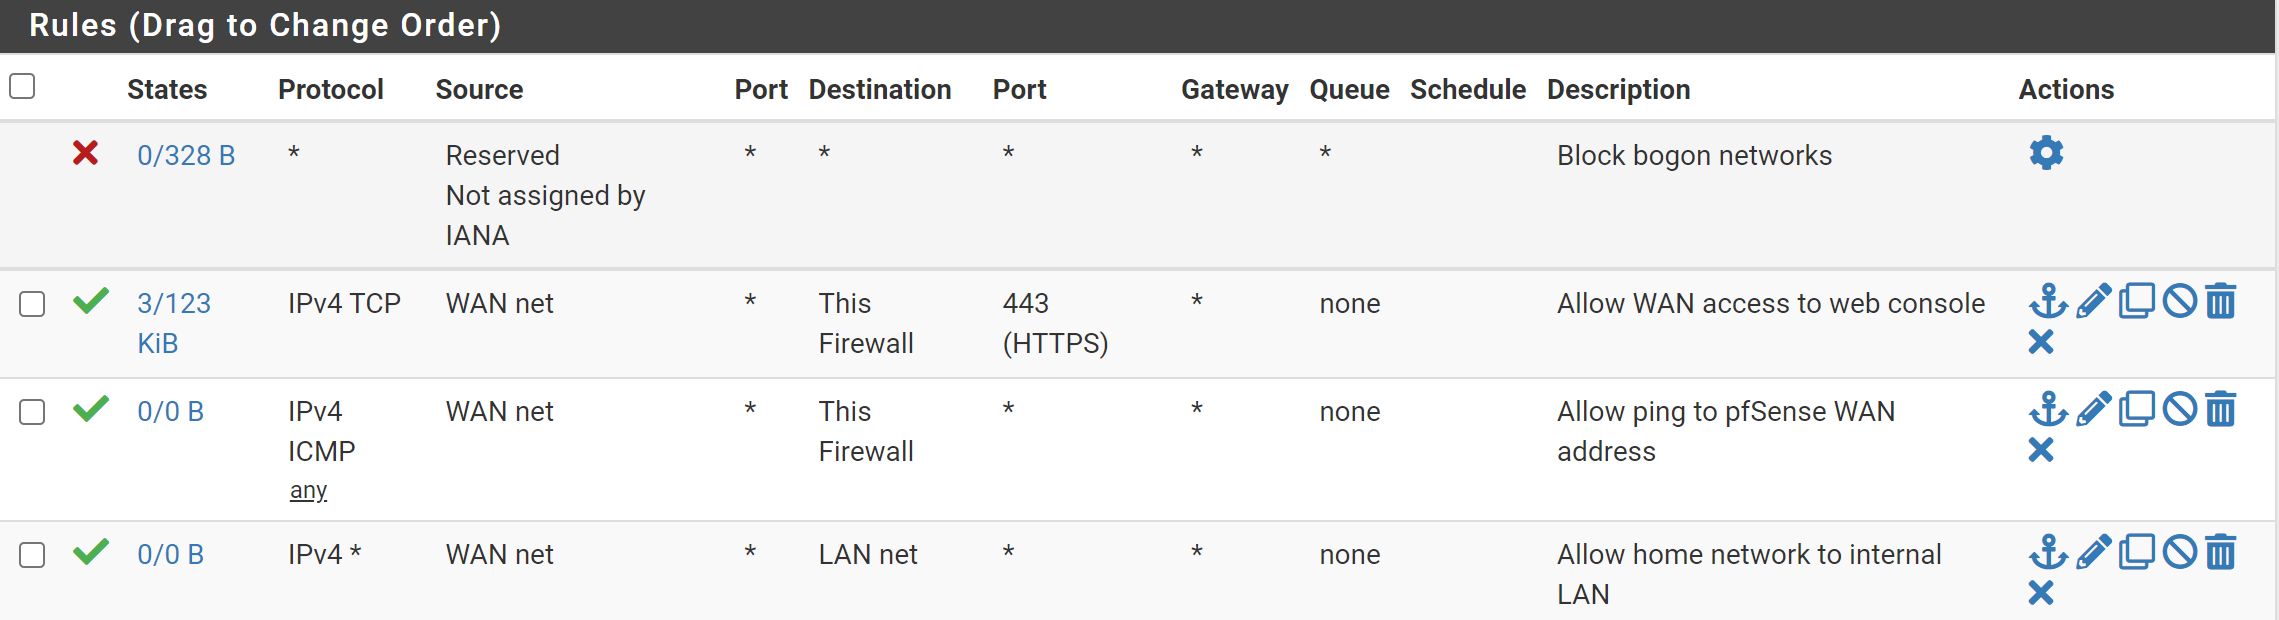
Add a WAN Rule
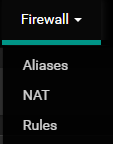
Go to Firewall > Rules > WAN
Click Add

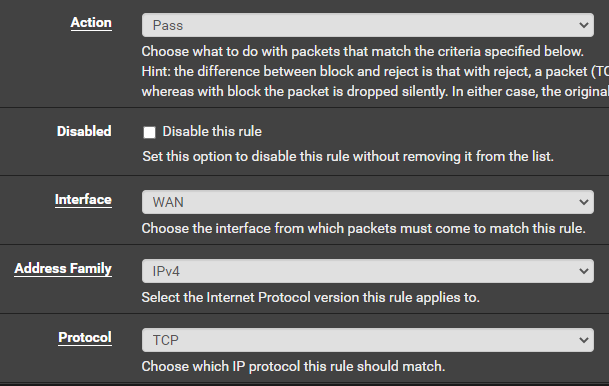


Click Save and Apply Changes
Finalize System Setup
Disable Hardware Checksum Offloading
Go to System > Advanced
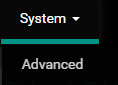
Go to the Networking tab. Check the box: Disable hardware checksum offloading. Reboot the VM when prompted.
Rename the Optional Interfaces
Go to Interface > Assignments
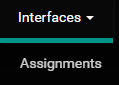
Then, click on each interface shown below and change their descriptions accordingly.
OPT1

Click Save and Apply Changes
OPT2

Click Save and Apply Changes
Set up Firewall Rules
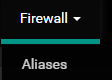
Create Firewall Aliases
Go to Firewall > Aliases
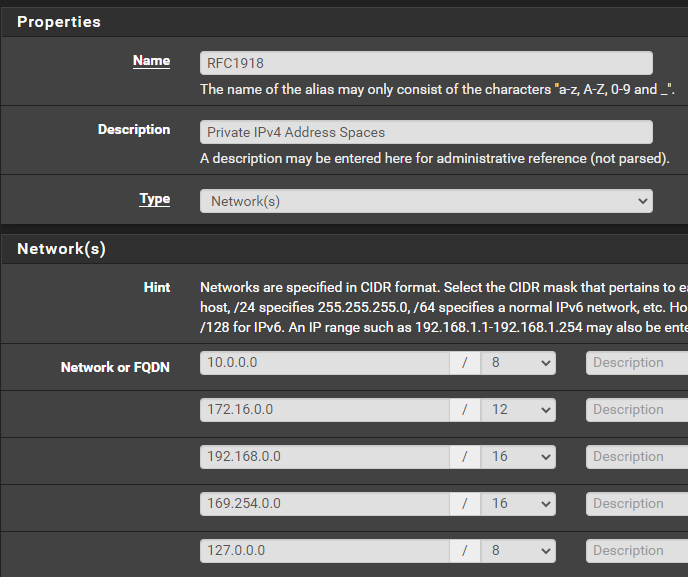
Create an Alias for RFC1918
This alias will be used in some future firewall rules to reference all private IPv4 address spaces.
Click Add
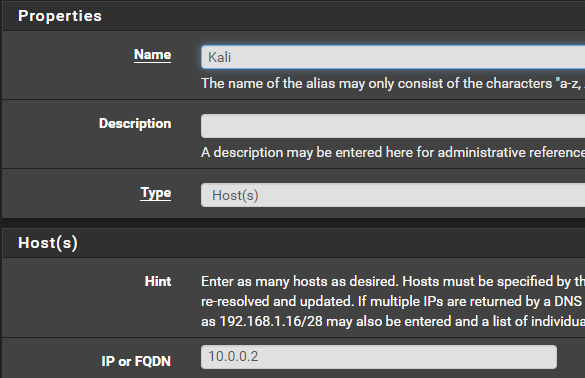
Create an Alias for Kali
Just create this for now even though we haven't create a Kali VM yet. We are going to assign a static DHCP reservation for Kali later.
Click Add
Click Save and Apply Changes
WAN Firewall Rules
Go to Firewall > Rules > WAN
Allow Home Network to Internal LAN
We want to allow our home network to reach the LAN where Kali is going to sit. That way you can ssh or open a remote desktop to your Kali VM.
Click Add

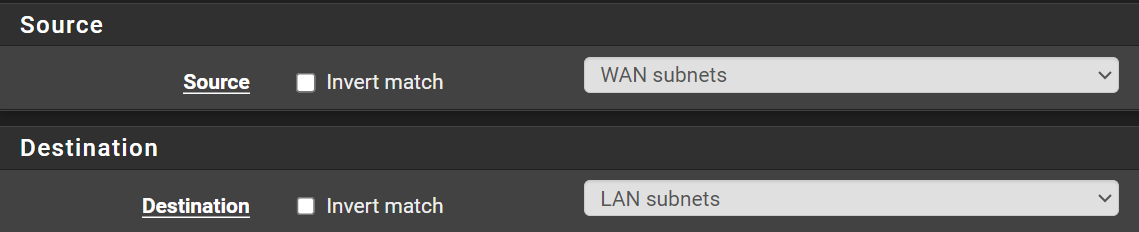

Click Save and Apply Changes
WAN Desired End State
LAN Firewall Rules
No changes necessary. Leave it as-is.
SEC_EGRESS Rules
Allow Packets to Local Gateway
Packets need to be able to reach the default gateway in order to reach the Internet. We have to do it this way, because we will be blocking RFC1918 addresses a few rules later.
Click Add

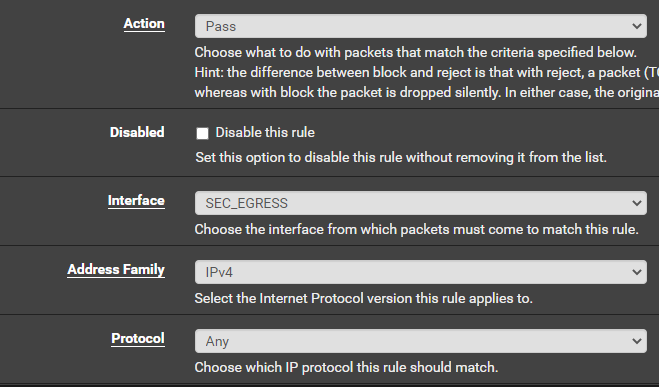
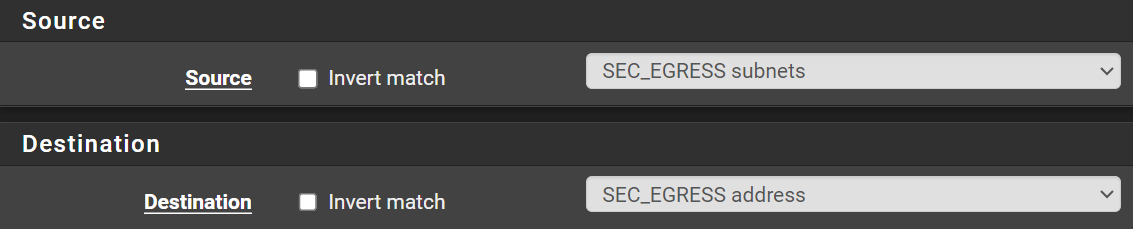

Click Save
Allow Packets to Kali VM
Click Add
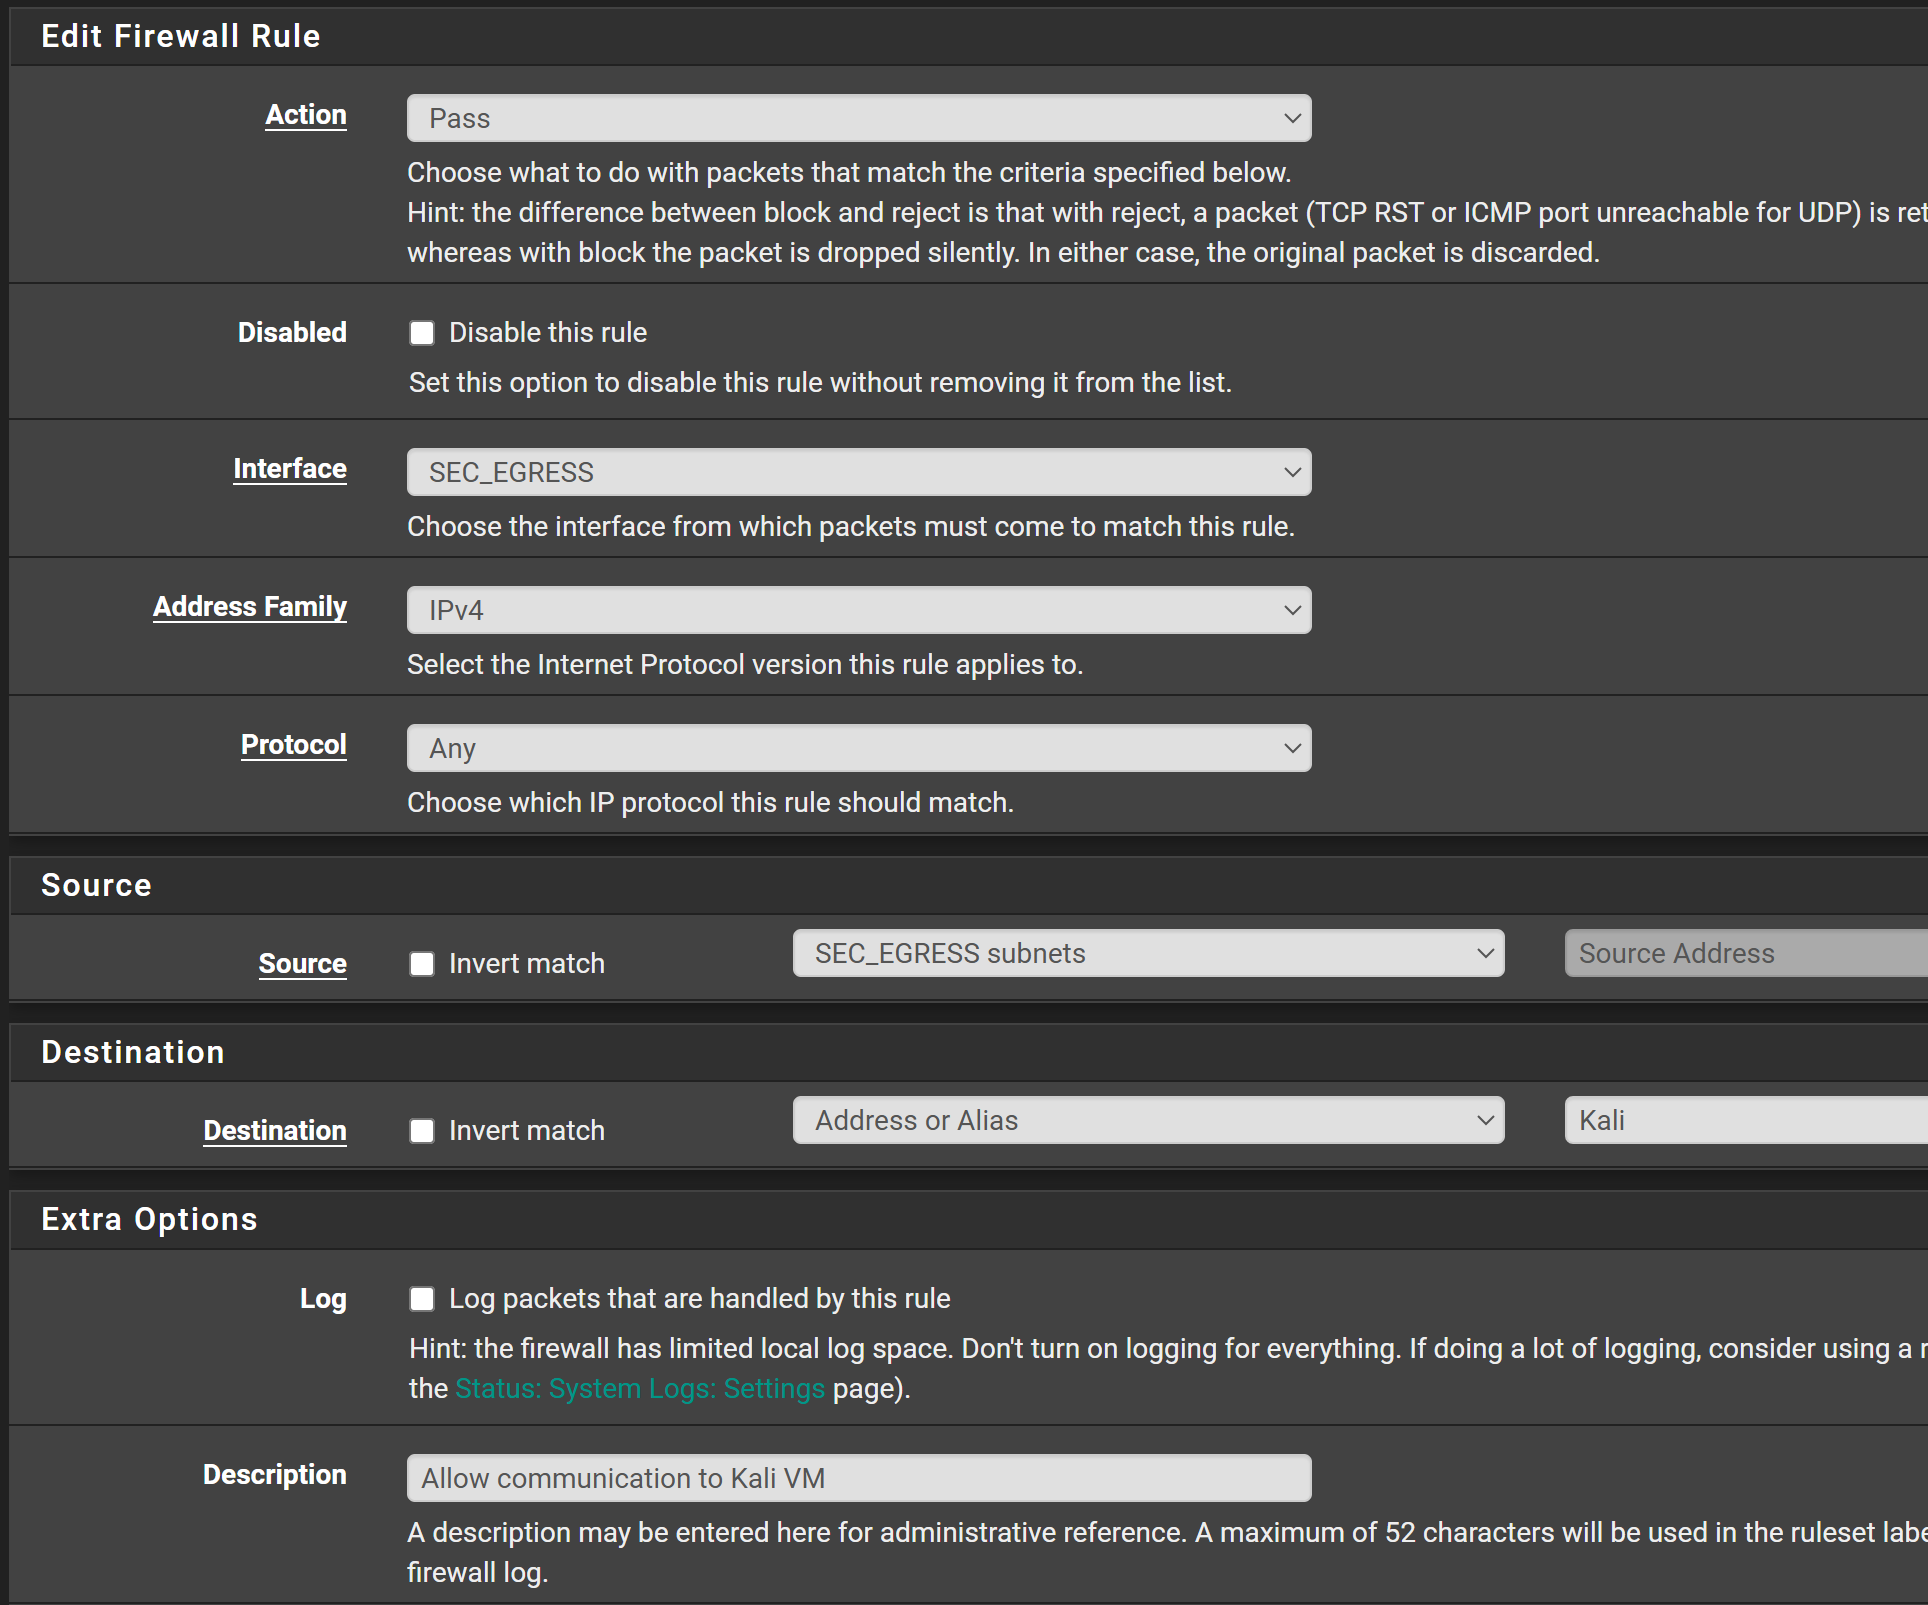
Click Save
Allow Packets to Internet (Non-Private Addresses)
Click Add
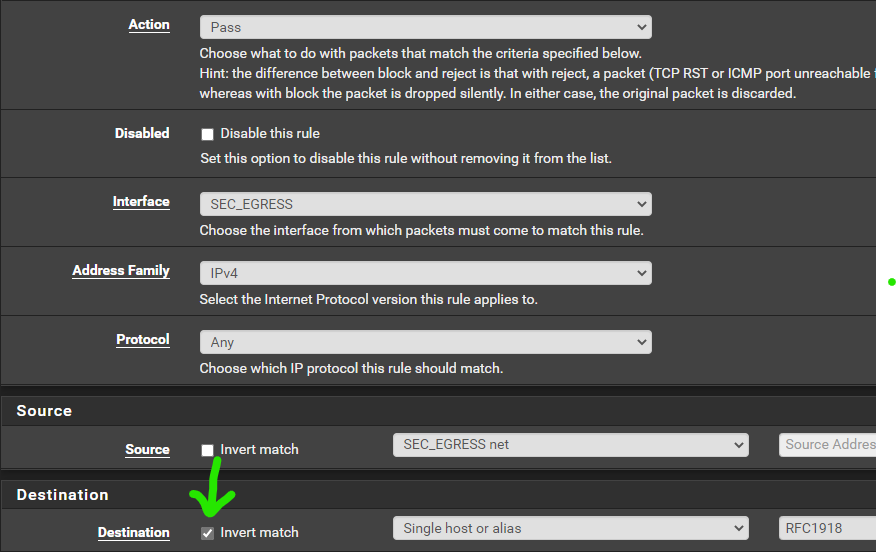

Click Save.
Block Everything Else
Click Add

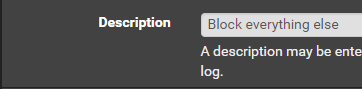
Click Save.
SEC_EGRESS Desired End State

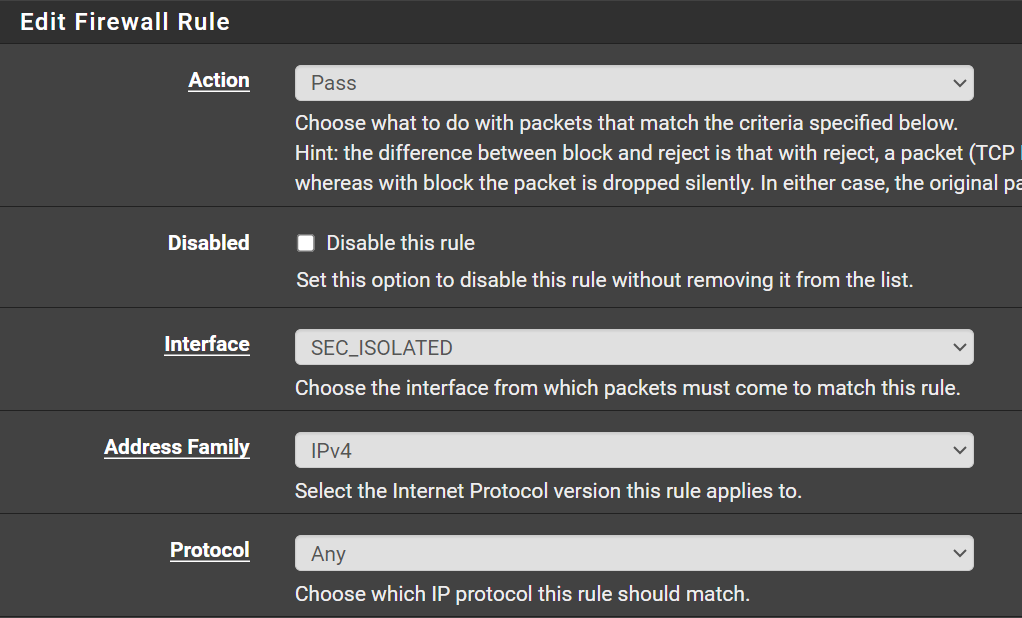
SEC_ISOLATED Rules
Allow SEC_ISOLATED DNS Lookups
Click Add


Click Save. No need to apply changes yet.
Allow SEC_ISOLATED LAN to Kali VM
Click Add
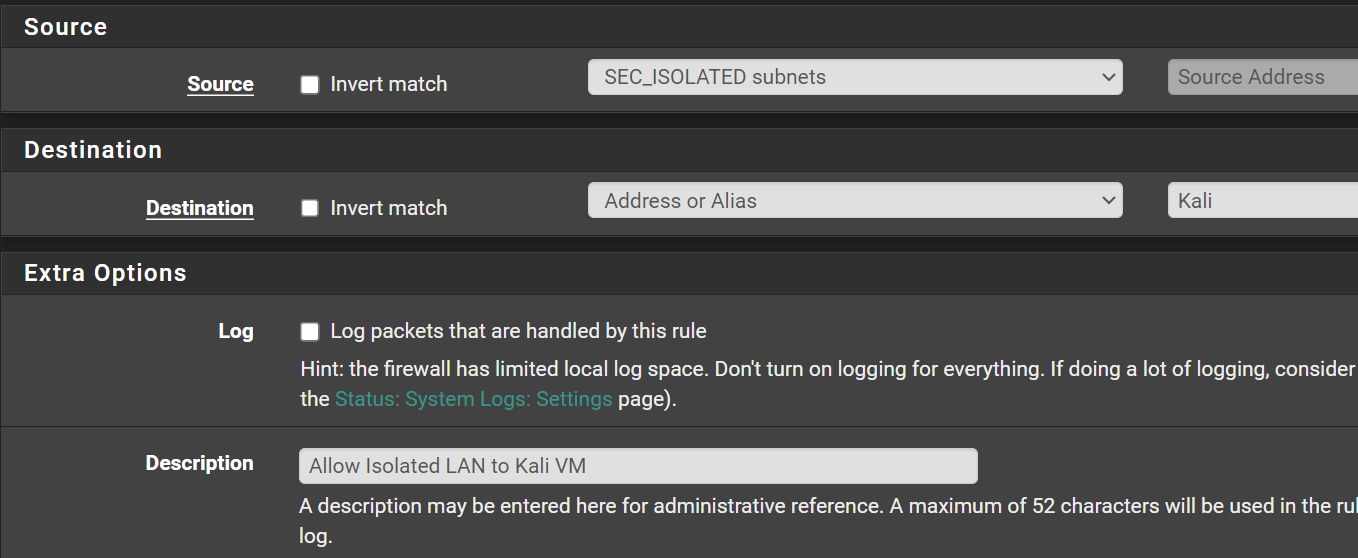
Click Save.
Block Everything Else
Click Add
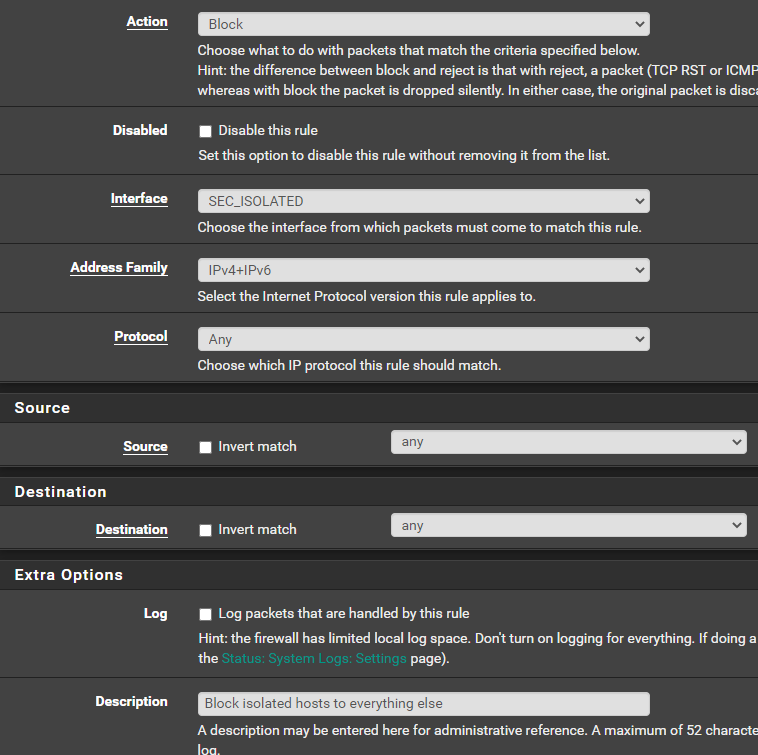
Click Save.
SEC_ISOLATED Desired End State

FLOATING Rules
Add the Port Alias


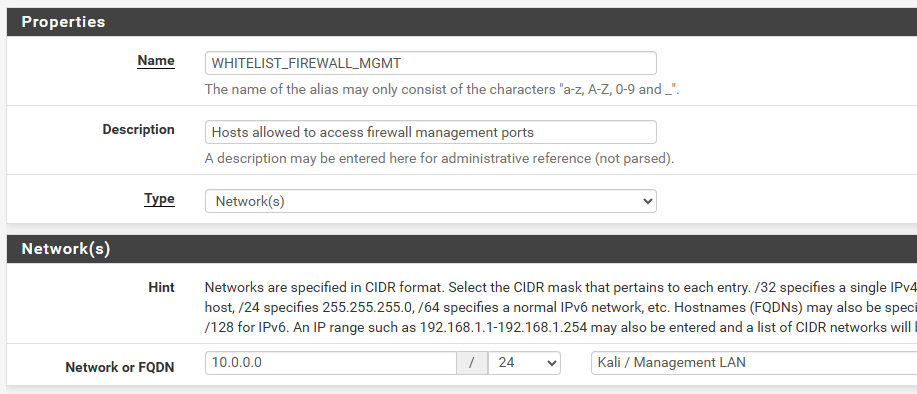
Add the Whitelist Alias

Add the Separators


Block Logins to the Firewall

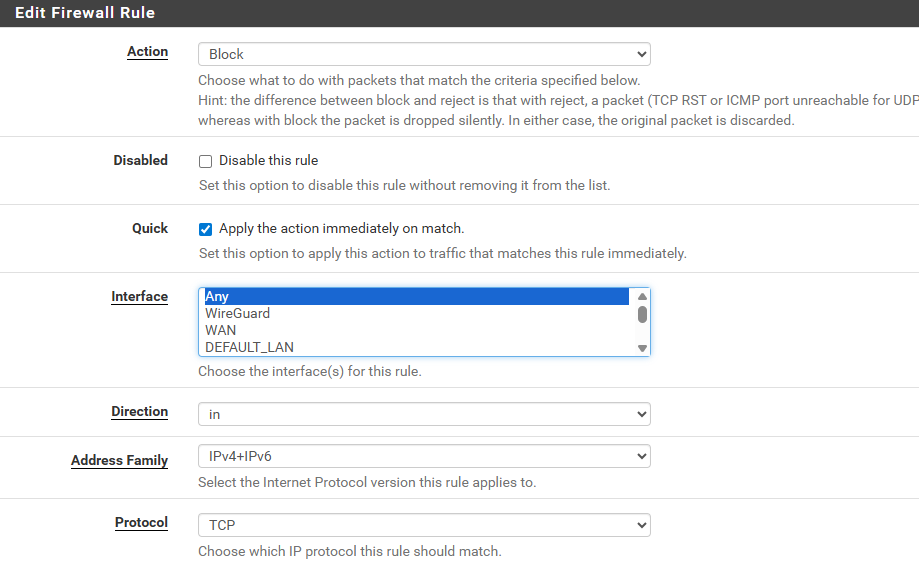
- Action: Block
- Quick: ✅
- Interface: Any
- Direction: in (packets entering the pfSense interface)
- Address Family: IPv4+IPv6
- Protocol: TCP

WHITELIST_FIREWALL_MGMT alias we created before, will be blocked by the rule.

FLOATING Rules Desired End State

Configure the DNS Resolver Service
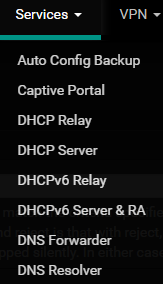
Go to Services > DNS Resolver
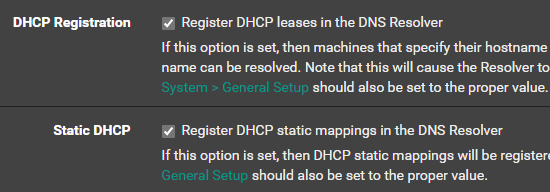
Check both of these boxes
Netgate is pushing people to the Kea DHCP daemon, as they're deprecating the ISC DHCP daemon. If you opt to move to the Kea DHCP daemon, these options will not be available.
You will need to switch back to ISC DHCP, make your desired selections, then switch back to Kea DHCP.
https://redmine.pfsense.org/issues/14972#:~:text=Seems%20like%20it%20is%20already,Reactivate%20KEA
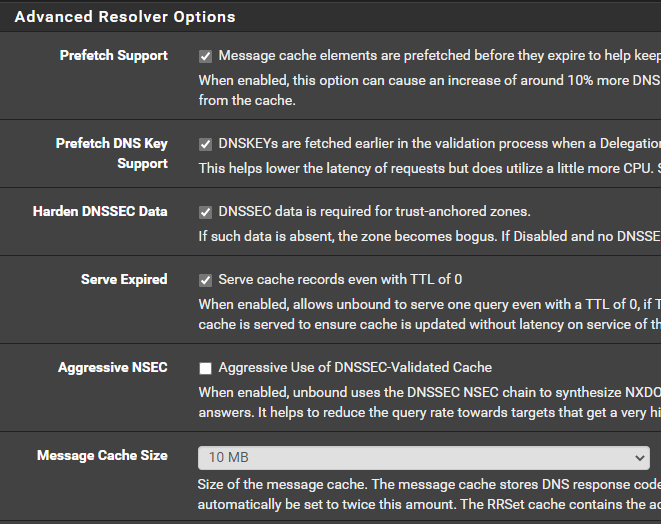
Go to Advanced Settings
Verify your settings match:
Adding Additional VLANs to the Cyber Range
As you grow your lab, you may find yourself wanting to add additional VLANs to your cyber range network. Fortunately, with pfSense and Open vSwitch, the process couldn’t be easier.
On the project home page, we already did the following:
- Created a SDN VLAN Zone
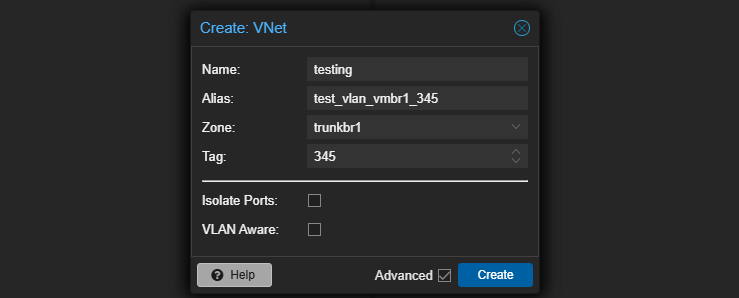
- Created a VNet and attached it to the VLAN Zone and set the VLAN tag
- Applied the SDN changes
Trunk the New VLAN to VMBR1
All we have to do on the Proxmox side, is add another VNet and apply the changes.
- Go to Datacenter
- SDN
- VNets
- SDN


Add the VLAN to pfSense
Log into pfSense and go to Interfaces > Assignments.
Click on VLANs

Click Add. Fill out the fields like this:
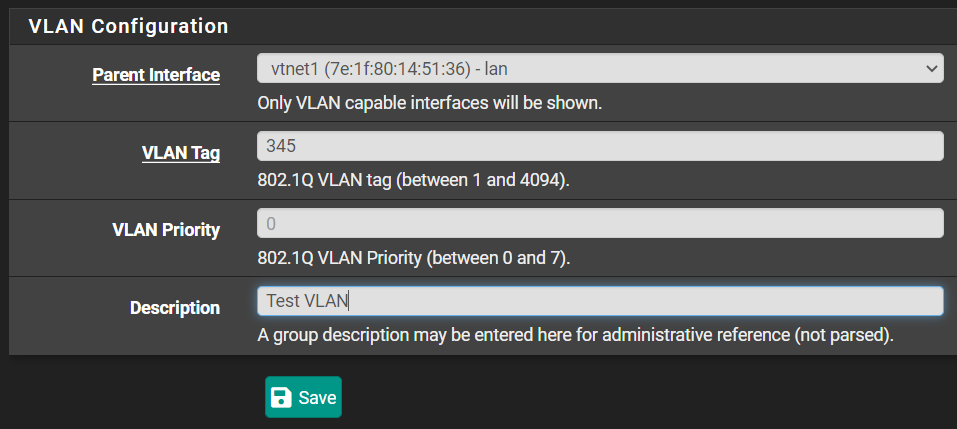
vtnet1 is the LAN interface. We are saying that 345 is a sub-interface of this interface. vtnet1 is the parent. Click Save.
Go to Interface Assignments

Click Add next to the newly added sub-interface.

Click Save. You should now see an OPT# interface. Click on the OPT# interface name.
Configure the Interface
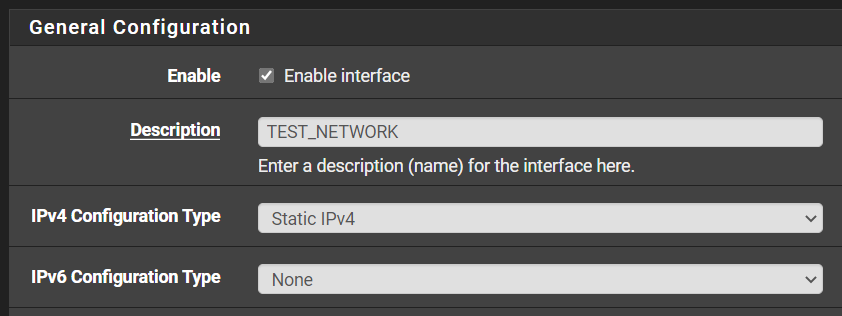
You can use whatever private IP address range you want. This is just an example. You need to specify the IPv4 address of the gateway – not the network. That’s why I entered 192.168.10.1/24 and not 192.168.10.0/24.

Scroll to the bottom. Check the box Block bogon networks. Click Save and Apply Changes.
Configure the DHCP Server
Go to Services > DHCP Server > TEST_NETWORK
Enable the DHCP server on this interface. Set the range to whatever you wish. I will be entering: 192.168.10.11 -- 192.168.10.244.
Click Save and Apply Changes.
Add Some Firewall Rules
In pfSense, go to Firewall > Rules > TEST_NETWORK
There are not going to be any rules by default (except if you’re blocking bogon nets).
It's up to you how you want to configure your firewall rules and routes.
- Do you want this VLAN to have Internet access?
- Which other LANs should it be allowed to talk to?
- Do you want to route to it from your WAN?
Recommended: Configuring Static Routes
Why Add Static Routes?
If you look at the network diagram for the lab, you'll note a couple of things:
- The network on home router has a subnet of
172.16.1.0/24 - And the laptop acting as a SSH / RDP client is addressed at
172.16.1.110/24
If
172.16.1.110 is trying to reach 10.0.0.2 — which is behind the pfSense VM, how is it going to get there?- Being on the
172.16.1.0/24network, it has no means of reaching10.0.0.2as a neighbor - Hosts on the
172.16.1.0/24network can't just magically become aware of how to get the traffic to the10.0.0.0/24network
Where to Add Static Routes
Global Static Routes (Router)
If you configure the static route in the router, this route becomes available to any host that uses the router as a gateway.
- In this situation, if
172.16.1.110tries to send a packet to10.0.0.2, the destination IP is in a foreign subnet, so172.16.1.110sends the packet to the default gateway on the router —172.16.1.1— for assistance moving the packet- Once home router receives the packet, then what?
- Does home router have any knowledge of the
10.0.0.0/24network? No, not yet at least. - That's why we need to log into home router and add the static route(s) to tell it how to get to that network
- Does home router have any knowledge of the
- Once home router receives the packet, then what?
10.0.0.2 network?- That would be the pfSense VM WAN IP
- The WAN Interface on pfSense is plugged into
vmbr0as is home router
- The WAN Interface on pfSense is plugged into
- Home router receives the packet from
172.16.1.110addressed to10.0.0.2and sends the packet to pfSense WAN IP in accordance with the static route - Home router and pfSense VM manage the conversation between them
Local Static Routes (Host)
If you configure the static route locally at the host — for example, a laptop like 172.16.1.110 — then only the host knows about the route.
- In this situation,
172.16.1.110is connected to the wireless and is on the same subnet as pfSense WAN IP - We alter the routing table on
172.16.1.110and add a static route locally to say if a packet is destined for10.0.0.0/24then we send it pfSense WAN IP - Again,
172.16.1.110is the only one that knows this now, since we've only added the route locally - If we send a packet to
10.0.0.2, then172.16.1.110sends the packet directly to pfSense WAN IP itself without the assistance of the router, since it knows where to send it
How to Add Static Routes
Router (Global)
Log into your router with the administrative credentials and navigate to the interface for configuring static routes
Example 1:
- Destination:
10.0.0.0/24 - Gateway:
[pfSense WAN IP address] - Description:
Route to pfSense internal LAN
Example 2:
- Destination:
10.80.80.0 - Subnet Mask:
255.255.255.0(same as/24) - Gateway:
[pfSense WAN IP address] - Description:
Route to pfSense internal AD subnet
Laptop (Local)
Example 1

powershell and open it as administrator-PolicyStore PersistentStore to the cmdlet below. Get-NetIPConfiguration
172.16.1.0/24 configuration on my laptop$destinationNet = '10.0.0.0/24'
$pfsenseWanIP = '172.16.1.3'
$interfaceIndex = 28
New-NetRoute -DestinationPrefix $destinationNet -NextHop $pfsenseWanIP -InterfaceIndex $interfaceIndex -RouteMetric 2NextHopis the term indicating the next router that will receive the packet for routingInterfaceIndexis28in accordance with the IP configuration screenshot above, since that's the interface that will be transmitting the packet to10.0.0.2RouteMetricis2as a smaller number here indicates a higher importance- If desired, add
-PolicyStore PersistentStoreto make the route persist reboots (as mentioned above).
Configure pfSense VM
However, you will need to create some firewall rules to allow the traffic from your home network into the pfSense internal LANs.
WAN Firewall Rules
Allow WAN subnet to LAN


Resolving Packet Loss
If your home router is a stateful firewall — it probably is — you should strongly heed the advice linked in the article just below.
- Click System > Advanced
- Click the Firewall/NAT tab
- Check Bypass firewall rules for traffic on the same interface
- Click Save

Next Step

