All of the VMs featured in this project leverage x86-64 CPU instruction set and Apple silicon is ARM based. You may experience poor performance due to the overhead of VMware Fusion emulating a x86-64 CPU and converting the CPU instructions to and from ARM.
Change Log
View Change Log
Mar 16, 2026
- Added some documentation for network performance enhancements on the pfSense VM that was brought to my attention by a generous reader, Steve Legere.
- Go check out Steve's blog here: https://itsec.blog/
- And, connect with him on Discord if you're on there:
.melvrik.
- These changes modify the VM's
.vmxfile to change thee1000adapter tovmxnet3, which brings it in alignment with thevirtio-netdrivers used on the VirtualBox project counterpart
Feb 9, 2026
- Refactored the FLOATING rule when configuring pfSense
- Adheres to best practcve with an implicit deny, whereby approved networks and/or IPs must be explicitly whitelisted to access firewall management ports
Sep. 16, 2025
- Update the Hack Your VMware AD Lab Step step with corrected Remote Desktop GPO configuration
- Thanks, Eggzy (@hcb420) in the HackTheBox Discord server for all the effort in tracking down the lapse in documentation
July 3, 2025
- Project first published
What We'll Build
Click here to view this diagram in a new tab
Reviewing the Network Diagram
Lab Overview (Show / Hide)
-
A pfSense VM acts as a NAT firewall for the entire lab
- Segmenting the lab from the hosts's network
- More granular control than VMware's NAT mode
- pfSense firewall rules control traffic between subnets
-
A Kali VM sits in the default LAN
- Kali is used as the pentest VM
- Kali is used as the pentest VM
-
The ISOLATED network will house our vulnerable VMs
- Firewall rules here prevent Internet access
- You will import Vulnhub and HackMyVM boxes
- Only allowed to communicte with Kali
-
The AD_LAB network is for the Active Directory lab
- You will stand up a basic AD forest
- You will also configure it to make it vulnerable
-
The SEC_EGRESS network is added later
- Shows you how to configure additional networks in VMware and pfSense
- This network can be used for vulnerable hosts that...
- May access the Internet
- May NOT access any other private IP addresses
-
The final module adds a SIEM to the lab
- You'll configure packet capture on all of your networks
- Captured packets will pass through a Suricata NIDS
- And, all logs will be sent to a Wazuh SIEM for analysis
Usage Scenarios
Desktop
You have a desktop – either your daily-use computer or backup computer – you do not want to reimage it, but would like to run some labs on your computer.
Laptop
Your daily-use computer. You want to run some labs on it and would like a mobile security lab.
Recommended System Specifications
- Multithreaded CPU with Virtualization Support
- At least 16GB RAM – 32GB would be better
- Plenty of free disk space, preferably more than one internal disk
Enabling Virtualization in the BIOS
- Turn on the laptop
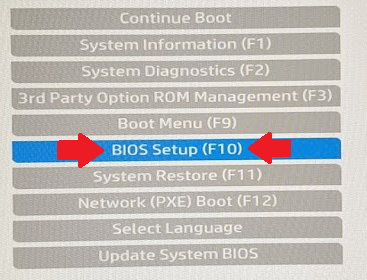
- Press the
ESCkey multiple times until you get to the system setup menu.
Warning: you might need to press a different key on your system to get to the BIOS menu. From my HP laptop, ESC is the key to get to the BIOS.
- Choose BIOS Setup
- Go to Advanced > System Options
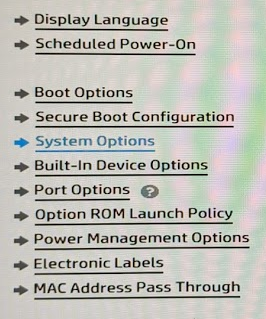
- Enable VTx and VTd (For AMD processors, there is a different name)

- Save changes and exit the BIOS setup
Install VMware Workstation Pro
Please follow along with the help articles below and install VMware Workstation Pro on your PC. Once installed, proceed to the next step.


Next Steps
Building a pfSense VM for Our Cyber Range
Importing Kali from Offensive Security Images

Configuring the pfSense Firewall
Adding Vulnhub VMs to the Lab
Adding HackMyVM Boxes to the Lab
Building the Active Directory Lab
Hack Your Active Directory Lab
Set up a Pivoting Lab

Adding Another Interface to pfSense
Adding a Comprehensive Wazuh SIEM and Network Intrusion Detection System (NIDS) to the Lab
Appendices
Appendix A: Double NAT Diagram
Learn more about NAT here: https://www.youtube.com/watch?v=wg8Hosr20yw