Change Log
View Change Log
Feb 18, 2026
- Completely reworked the SIEM and NIDS step to bring it to parity with the VMware Workstation lab.
- No longer uses the Wazuh Virtual Machine, which is based on Amazon Linux 2
- Using the Wazuh VM does not have a current version of Suricata in any package repositories for this OS release, and don't want to build from sources
- Now, follows the VMware Workstation guide in using an Ubuntu Cloud Image with a cloud-init ISO to configure first boot
- Up-to-date version of Suricata is available in package repository
- ⚠️Note⚠️ that if you followed the previous version of this module, you'll need to destory and rebuild the Wazuh and NIDS stack from the ground up
Feb 9, 2026
- Refactored the FLOATING rule when configuring pfSense
- Adheres to best practcve with an implicit deny, whereby approved networks and/or IPs must be explicitly whitelisted to access firewall management ports
Sep. 16, 2025
- Update the Hack Your VirtualBox AD Lab Step step with corrected Remote Desktop GPO configuration
- Thanks, Eggzy (@hcb420) in the HackTheBox Discord server for all the effort in tracking down the lapse in documentation
Aug. 4, 2025
- Updated the pfSense Installation step to bring it to parity with its VMware counterpart.
- Primarily due to the fact that the file server previously used in "the Google Way" step doesn't appear to be serving the latest version of pfSense CE any longer.
- It's also a better idea to update the guide to use the installation media officially supported by Netgate anyhow.
Feb. 25, 2025
- It's been long overdue, but I've finally added a SIEM / NIDS component to the VirtualBox lab.
- Now, you have the option to practice some defensive and detection techniques alongside your pen testing lab.
Jan. 6, 2025
- Updated the pfSense installation step in order to document two distinct ways of installing pfSense to the VM -- the online or offline installer. Also, updated the offline installer download link.
- Some cosmetic changes (screenshots, formatting)
Aug. 9, 2024
- Added a new step to the lab demonstrating how to import HackMyVM boxes to your VirtualBox cyber ranges
- This was added largely due to the fact that Vulnhub hasn't added a new challenge in over two years
June 25, 2024
- Updated the Building a pfSense VM step with updates to the pfSense CE ISO download procedure to include more privacy-friendly ways to obtain the ISO file
- Also added steps on extracting the ISO from the archive file
May 20, 2024
- Added some firewall rule changes as a floating rule. This enhances the security of the lab by ensuring that subnets that need to access the gateway can do so whilst also being denied access to firewall login ports.
Mar. 19, 2024
- Corrected the interface configuration on Metasploitable 2
- Prefer default route out AD lab interface for Internet access
- Added a route to Kali's subnet through the correct interface
Mar. 14, 2024
- Added a completely new module
- External Pentest Practice in Your VirtualBox AD Lab
Mar. 13, 2024
- Update several screenshots in the AD lab section to bring it up-to-date with the latest user experience
- Update the AD lab firewall rules to correct a logic flaw
- The original ruleset will block traffic to the default gateway of the lab
- Update adds a rule to the top of the ruleset that allows traffic to the default gateway, which will also correct issues with the DNS resolver
January 25, 2024
Updated the Configuring the pfSense Firewall for Our VirtualBox Lab step with new firewall rule creation screenshots and configurations
- Should remove any confusion where rules used to reference INTERFACE net and now reference INTERFACE subnets
- Moved the steps to create firewall aliases from the Adding Another Interface to pfSense in VirtualBox to the aforementioned step above, as creating the aliases earlier will help readers create better rules
- Also, updated firewall rules for the AD_LAB subnet, so that they reference the aforementioned aliases, they are a bit more restrictive, and they scale better for labs that add more subnets
December 30, 2023
- Massive upgrade to the Active Directory Lab Step!
- Added a completely new step to help you set up a vulnerable AD lab using this project on GitHub, and also demonstrate some example attacks that are possible
- Added additional steps to help you understand how to roll back your AD lab to clean slate
September 1, 2023
Updated the Building a pfSense VM for Our VirtualBox Cyber Range step, Importing Kali Using the Official VirtualBox Image step, and Adding Vulnhub VMs to Our VirtualBox Cyber Range step
- Lots of screenshot updates!
- Brings the guide up to the VirtualBox 7.x experience, so less guesswork for readers when building their VMs
June 23, 2023
- Updated the Adding an Active Directory Forest to Our VirtualBox Lab step
What We'll Build
Click here to view this diagram in a new tab
Reviewing the Network Diagram
Lab Overview (Show / Hide)
-
A pfSense VM acts as a NAT firewall for the entire lab
- Segmenting the lab from the hosts's network
- More granular control than VirtualBox's NAT mode
- pfSense firewall rules control traffic between subnets
-
A Kali VM sits in the default LAN
- Kali is used as the pentest VM
- Kali is used as the pentest VM
-
The ISOLATED network will house our vulnerable VMs
- Firewall rules here prevent Internet access
- You will import Vulnhub and HackMyVM boxes
- Only allowed to communicte with Kali
-
The AD_LAB network is for the Active Directory lab
- You will stand up a basic AD forest
- You will also configure it to make it vulnerable
-
The SEC_EGRESS network is added later
- Shows you how to configure additional networks in VirtualBox and pfSense
- This network can be used for vulnerable hosts that...
- May access the Internet
- May NOT access any other private IP addresses
-
The final module adds a SIEM to the lab
- You'll configure packet capture on all of your networks
- Captured packets will pass through a Suricata NIDS
- And, all logs will be sent to a Wazuh SIEM for analysis
Usage Scenarios
Desktop
You have a desktop – either your daily-use computer or backup computer – you do not want to reimage it, but would like to run some labs on your computer.
Laptop
Your daily-use computer. You want to run some labs on it and would like a mobile security lab.
Recommended System Specifications
- Multithreaded CPU with Virtualization Support
- At least 16GB RAM – 32GB would be better
- Plenty of free disk space, preferably more than one internal disk
Enabling Virtualization in the BIOS
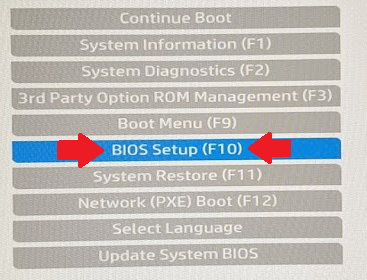
- Turn on the laptop
- Press the
ESCkey multiple times until you get to the system setup menu.
Warning: you might need to press a different key on your system to get to the BIOS menu. From my HP laptop, ESC is the key to get to the BIOS.
- Choose BIOS Setup
- Go to Advanced > System Options
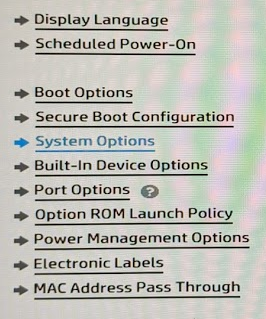
- Enable VTx and VTd (For AMD processors, there is a different name)

- Save changes and exit the BIOS setup
Install VirtualBox
To download the VirtualBox installer for your host OS, navigate to their downloads page here:

You'll see a list of downloads based on host operating system. At the time of writing this guide, the latest version was 6.1.32.

- If downloading for Windows, click
Windows hosts - If downloading for Mac OS, click
OS X hosts - If downloading for Linux, click
Linux distributionsand follow the instructions. You can downloading using an.rpmor.debpackage, or you can install using your package manager such asyumorapt.
Install the VirtualBox Extension Pack
Once you've installed VirtualBox, I'd highly recommend you add the extension pack for better VM support.
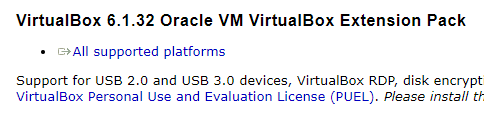
You can download the extension pack file. Once you open the file, VirtualBox should be the default file handler and install the extension pack. You must reinstall the extension pack any time you update VirtualBox!
A Note on VirtualBox Guest Additions
What are the VirtualBox Guest Additions? As you continue to experiment with VirtualBox, you may hear this name come up. Put simply, the Guest Additions are drivers (or software) you can install inside the VM, to enable it to run more smoothly with VirtualBox.
For example, sometimes you may have VM that has a poor screen resolution, the screen doesn't resize, or some other strange issues. You may need to install the VirtualBox Guest Additions drivers to help the VM run more smoothly.
Next Steps
Building a pfSense VM for Our Cyber Range
 0xBEN
0xBENImporting Kali from Offensive Security Images
0xBEN
Configuring the pfSense Firewall
0xBENAdding Vulnhub VMs to the Lab
0xBENAdding HackMyVM Boxes to the Lab
0xBENBuilding the Active Directory Lab
0xBENHack Your Active Directory Lab
0xBENSet up a Pivoting Lab
0xBEN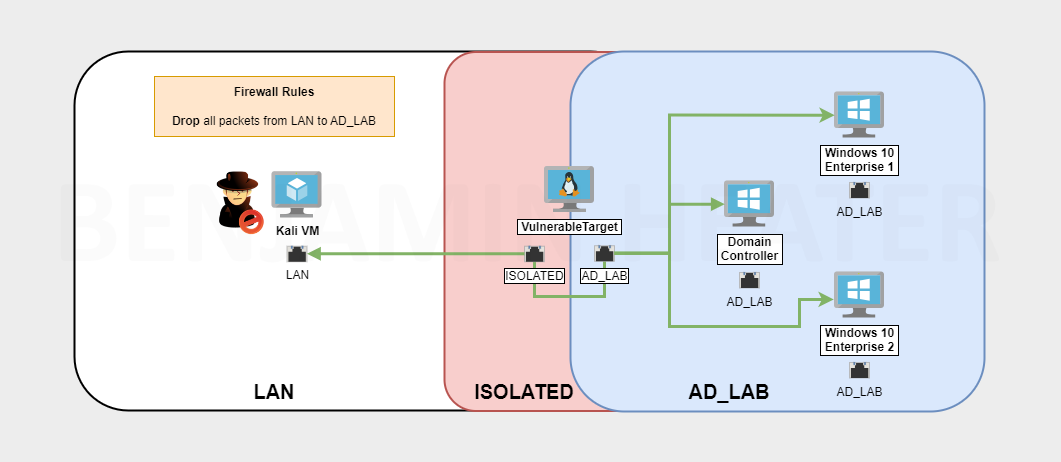
Troubleshooting Your Lab
0xBENCreating a Windows 7 Buffer Overflow Practice VM
0xBEN
Adding Another Interface to pfSense
0xBENAdding a Comprehensive Wazuh SIEM and Network Intrusion Detection System (NIDS) to the Lab
Appendices
Appendix A: Double NAT Diagram
Learn more about NAT here: https://www.youtube.com/watch?v=wg8Hosr20yw
Other Projects