
ℹ️
This page is part of a larger series on building a cybersecurity lab using VirtualBox. Click here to be taken back to the project home page.
Previous Step
External Pentest Practice in Your VirtualBox AD Lab
In this module of the VirtualBox cybersecurity home lab project, we are going to look at the process of setting up a dual-homed target to serve as a pivot point into an Active Directory network.
 0xBEN
0xBEN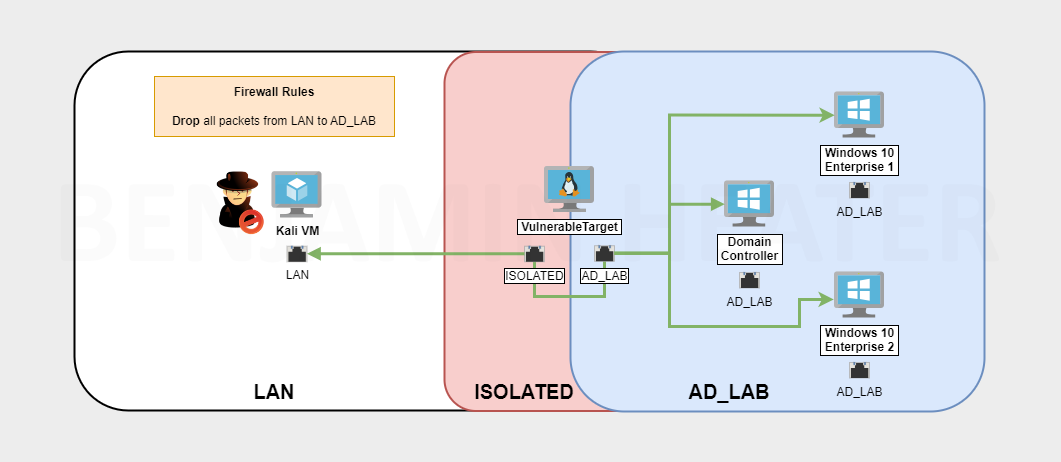
pfSense is stuck at configuring WAN interface
- Make sure you’re bridged to the Internet-connected interface
My Internet-facing VMs can’t get out to the Internet
- Make sure pfSense is running (should always be the first to boot)
- Make sure pfSense is bridged to the Internet-connected interface
- Is your VM on the right LAN?
- Check your firewall rules in pfSense
My VM’s screen is tiny
- Go to View > Virtual Screen > Turn up the scaling
- Or, try changing the view to Scaled Mode (won’t work for all VMs)
When I try to ping Kali’s DNS name I get its old IP address
- In pfSense, go to Services > DNS Resolver and restart the service
I am having trouble running some attacks in the AD lab
- Make sure your Kali VM is on the same subnet
- Stop the VM
- Go to VirtualBox settings for Kali VM
- Change the network adapter to be on the AD_LAB LAN
- Start Kali again
- Make sure you have Windows Firewall completely disabled on the Windows 10 clients
- Check the Tamper Protection setting
- Ensure SMB is enabled on all parties
- Google around on how the attacks work
- Ask your peers
Next Step
Creating a Windows 7 Buffer Overflow Practice VM in VirtualBox
In this module, we will look at creating a vulnerable Windows 7 VM in VirtualBox that will run some applications which are vulnerable to 32-bit stack-based buffer overflows
0xBEN