
Previous Step
Why GitLab?
If the whole premise of Infrastructure-as-Code is to define our IT infrastructure — and its corresponding baselines, configurations, policies, and more — as code, then it stands to reason that we'll want a Git server to commit said code and track changes to it over time.
Also, self-hosting our own Git server has the added benefit of complete data ownership and privacy.
GitOps Diagram
Click here to view this diagram in a new tab
GitLab CE
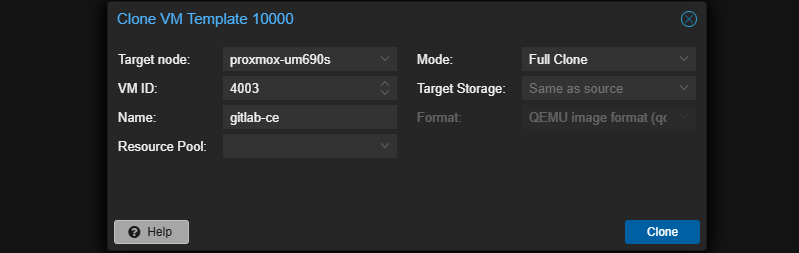
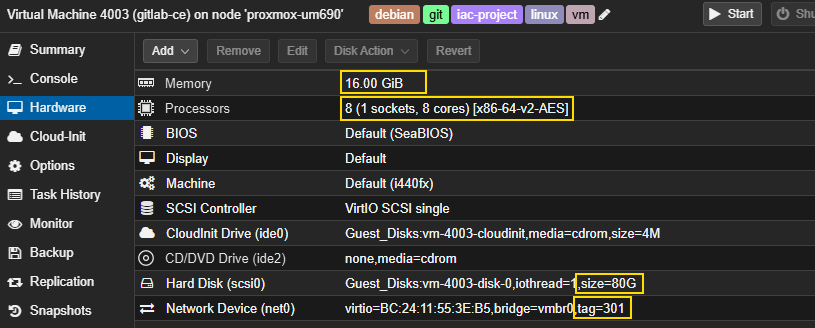
Create the VM
Reading through the guidance here, the specs I'll start with are:
- Latest Debian release
- 80 GB disk
- 8 vCPU
- 16 GB RAM
As mentioned in the documentation, you can configure GitLab to run in resource-restricted environments.


You may now power on the VM and complete the Debian installation process. I'll only be showing a couple of screenshots from setup below.
Install GitLab Community Edition
curl --location "https://packages.gitlab.com/install/repositories/gitlab/gitlab-ce/script.deb.sh" | sudo bashsudo apt install gitlab-ceGenerate ACME Certificate
sudo apt install -y certbot python3-certbot-nginx nginxsudo certbot certonly \
--nginx \
--server https://sub-ca.pki.home.internal/acme/acme@lab.home.internal/directory \
--domain gitlab-ce.lab.home.internal \
--email admin@lab.home.internal \
--agree-tos \
--non-interactiveWe'll be disabling TCP port 80 on GitLab, so that it doesn't interfere with Nginx

Configure TLS on GitLab
sudo nano /etc/gitlab/gitlab.rbexternal_url 'https://gitlab-ce.lab.home.internal'
# ...
# ...
registry_external_url 'https://gitlab-ce.lab.home.internal:5050'
gitlab_rails['registry_enabled'] = true
registry['enable'] = true
# ...
# ...
nginx['redirect_http_to_https'] = false
# ...
# ...
nginx['ssl_certificate'] = "/etc/letsencrypt/live/gitlab-ce.lab.home.internal/fullchain.pem"
nginx['ssl_certificate_key'] = "/etc/letsencrypt/live/gitlab-ce.lab.home.internal/privkey.pem"
# ...
# ...
registry_nginx['ssl_certificate'] = "/etc/letsencrypt/live/gitlab-ce.lab.home.internal/fullchain.pem"
registry_nginx['ssl_certificate_key'] = "/etc/letsencrypt/live/gitlab-ce.lab.home.internal/privkey.pem"Disable HTTP->HTTPS redirect to disable port 80, which conflicts with certbot
sudo gitlab-ctl reconfigureInitial Sign-In
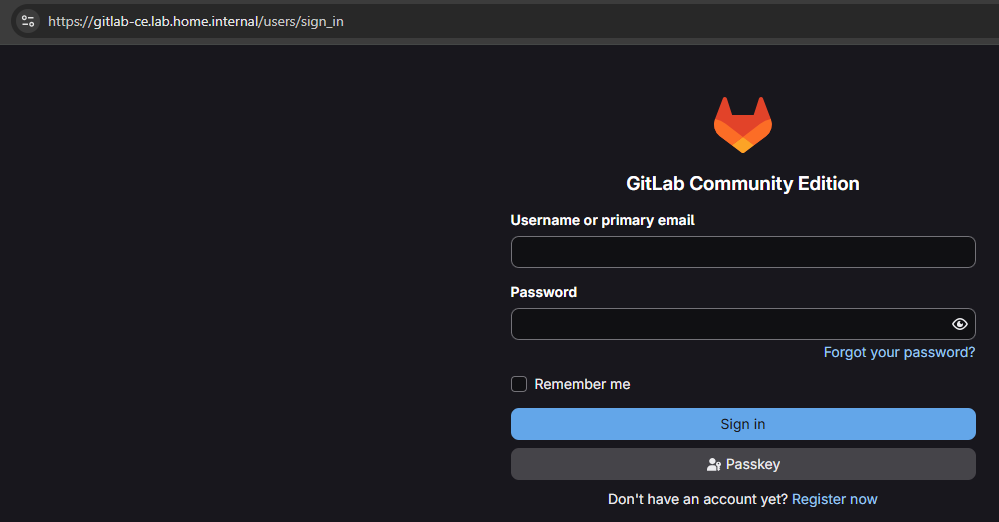
root and the password found in /etc/gitlab/initial_root_password. If the password here doesn't work, reset it following the documentation here.
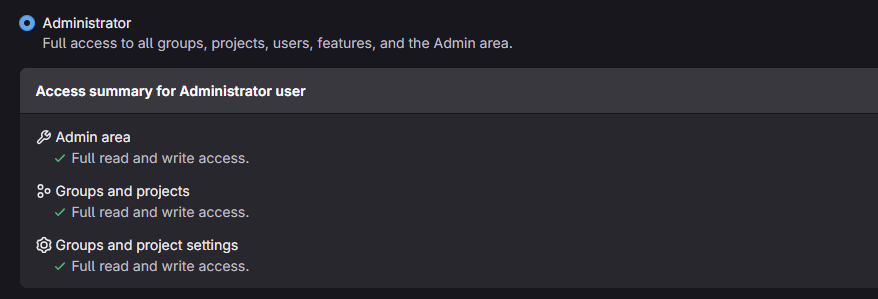
Add User Account
Log into GitLab CE as the root user. Go to Admin area > Overview > Users > Click New user.
sudo gitlab-rails consoleuser = User.find_by(email: 'username@domain.tld')new_password = ::User.random_password
new_password # Print the password
user.password = new_password
user.password_confirmation = new_password
user.password_automatically_set = false
user.save!Security and Hardening
Now that you've successfully installed GitLab CE, you should take some time to securely configure and harden your installation. For that task, I'll refer you to the GitLab documentation.
Infisical OIDC Trust

Official documentation
Blog with a more detailed overview
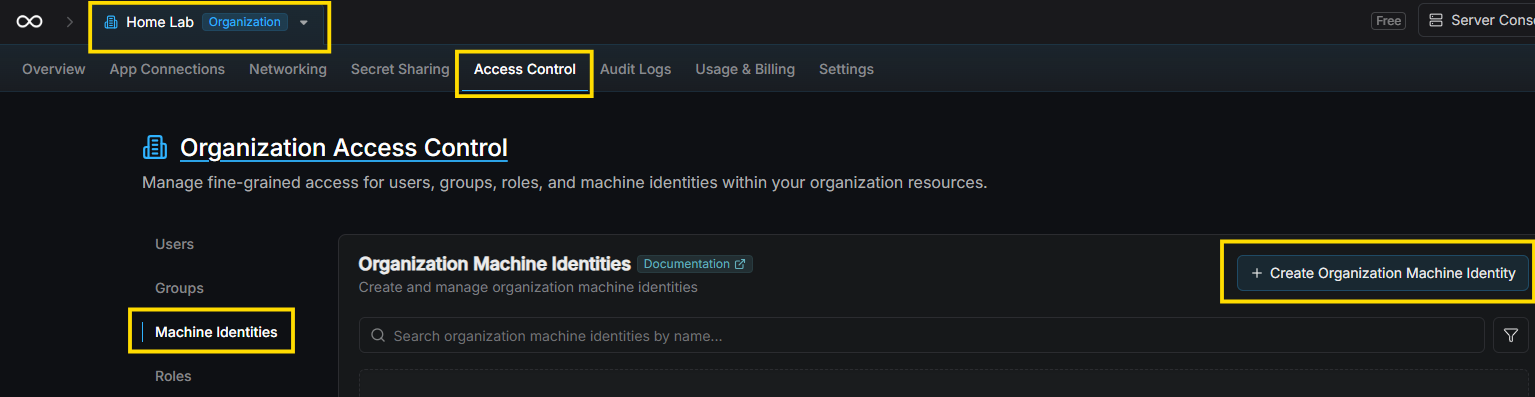
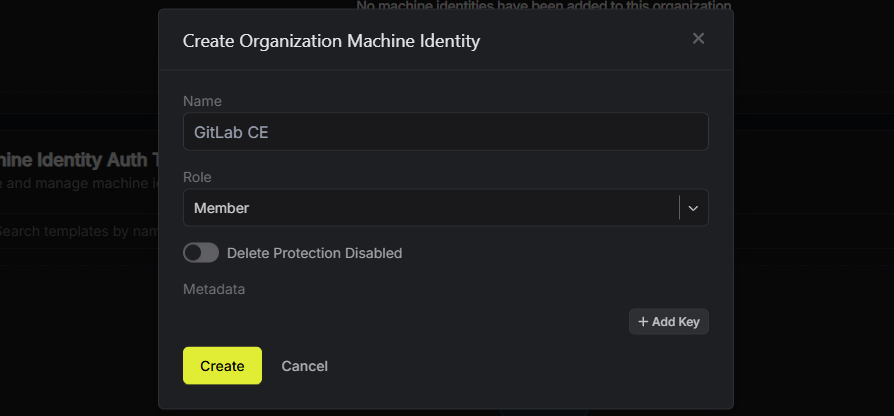
Create the Machine Identity for GitLab CE


The
subject and claims both reference the infrastructure group we will create in the next step. The * in the project_path identifier allows for any repository under this group. And, the Runner will executed against commits to the main branch.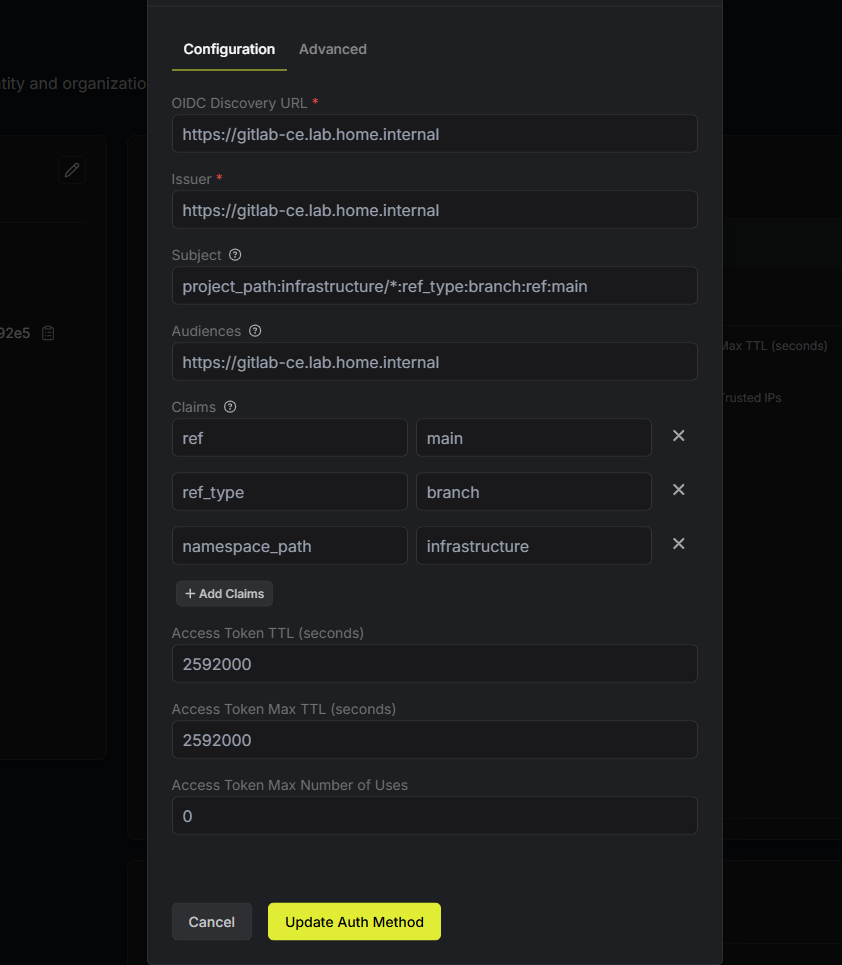

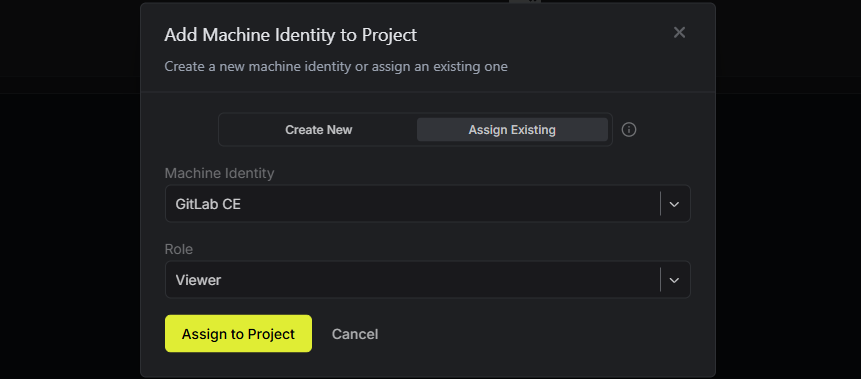
Assign the Machine Identity to IaC Project


CI/CD Configuration
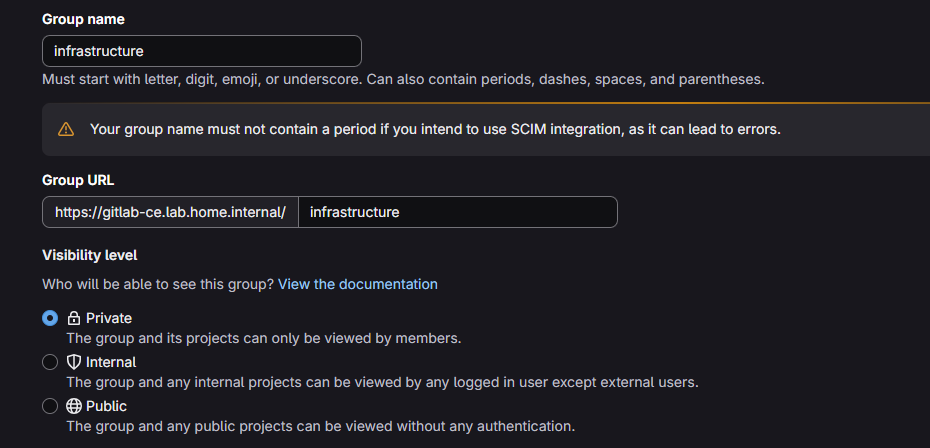
Create Group for IaC Repositories
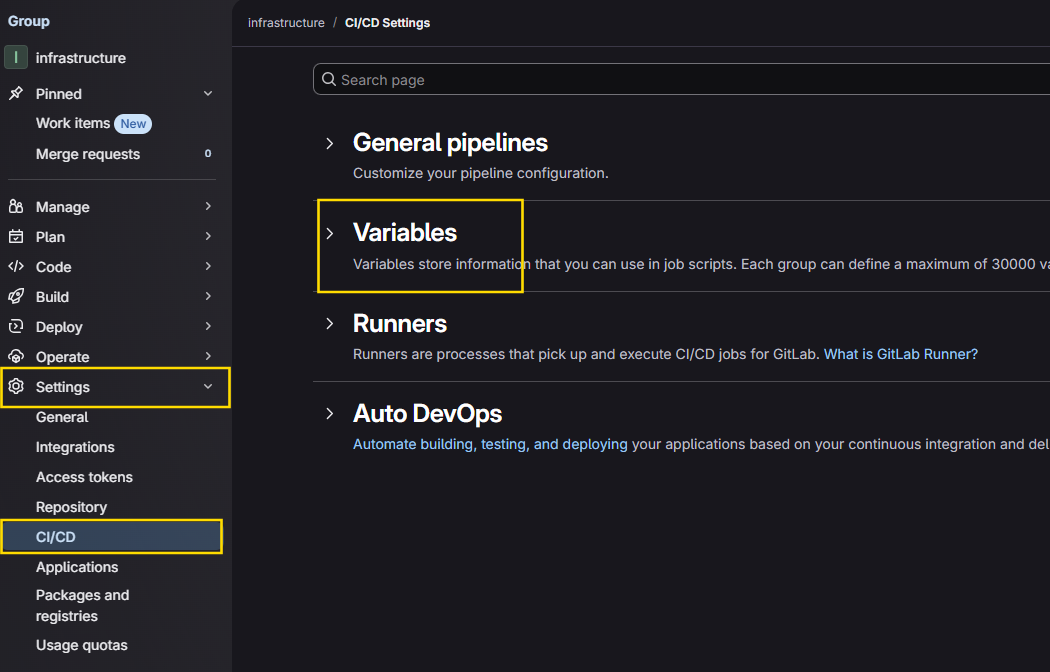
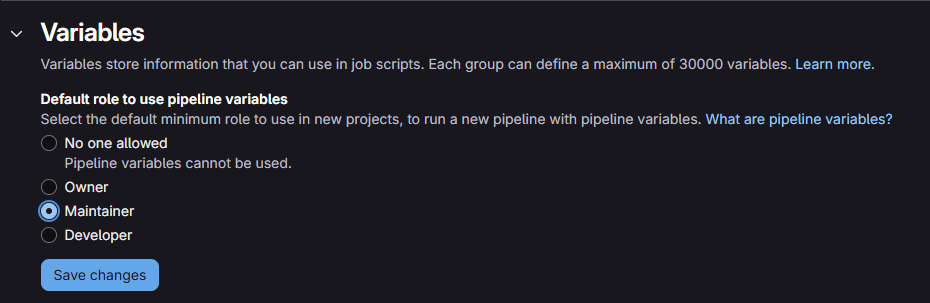
Configure Group Based CI/CD
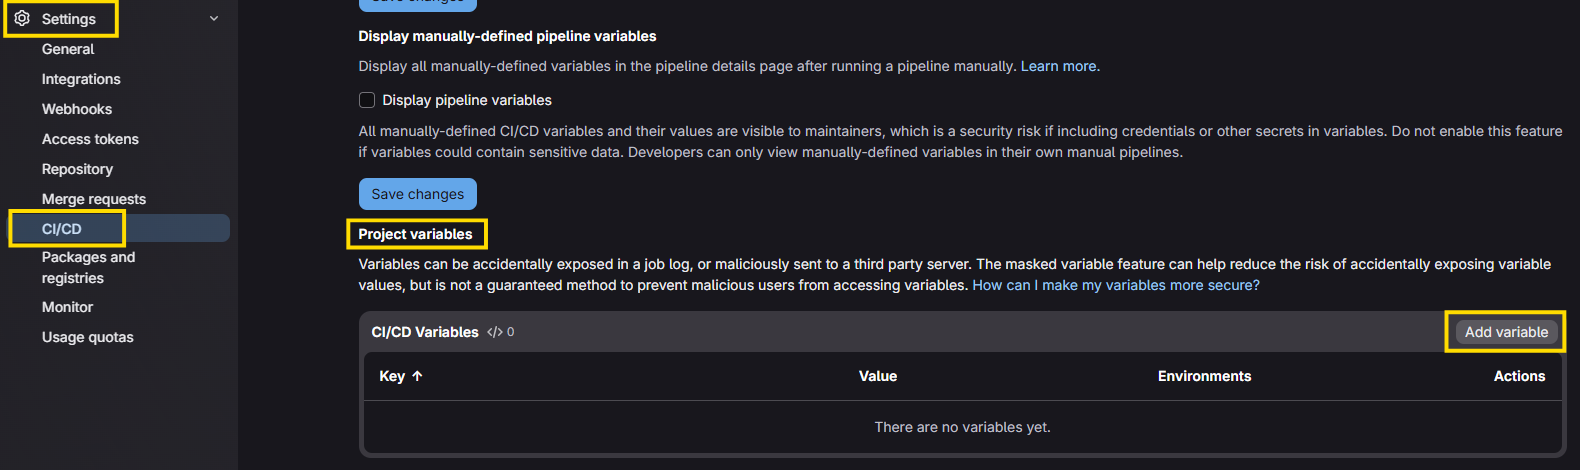
Add Group Variables
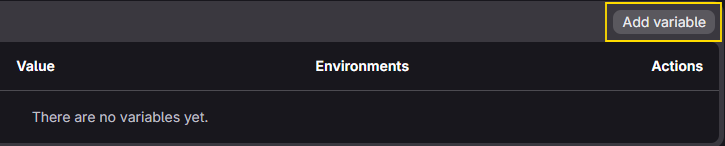
We'll add the following variables for use by the GitLab Runner, which we'll add to the environment in a later step.
INFISICAL_API_URL:https://secrets.lab.home.internal(change this to the URL of your Infisical instance)- Type: Variable
- Environments: All
- Visibility: Visible
- Flags: ✅Protect variable
- Description: Self-hosted Infisical server
- Key:
INFISICAL_API_URL - Value:
https://secrets.lab.home.internal
INFISICAL_IDENTITY_ID:994axxxx-xxxx-xxxx-xxxx-xxxxxxx392e5(machine ID as noted before)- Type: Variable
- Environments: All
- Visibility: Masked
- Flags: ✅Protect variable
- Description: OIDC Machine ID from Infisical
- Key:
INFISICAL_IDENTITY_ID - Value:
994axxxx-xxxx-xxxx-xxxx-xxxxxxx392e5
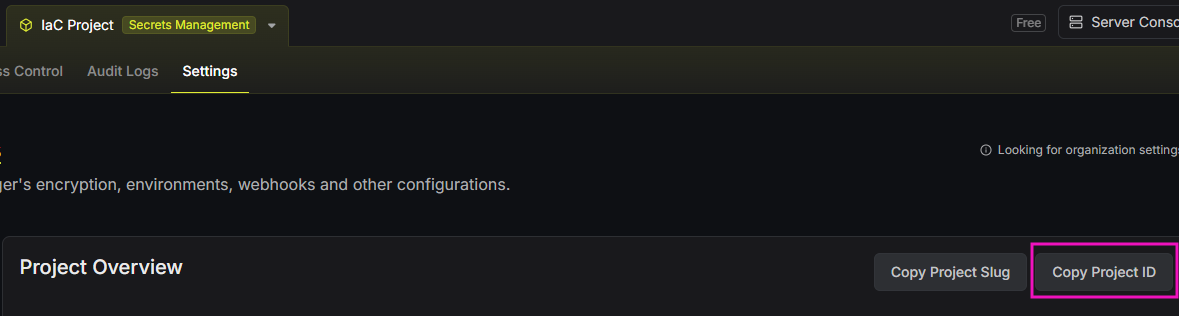
INFISICAL_PROJECT_ID:bf490xxx-xxxx-xxxx-xxxx-xxxxxxxb9ae1(Infisical project ID as noted before)- Type: Variable
- Environments: All
- Visibility: Masked
- Flags: ✅Protect variable
- Description: Infisical "IaC Project" project ID
- Key:
INFISICAL_PROJECT_ID - Value:
bf490xxx-xxxx-xxxx-xxxx-xxxxxxxb9ae1
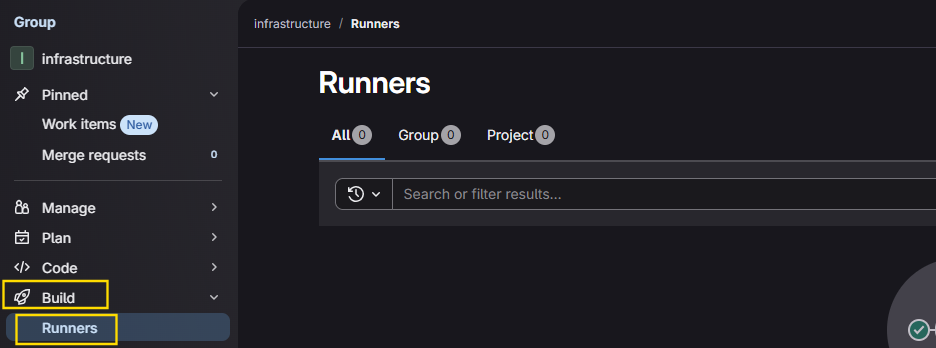
Add Group Runner

Create Group Repositories (Projects)

Project 1: runner-images
This project will house the Docker files that identify how each tools is configured — packer, terraform, and ansible. Having these Docker files in their own project allows us to maintain clear version control of our tooling.

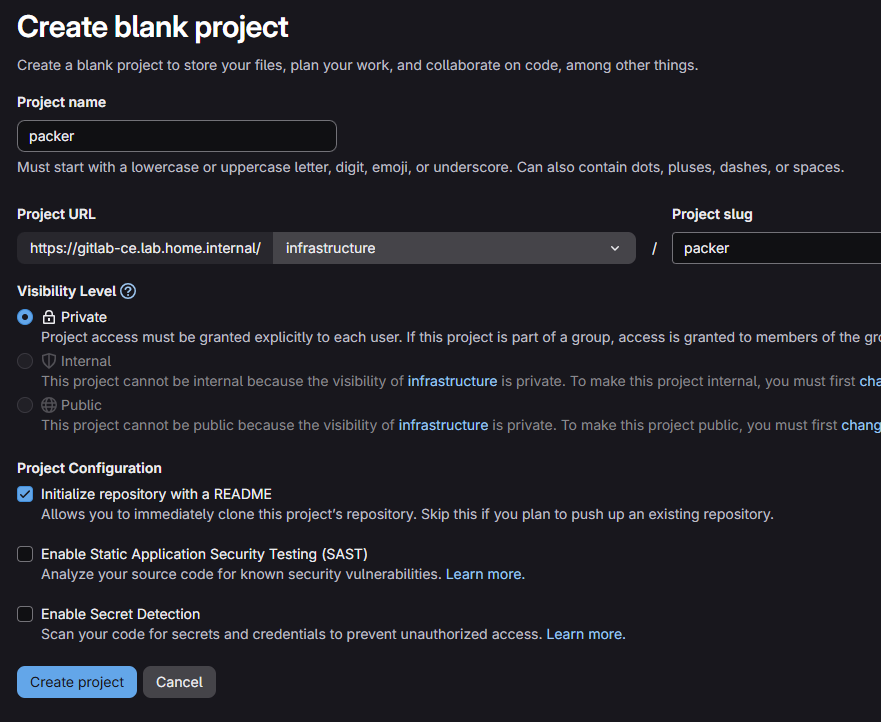
Project 2: packer
Project 3: terraform


- Type: Variable
- Environments: All
- Visibility: Masked
- Flags: ✅Protect variable
- Description: GitLab CE URL for Terraform state management
- Key:
TF_STATE_ADDRESS - Value:
https://gitlab-ce.lab.home.internal/api/v4/projects/3/terraform/state/pve-prod
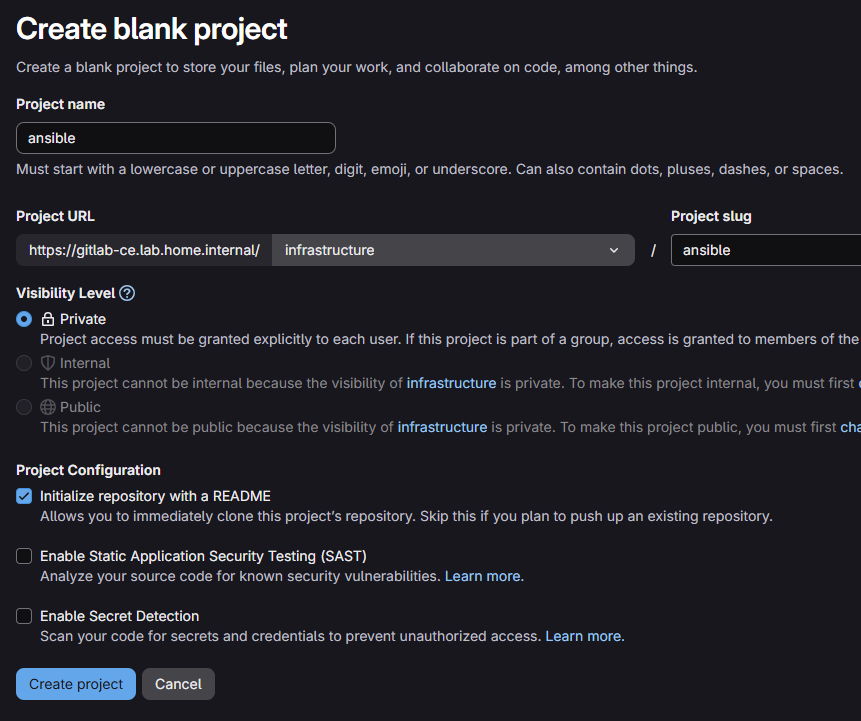
3 in my case (as noted above when the project was created).Project 4: ansible
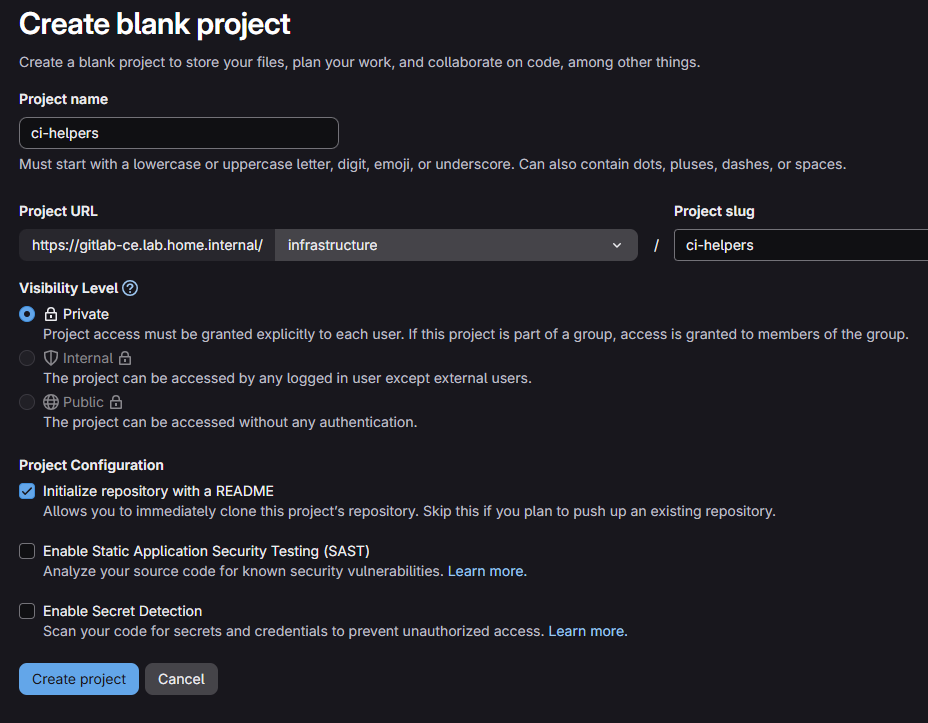
Project 5: ci-helpers
This project will store a unique pipeline with helper functions that we'll call and extend in other pipelines. Consider it the same as a repository of helper functions.

.gitlab-ci.yml file here to host helper functions and don't actually expect any code commits to trigger CI/CD functions.GitLab Runner
Protected Runner
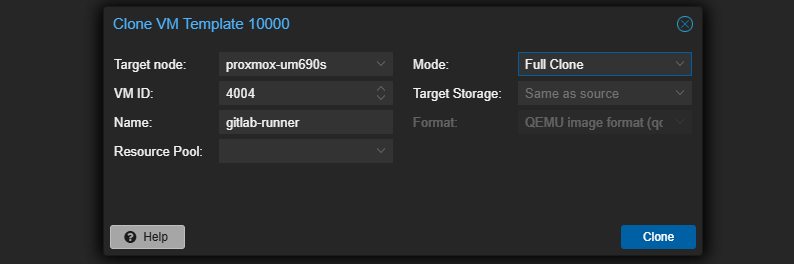
Create the VM
The system requirements for a GitLab Runner VM are highly variable depending on what kind of workload is expected. Since this is a home lab environment and I am going to be the only using it, the workload should be quite light.
Make a clone of the Debian 13 template VM created in a previous step and modify some settings.


Configure Disk 2 as Docker Data Store
ssh -i privkey.pem debian@gitlab-runner.domain.tldUse SSH to log into the VM
sudo mkdir -p /var/lib/dockerCreate the mountpoint before installing Docker
sudo fdisk -l | grep Disk
sudo apt install -y partedsudo parted /dev/sdb --script mklabel gpt mkpart primary ext4 0% 100%Make a primary partition on the disk

sudo mkfs.ext4 /dev/sdb1Format ext4, takes a few seconds to complete
echo "UUID=$(sudo blkid /dev/sdb1 | cut -d '"' -f 2) /var/lib/docker ext4 defaults,noatime 0 2" | sudo tee -a /etc/fstabAdd the "/etc/fstab" mapping by UUID

sudo systemctl daemon-reloadsudo mount -aRemount all partitions to include our new Docker mount
mount | grep dockerShow Docker volume is mounted
df -h /var/lib/dockerInspect free space

Install Docker (Debian)

Link to installation documentation for "apt" package manager
sudo usermod -aG docker debianAdd default user to "docker" group
docker info | grep "Docker Root Dir"
cloud-init to bake in the Intermediate CA certificate, which is stored at /usr/local/share/ca-certificates/internal-intermediate.crt. This allows the Debian host to trust certificates issued by our internal PKI, but does not cover the Docker engine itself.sudo mkdir -p "/etc/docker/certs.d/gitlab-ce.lab.home.internal:5050"Create the certificates store for Docker
sudo cp /usr/local/share/ca-certificates/internal-intermediate.crt \
  "/etc/docker/certs.d/gitlab-ce.lab.home.internal:5050/ca.crt"
Copy the Intermediate CA certificate to a directory matching the target hostname (Docker Container registry on GitLab)
sudo mkdir -p "/etc/docker/certs.d/gitlab-ce.lab.home.internal:443"sudo cp /usr/local/share/ca-certificates/internal-intermediate.crt \
"/etc/docker/certs.d/gitlab-ce.lab.home.internal:443/ca.crt"Copy the Intermediate CA certificate to a directory matching the target hostname (Dependency Proxy on GitLab)
sudo systemctl restart dockerInstall and Register the GitLab Runner
Install the Runner
curl -L "https://packages.gitlab.com/install/repositories/runner/gitlab-runner/script.deb.sh" -o script.deb.shInspect the script source code before execution
sudo bash script.deb.shAdds the apt repositories
sudo apt install -y gitlab-runnersudo usermod -aG docker gitlab-runnerAdd the "gitlab-runner" service account to the Docker group
Register the Runner
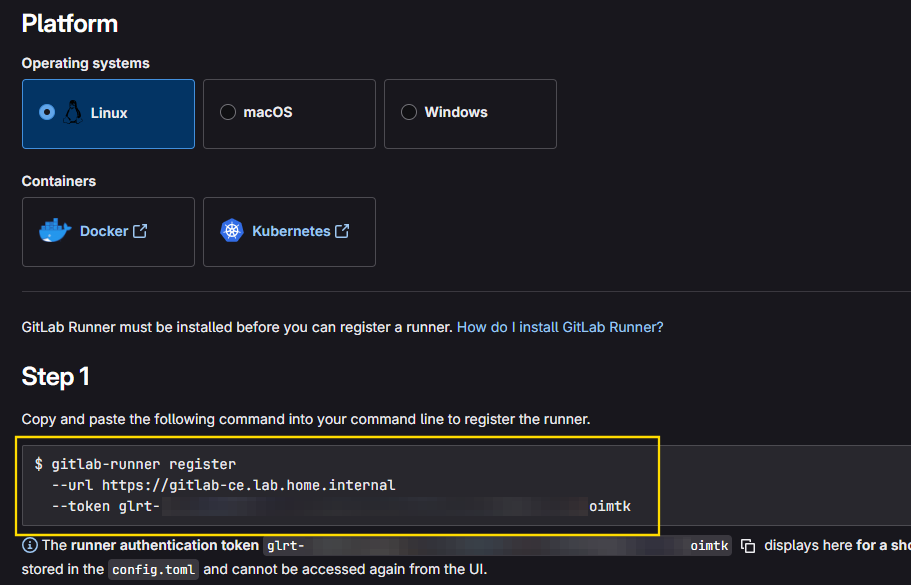
sudo gitlab-runner register \
  --non-interactive \
  --url "https://gitlab-ce.lab.home.internal" \
  --token "glrt-...REDACTED..." \
  --executor "docker" \
  --docker-privileged \
  --docker-image "docker:29" \
  --description "proxmox-iac-runner" \
  --docker-volumes "/certs" \
  --docker-volumes "/etc/docker/certs.d:/etc/docker/certs.d:ro" \
  --docker-volumes "/usr/local/share/ca-certificates/internal-intermediate.crt:/usr/local/share/ca-certificates/internal-intermediate.crt:ro"
Use the command from step above to register the runner


Adjust Runner Configurations
sudo nano /etc/gitlab-runner/config.tomlconcurrent = 4Change "1" to "4" here
  executor = "docker"
  tls-ca-file = "/usr/local/share/ca-certificates/internal-intermediate.crt"
  request_concurrency = 4
Add the "tls-ca-file" line below "executor" to trust the internal PKI-issued certificates Match "request_concurrency" to the "concurrent" option
sudo systemctl restart gitlab-runnersudo gitlab-runner verifyTest the configuration
Unprotected and Untagged Runner
Why Another Runner?
We're going to register another runner with GitLab and put it on a separate VLAN for segmentation.
Having it in a separate VLAN minimizes the blast radius in the event of compromise.
What If I Just Want One Runner?
Then, edit the runner registered previously and do the following:
- ✅ Check the box that says run untagged jobs
- 🔳 Uncheck the box that says protected
This will allow your single runner to pick up jobs in all circumstances. Just realize that there is less separation in the event of compromise.
Server Build Checklist
We'll be following most of the steps from above, but to be clear, I'll recap them here:
- Clone the Debian 13 VM template (cloud-init enabled)
- Add tags to VM after cloning (e.g. git, runner)
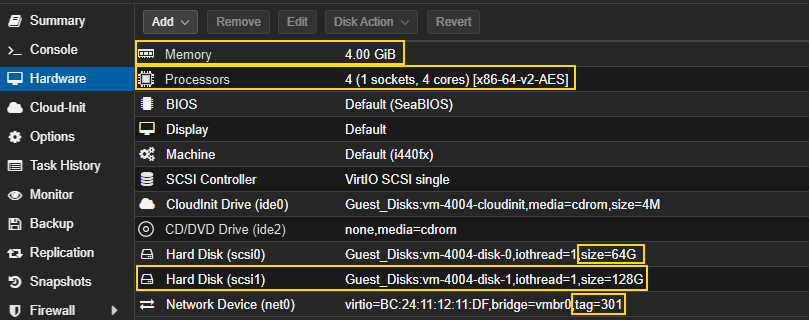
- Adjust hardware resources
- Hostname: gitlab-runner-unprotected
- 4 GB RAM
- 4 CPU
- Disk 1: 64 GB (OS)
- Disk 2: 128 GB (Docker data)
- VLAN: Whichever VLAN you wish to isolate on
- Firewall rules:
- Runner -> Intermediate CA on TCP port 443 (certificates)
- Runner -> GitLab CE on TCP port 443 (job polling)
- Runner -> GitLab CE on TCP port 5050 (container registry)
- Configure Disk 2 as Docker Data Store
- Install Docker
- Install GitLab Runner
Add Another Group Runner
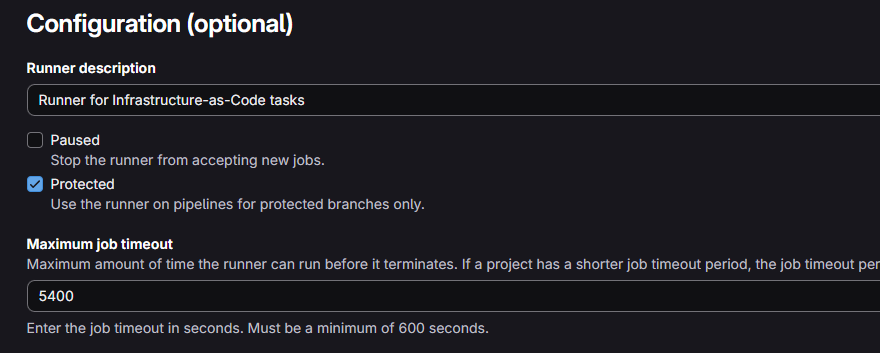
- Tags:
validate,lint - Run untagged jobs: ✅
- Protected: 🔳
- Maximum job timeout:
5400

Create the Docker Certificate Store
sudo mkdir -p "/etc/docker/certs.d/gitlab-ce.lab.home.internal:5050"Create the certificates store for Docker
sudo cp /usr/local/share/ca-certificates/internal-intermediate.crt \
  "/etc/docker/certs.d/gitlab-ce.lab.home.internal:5050/ca.crt"
Copy the Intermediate CA certificate to a directory matching the target hostname (Docker Container registry on GitLab)
sudo mkdir -p "/etc/docker/certs.d/gitlab-ce.lab.home.internal:443"sudo cp /usr/local/share/ca-certificates/internal-intermediate.crt \
"/etc/docker/certs.d/gitlab-ce.lab.home.internal:443/ca.crt"Copy the Intermediate CA certificate to a directory matching the target hostname (Dependency Proxy on GitLab)
sudo systemctl restart dockerRegister the Runner
sudo gitlab-runner register \
  --non-interactive \
  --url "https://gitlab-ce.lab.home.internal" \
  --token "glrt-...REDACTED..." \
  --executor "docker" \
  --docker-privileged \
  --docker-image "docker:29" \
  --description "unprotected-iac-runner" \
  --docker-volumes "/certs" \
  --docker-volumes "/etc/docker/certs.d:/etc/docker/certs.d:ro" \
  --docker-volumes "/usr/local/share/ca-certificates/internal-intermediate.crt:/usr/local/share/ca-certificates/internal-intermediate.crt:ro"
Update Configurations
sudo nano /etc/gitlab-runner/config.tomlconcurrent = 4Change "1" to "4" here
  executor = "docker"
  tls-ca-file = "/usr/local/share/ca-certificates/internal-intermediate.crt"
  request_concurrency = 4
Add the "tls-ca-file" line below "executor" to trust the internal PKI-issued certificates Match "request_concurrency" to the "concurrent" option
sudo systemctl restart gitlab-runnersudo gitlab-runner verifyTest the configuration
