
When to Do This?
This is an extension of my home lab guide here:
I was hitting the maximum number of shards in my Elasticsearch backend and decided now would be a good time to expand from a single-node Elasticsearch backend to a multi-node backend.
Take Inventory
In my current setup, I am running a distributed deployment:
Infrastructure
- 5 Linux Containers
- Opendistro Elasticsearch
- Opendistro Kibana
- Wazuh Single-Node Master
- OwlH NIDS Master
- OwlH NIDS Node
Networking
Be mindful of things like:
- IP addressing
- VLAN Tags
- Firewall Rules
- DNS Hostnames
- Will any names need to change to fit the cluster naming schema?
- Example:
wazuh-elastic-1,wazuh-elastic-2
- Example:
- Will changing hostnames require updates in:
- Wazuh
- Filebeat
- Kibana
- Will any names need to change to fit the cluster naming schema?
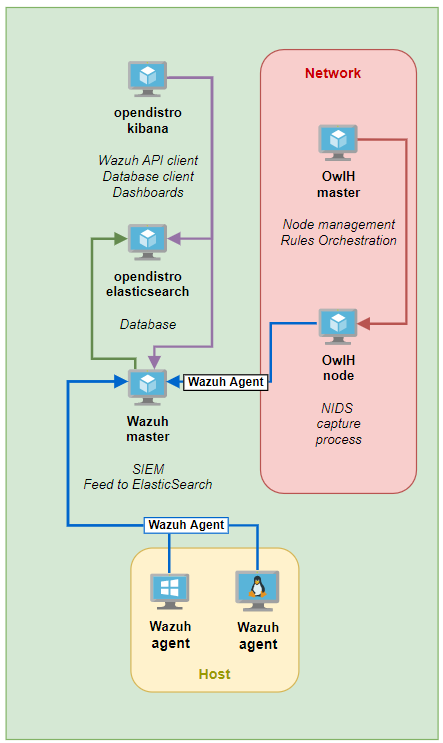
Looking at the diagram, all of the agents forward to Wazuh. Wazuh then uses Filebeat to forward events into Elasticsearch. Kibana is the web front end to query Elasticsearch.
So, it's safe to assume that the only places an Elasticsearch change would cause any disruptions would be with:
- Wazuh
- Kibana
Creating the Elasticsearch Cluster
Looking at the guidance here, it should be straightforward enough to follow along with this guide here. The guide is broken up into two parts:
- Initial Node Configuration
- Subsequent Node(s) Configuration
- Cluster Initialization
 Wazuh
Wazuh
1. Initial Node Configuration
This is the Elasticsearch node that you has already been installed, configured, and running. You want to expand the cluster horizontally from here.
NOTE: If you're going to move to a new node naming scheme – such as wazuh-elastic-1, wazuh-elastic-2, wazuh-elastic-3 – you may need to update the hostname of the existing host. For example, the hostname of my initial node is currently wazuh-elastic and I want to update it to wazuh-elastic-1.
Create a New Elastic Search Configuration
Backup the existing configuration file:
mv /etc/elasticsearch/elasticsearch.yml /etc/elasticsearch/elasticsearch.yml.bakDownload the template elasticsearch.yml file:
curl -so /etc/elasticsearch/elasticsearch.yml https://packages.wazuh.com/resources/4.2/open-distro/elasticsearch/7.x/elasticsearch_cluster_initial_node.ymlEdit the /etc/elasticsearch/elasticsearch.yml file (using my infrastructure as an example here):
# Initial node configuration
network.host: 10.148.148.6
# Using the hostname of my node
node.name: wazuh-elastic-1
cluster.name: home-lab
cluster.initial_master_nodes:
        - wazuh-elastic-1
        - wazuh-elastic-2
discovery.seed_hosts:
        - 10.148.148.6
        - 10.148.148.15

opendistro_security.nodes_dn:
    - CN=wazuh-elastic-1,OU=Docu,O=Wazuh,L=California,C=US
    - CN=wazuh-elastic-2,OU=Docu,O=Wazuh,L=California,C=US
Update Elasticsearch Roles and Users
curl -so /usr/share/elasticsearch/plugins/opendistro_security/securityconfig/roles.yml https://packages.wazuh.com/resources/4.2/open-distro/elasticsearch/roles/roles.yml
curl -so /usr/share/elasticsearch/plugins/opendistro_security/securityconfig/roles_mapping.yml https://packages.wazuh.com/resources/4.2/open-distro/elasticsearch/roles/roles_mapping.yml
curl -so /usr/share/elasticsearch/plugins/opendistro_security/securityconfig/internal_users.yml https://packages.wazuh.com/resources/4.2/open-distro/elasticsearch/roles/internal_users.yml
New Certificates
Just for good measure, remove any potential demo certificates:
rm /etc/elasticsearch/esnode-key.pem /etc/elasticsearch/esnode.pem /etc/elasticsearch/kirk-key.pem /etc/elasticsearch/kirk.pem /etc/elasticsearch/root-ca.pem -fDownload the certificate template and the certificate creation utility:
curl -so ~/wazuh-cert-tool.sh https://packages.wazuh.com/resources/4.2/open-distro/tools/certificate-utility/wazuh-cert-tool.sh
curl -so ~/instances.yml https://packages.wazuh.com/resources/4.2/open-distro/tools/certificate-utility/instances.yml
Edit the /root/instances.yml file (using my infrastructure as a template):
# Elasticsearch nodes
elasticsearch-nodes:
  - name: wazuh-elastic-1
    ip:
      - 10.148.148.6
  - name: wazuh-elastic-2
    ip:
      - 10.148.148.15

# Wazuh server nodes
wazuh-servers:
  - name: wazuh-server
    ip:
      - 10.148.148.8

# Kibana node
kibana:
  - name: wazuh-kibana
    ip:
      - 10.148.148.7
Run the certificates creation utility:
bash ~/wazuh-cert-tool.shDeploy the Certificates on the Initial Node
Using variables from my environment here. I add the rm -rf /etc/elasticsearch/certs/ line here in order to remove existing certificates.
node_name=wazuh-elastic-1

rm -rf /etc/elasticsearch/certs/
mkdir /etc/elasticsearch/certs/
mv ~/certs/$node_name* /etc/elasticsearch/certs/
mv ~/certs/admin* /etc/elasticsearch/certs/
cp ~/certs/root-ca* /etc/elasticsearch/certs/
mv /etc/elasticsearch/certs/$node_name.pem /etc/elasticsearch/certs/elasticsearch.pem
mv /etc/elasticsearch/certs/$node_name-key.pem /etc/elasticsearch/certs/elasticsearch-key.pem
Archive the Certificates for Use on Other Hosts
cd ~/certs/
tar -cvf certs.tar *
mv ~/certs/certs.tar ~/

# Removing certs.tar because Kibana is on another host
rm -f certs.tar
Restart Elasticsearch
systemctl restart elasticsearchStart a Web Server to Transfer the Certificates Archive
cd /root
python3 -m http.server 80
2. New Node Configuration
Install Elasticsearch on the New Node
Ensure you're installing the same version as found on the initial node. I'm using the apt package manager here:
apt install curl apt-transport-https unzip wget software-properties-common

curl -s https://packages.wazuh.com/key/GPG-KEY-WAZUH | apt-key add -

echo "deb https://packages.wazuh.com/4.x/apt/ stable main" | tee -a /etc/apt/sources.list.d/wazuh.list

apt clean && apt update

apt install elasticsearch-oss=<version-number> opendistroforelasticsearch=<version-number>
Configure Elasticsearch
Download the configuration template:
curl -so /etc/elasticsearch/elasticsearch.yml https://packages.wazuh.com/resources/4.2/open-distro/elasticsearch/7.x/elasticsearch_cluster_subsequent_nodes.ymlEdit the template file:
# New node configuration
network.host: 10.148.148.15
node.name: wazuh-elastic-2
cluster.name: home-lab
cluster.initial_master_nodes:
        - wazuh-elastic-1
        - wazuh-elastic-2
discovery.seed_hosts:
        - 10.148.148.6
        - 10.148.148.15

opendistro_security.nodes_dn:
    - CN=wazuh-elastic-1,OU=Docu,O=Wazuh,L=California,C=US
    - CN=wazuh-elastic-2,OU=Docu,O=Wazuh,L=California,C=US
Remove any potential demo certificates:
rm /etc/elasticsearch/esnode-key.pem /etc/elasticsearch/esnode.pem /etc/elasticsearch/kirk-key.pem /etc/elasticsearch/kirk.pem /etc/elasticsearch/root-ca.pem -fCopy certs.tar from the Initial Node
cd /root
wget http://10.148.148.6/certs.tar

node_name=wazuh-elastic-2

mkdir /etc/elasticsearch/certs
mv ~/certs.tar /etc/elasticsearch/certs/
cd /etc/elasticsearch/certs/
tar -xf certs.tar $node_name.pem $node_name-key.pem root-ca.pem
mv /etc/elasticsearch/certs/$node_name.pem /etc/elasticsearch/certs/elasticsearch.pem
mv /etc/elasticsearch/certs/$node_name-key.pem /etc/elasticsearch/certs/elasticsearch-key.pem

# Kibana is on another host, delete the archive
rm -f certs.tar
Log4J Mitigations
mkdir -p /etc/elasticsearch/jvm.options.d
echo '-Dlog4j2.formatMsgNoLookups=true' > /etc/elasticsearch/jvm.options.d/disabledlog4j.options
chmod 2750 /etc/elasticsearch/jvm.options.d/disabledlog4j.options
chown root:elasticsearch /etc/elasticsearch/jvm.options.d/disabledlog4j.options
Enable the Elasticsearch Daemon
systemctl daemon-reload
systemctl enable elasticsearch
systemctl start elasticsearch
3. Recommended: Tuning Elasticsearch
WazuhIf you're using Linux Containers (LXC), like I am, memory locking will not work for you, because the container cannot lock the memory on the host. You can skip that step and just modify the JVM heap limits.
4. Initialize the Cluster
Run the command on the Initial Node, using the Initial Node's IP address.
export JAVA_HOME=/usr/share/elasticsearch/jdk/ && /usr/share/elasticsearch/plugins/opendistro_security/tools/securityadmin.sh -cd /usr/share/elasticsearch/plugins/opendistro_security/securityconfig/ -icl -nhnv -cacert /etc/elasticsearch/certs/root-ca.pem -cert /etc/elasticsearch/certs/admin.pem -key /etc/elasticsearch/certs/admin-key.pem -h 10.148.148.6Updating Remaining Infrastructure
Wazuh
Update the Filebeat Configuration
Backup Filebeat Configuration
mv /etc/filebeat/filebeat.yml /etc/filebeat/filebeat.yml.bakDownload the Filebeat Configuration Template
curl -so /etc/filebeat/filebeat.yml https://packages.wazuh.com/resources/4.2/open-distro/filebeat/7.x/filebeat.ymlEdit /etc/filebeat/filebeat.yml (using my infrastructure as an example). Also, note here that I am using the OwlH NIDS infrastructure in my environment, so modify accordingly.
# Wazuh - Filebeat configuration file
output.elasticsearch:
  hosts: ["10.148.148.6:9200", "10.148.148.15:9200"]
  protocol: https
  username: "admin"
  password: "redacted"
  ssl.certificate_authorities:
    - /etc/filebeat/certs/root-ca.pem
  ssl.certificate: "/etc/filebeat/certs/filebeat.pem"
  ssl.key: "/etc/filebeat/certs/filebeat-key.pem"
setup.template.json.enabled: true
setup.template.json.path: '/etc/filebeat/wazuh-template.json'
setup.template.json.name: 'wazuh'
setup.ilm.overwrite: true
setup.ilm.enabled: false

filebeat.modules:
  - module: wazuh
    alerts:
      enabled: true
    archives:
      enabled: false
  # Enable OwlH Module
  - module: owlh
    events:
      enabled: true

# OwlH pipeline sync
filebeat.overwrite_pipelines: true
Copy the certs.tar file from the Initial Elasticsearch node
cd /root
wget http://10.148.148.6/certs.tar

node_name=wazuh-server

rm -rf /etc/filebeat/certs
mkdir /etc/filebeat/certs
mv ~/certs.tar /etc/filebeat/certs/
cd /etc/filebeat/certs/
tar -xf certs.tar $node_name.pem $node_name-key.pem root-ca.pem
mv /etc/filebeat/certs/$node_name.pem /etc/filebeat/certs/filebeat.pem
mv /etc/filebeat/certs/$node_name-key.pem /etc/filebeat/certs/filebeat-key.pem

rm -f certs.tar
Restart Daemons
systemctl restart filebeat
systemctl restart wazuh-manager
Test Filebeat
filebeat test outputKibana
Update Kibana Configuration
Backup the current configuration file
mv /etc/kibana/kibana.yml /etc/kibana/kibana.yml.bakDownload the new configuration file template
curl -so /etc/kibana/kibana.yml https://packages.wazuh.com/resources/4.2/open-distro/kibana/7.x/kibana.ymlEdit /etc/kibana/kibana.yml (using my infrastructure as an example)
server.host: "10.148.148.7"
elasticsearch.hosts: ["https://10.148.148.6:9200", "https://10.148.148.15:9200"]
server.port: 443
elasticsearch.ssl.verificationMode: certificate
elasticsearch.username: kibanaserver
elasticsearch.password: kibanaserver
elasticsearch.requestHeadersWhitelist: ["securitytenant","Authorization"]
opendistro_security.multitenancy.enabled: true
opendistro_security.readonly_mode.roles: ["kibana_read_only"]
server.ssl.enabled: true
server.ssl.key: "/etc/kibana/certs/kibana-key.pem"
server.ssl.certificate: "/etc/kibana/certs/kibana.pem"
elasticsearch.ssl.certificateAuthorities: ["/etc/kibana/certs/root-ca.pem"]
server.defaultRoute: /app/wazuh?security_tenant=global
telemetry.banner: false
Copy the certs.tar from the Initial Node
cd /root
wget http://10.148.148.6/certs.tar

node_name=wazuh-kibana

rm -rf /etc/kibana/certs
mkdir /etc/kibana/certs
mv ~/certs.tar /etc/kibana/certs/
cd /etc/kibana/certs/
tar -xf certs.tar $node_name.pem $node_name-key.pem root-ca.pem
mv /etc/kibana/certs/$node_name.pem /etc/kibana/certs/kibana.pem
mv /etc/kibana/certs/$node_name-key.pem /etc/kibana/certs/kibana-key.pem
chown kibana:kibana /etc/kibana/certs/*
rm -f certs.tar
Restart Kibana
systemctl restart kibanaTry logging into https://kibana-ip/ to test.
Recommended: Change Default Passwords
Use the guidance on this page to rotate and update the passwords of the various service accounts.
NOTE: Run this on the initial Elasticsearch node. This script will run the securityadmin.sh script for you and update the passwords for the service accounts automatically. Once run, make a note of the updated passwords.
Also, follow any recommendations to update Filebeat and/or Kibana as needed.
WazuhAdditional Notes
Performance Issues
I was still experiencing degraded performance on my Elasticsearch cluster due to insufficient memory on my nodes. To remedy this, I:
- Increased the RAM to
8192 GiBon each node - Increased the CPU count to
4on each node - Modified the JVM Options in
/etc/elasticsearch/jvm.optionson each node and set the heap space to:
-Xms4g
-Xmx4g- Restart the Elasticsearch service on each node:
systemctl restart elasticserach
Missing OwlH Templates
- After the upgrade, something I did knocked out the templates for the OwlH indices on Kibana and Elasticsearch
- It was a quick fix following the
Add OwlH Dashboards and Tempates to Elastic Stackstep in the original home lab guide:
 0xBEN
0xBEN
- I just went down through the sub-steps and re-added the templates and all the historical and current data was retrievable
