
Previous Step
 0xBEN
0xBENObjectives for this Step
- Configure Terraform variables
- Create the lab environment with Terraform via the
goad.shscript
Install the Lab
terraform binary ourselves, when we use the goad.sh script to install the Proxmox lab, that's what's going on under the hoodDefine Global Variables
cd /root/GOADnano globalsettings.ini[all:vars]
; This is the global inventory file, data here will override all lab or provider inventory datas
; modify this to add layouts to VMs
; https://learn.microsoft.com/en-us/windows-hardware/manufacture/desktop/windows-language-pack-default-values
; French : 0000040C
; US : 00000409
; German : 00000407
; Spanish : 0000040A
; the first in the list will be the default layout (here: FR | US)
keyboard_layouts=["00000409"]Set the desired keyboard_layouts variable. I've set mine to US exclusively.
Define Proxmox Provider Variables
nano /root/.goad/goad.ini[proxmox]
pm_api_url = https://192.168.1.1:8006/api2/json
pm_user = infra_as_code@pve
pm_node = GOAD
pm_pool = GOAD
pm_full_clone = false
pm_storage = local
pm_vlan = 10
pm_network_bridge = vmbr3
pm_network_model = e1000
[proxmox_templates_id]
winserver2019_x64 = 102
winserver2016_x64 = 103
winserver2019_x64_utd = 104
windows10_22h2_x64 = 105Original File Contents
So even though the variables contain references to Windows 10, this lab does not deploy that host, and it would fail anyway, because we didn't download a Windows 10 ISO, nor template it with Packer.

100 and Windows Server 2016 is at template ID 102[proxmox]
pm_api_url = https://172.16.1.14:8006/api2/json
pm_user = root@pam
pm_node = proxmox-um690
pm_pool = GOAD
pm_full_clone = false
pm_storage = local-lvm
pm_vlan = 10
pm_network_bridge = vmbr1
pm_network_model = e1000
[proxmox_templates_id]
winserver2019_x64 = 100
winserver2016_x64 = 102
winserver2019_x64_utd = 104
windows10_22h2_x64 = 105Variables for My Environment
❗Changes made to the variables:
pm_api_url— changed the IP address of the PVE node to match minepm_user = root@pam- In the original guide written by m4yfly, we end up giving full permissions to
infrastructure_as_code@pveanyway
- In the original guide written by m4yfly, we end up giving full permissions to
pm_node = proxmox-um690— this is the hostname of the target PVE nodepm_pool = GOAD— this is the resource pool we created abovepm_storage = local-lvm—localis incorrect and is not used to store guest diskspm_network_bridge = vmbr1— this is the target virtual switch for mewinserver2019_x64 = 100— matches the template ID on my Proxmox VE nodewinserver2016_x64 = 102— matches the template ID on my Proxmox VE node
As mentioned before, we don't need to worry about the other template IDs, because the GOAD lab environment doesn't use either of these VM types.
Test Configurations
cd /root/GOAD./goad.sh -t check -l GOAD -p proxmox -ip 192.168.10
Provision GOADv3
cd /root/GOAD./goad.sh -t install -l GOAD -p proxmox -ip 192.168.10

root@pam on your Proxmox VE node
root@pam on your Proxmox VE node
yes when ready

Troubleshooting
Ansible Hosts Unreachable
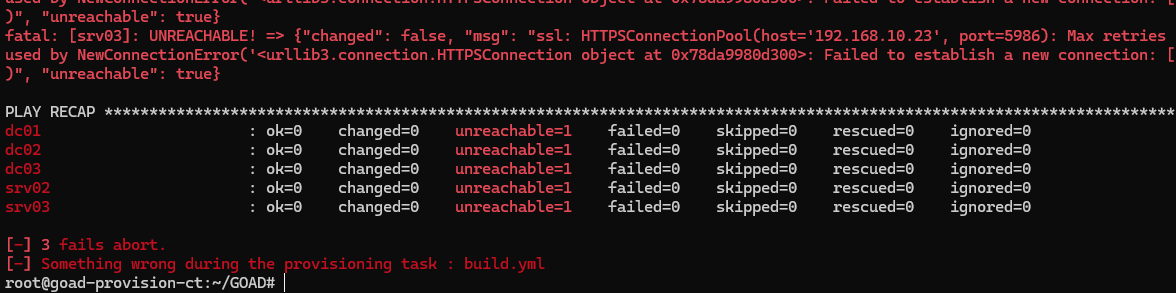
I know the correct IP address range was applied to the GOAD hosts — 192.168.10.x. And, I know pfSense is allowing TCP/5985 and TCP/5986 from the provisioning container to the GOAD subnet.
However, when I looked at the hosts in Proxmox, the Windows VMs were not fully booted. Ansible was triggered by the Terraform apply being completed, but the hosts were not ready yet to be managed over WinRM.
cd /root/GOAD./goad.sh -hHelp output for the script
./goad.sh -t show
./goad.sh -t install -i eacbdb-goad-proxmox -a eacbdb-goad-proxmox-i specifies the target GOAD lab instance and -a specifies to only run Ansible with the -t install task. You can find these script options and more using ./goad.sh -h

Current State of the Lab

